DIY: Building a busy light to show your Microsoft Teams presence
This post is over a year old, some of this information may be out of date.
For many of us, working from home is mandatory these days. For me, nothing major changed. I was already used to work from home since I joined Valo 2,5 years ago.
One thing that has changed is that my children are now at home while I am working. Luckily I was prepared for it (I thought). At the end of 2019, I bought myself a Luxafor wireless busy light.

In the beginning it worked fine, but it had some limitations. To overcome some of these limitations, I even created myself a website to synchronize my Microsoft Teams’ presence with the busy light. This synchronization is something the product can do by itself on Windows, but not yet on macOS.
Info: The site can be found here: https://luxafor-presence.azurewebsites.net/
After a couple of days, I noticed my kids were running into my office. Although I asked them to look at the light, they answered that it was always off. Tested the device for some days, and it appears that it frequently lost connection or the battery died. Every time it lost its connection, I had to do some manual interactions to re-establish the connection.
Lockdown extended
As the lockdown in Belgium got extended for another two weeks (and probably more weeks to come), I had to come up with a solution.
Recently I created myself a Homebridge plugin to do some state management for my Flic buttons I use in the house.
Info: Homebridge is a lightweight NodeJS server you can run on your home network that emulates the iOS HomeKit API - https://homebridge.io/.
Last Friday, I got the idea to create a busy light with a Raspberry Pi Zero W and Homebridge integration.

Info: The Homebridge integration is just because I already had it running in the house, that way, it was easy to turn on/off. You can also do it without if you want.
The hardware
To get started, you first need to get yourself some hardware. I went for the following equipment:
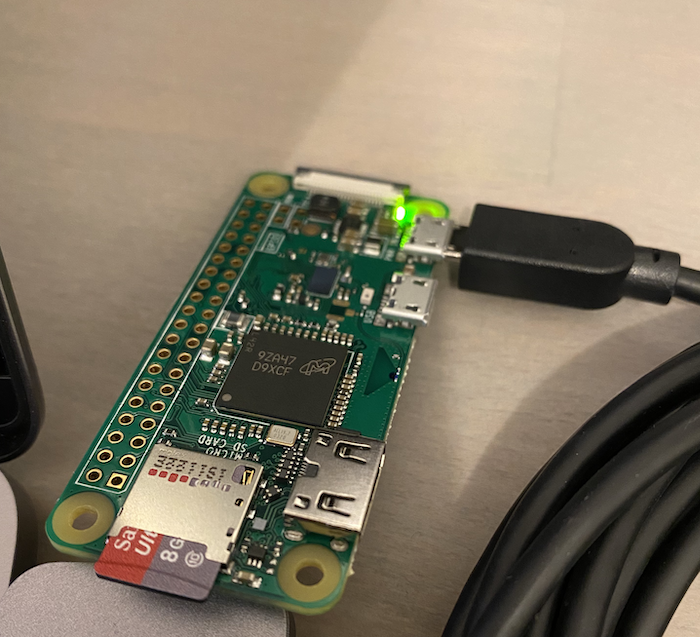
- The device: Raspberry Pi Zero W: small, quick, and has a WiFi chip on board. I went for the one without the pre-soldered header.
The LEDs: Pimoroni Unicorn pHAT 🦄: this HAT gives you 32 (8x4) RGB LEDs.- It seems that Pimoroni does not sell these Unicorn pHATs anymore. Someone recommended to use the Waveshare LED HAD which works the same way.
- pHAT diffuser: The LEDs are bright, so to make it easier for the eyes, I bought a diffuser.
- Pogo-a-go-go Solderless GPIO Pogo Pins: when you do not want to solder yourself.
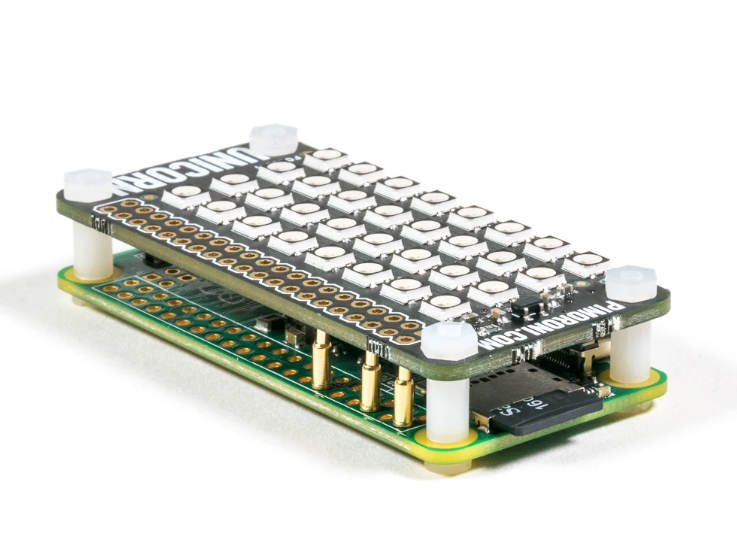
Info: On the picture you can see where you need to place the pins. An instruction video can be found on the product page.
- Pibow Zero W: when you want a simple case. I only used the bottom part of the case, but you can use the whole case with the Unicorn hat.
- 8GB micro sd
- 5-meter micro-USB cable
The software
The hardware cannot run without software, so for my solution itself, I made use of the following software/tools:
- DietPi: lightweight Debian OS. Used this as well for my PiHole, and really like its simplicity.
- Once I installed the DietPi, I specified to install the following software from the DietPi Optimized Software list:
- RPI.GPIO: This software is available from the DietPi optimized software list
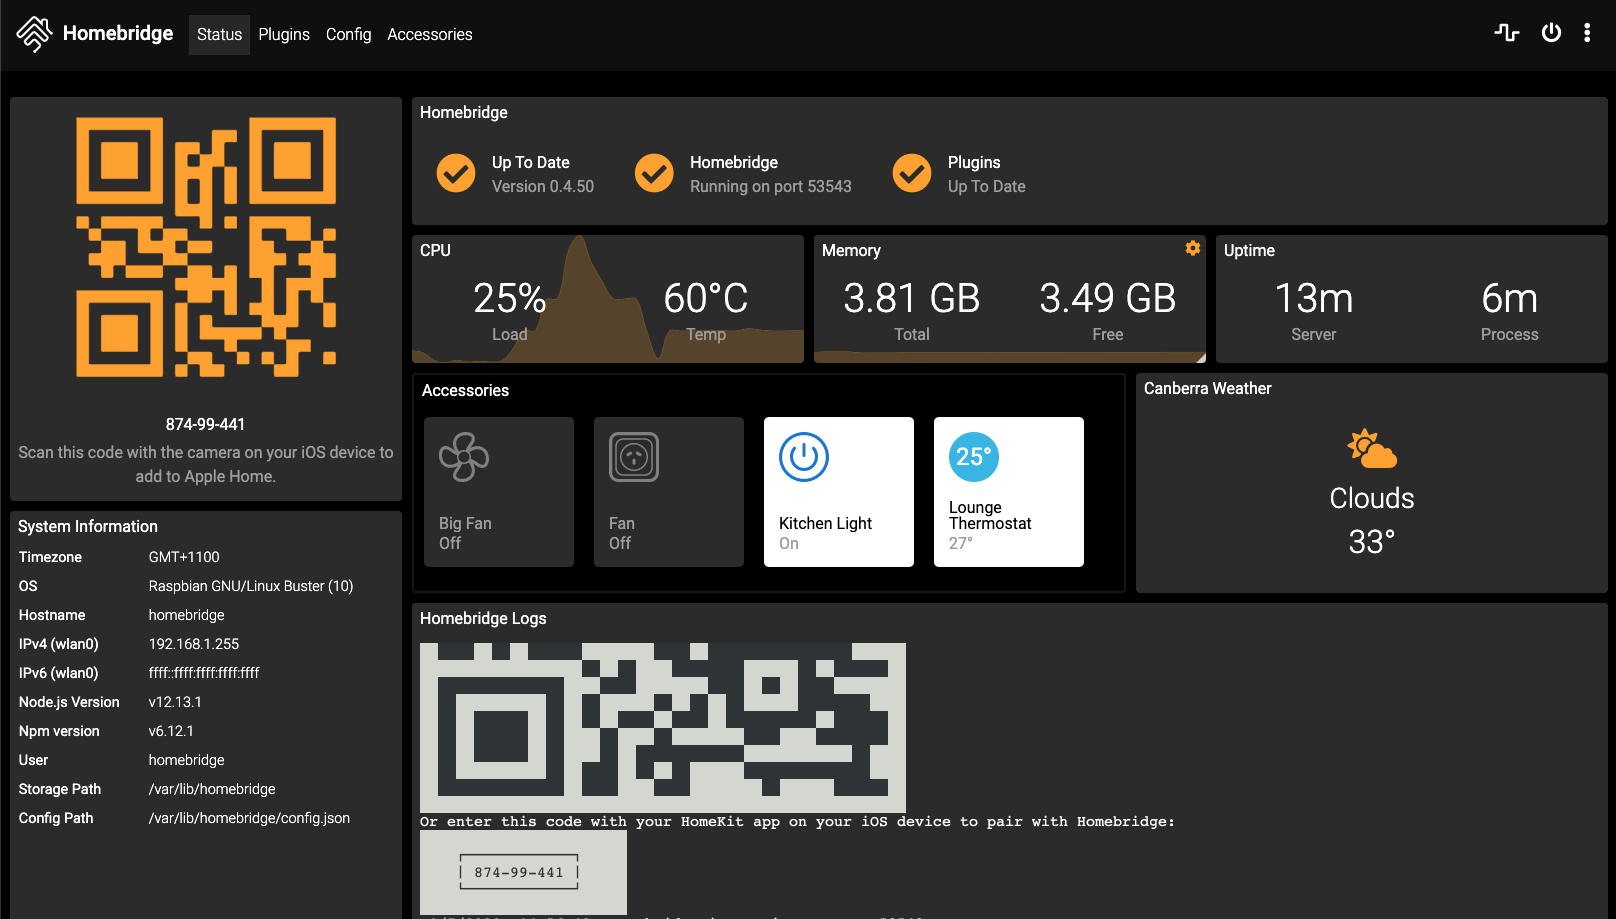
- Homebridge: this can run fine on the Raspberry Pi, if you are not an Apple fan, you can try to use something else. You will only have to port the code from the Homebridge plugin I wrote to your platform preference.
- The installation guide I followed was this one: Install Homebridge on Raspbian
Once you got all the hardware and software installed, it is time to build the solution.
The solution
My solution contains two parts:
- Lightweight Python API for switching and turning the LEDs ON/OFF. I also added a status API in it to verify when the last call happened, what the CPU temperature, is and the color.
- Homebridge plugin for managing the presence
Info: The reason why I split it up in two is that my Homebridge is running on another Raspberry Pi in the house, but it can entirely run on the same device. Another reason is that I don’t like to work with Python 🐍, so I wanted to keep that part as simple as possible.
Important: To retrieve your presence, the Homebridge plugin uses the currently in
betaMicrosoft Graph Presence API. The API is at the moment only supported for work or school accounts. More information here: Get presence.
The busy light service
For the service, I wrote myself a straightforward API. At the moment it contains the following API endpoints:
api/on- GET: turn the LEDs on, it will set a random color.api/off- GET: think you can guess what it does.api/status- GET: Returns the current RGB colors, timestamp of the last call, last called API, and the CPU temperature.api/switch- POST: This allows you to specify the colors to set. The following request body is required:
{ "red": 0, // 0 - 255 "green: 0, // 0 - 255 "blue": 0, // 0 - 255, "brightness": 0.5, // 0.5 is the default, you can specify between 0.4 and 1. This property is optional. "Speed": null // Optional: allows you to set the blinking speed. If you want to get more attention for your busy light.}Important: You can find the code of the service I am using here: https://github.com/estruyf/unicorn-busy-server
The quickest way to start is to get the files copied to your Raspberry Pi (if you want, you can install Git, which makes it easier to clone and fetch updates later). Once you copied the files, you should be able to run the install.sh script. This script installs the required Python dependencies.
Info: The installation script was updated recently, and only supports
Raspbian/Ubuntu. The original installation script is provided as a fallback script. In case you are running another distro, feel free to submit a PR or use theinstall-fallback.shscript.
Once all dependencies installed successfully, it is time to test out the API. You can execute the following script to get the API up and running: python3 server.py.

The following actions are not required anymore, the installation scripts will automatically perform these steps for you. Just in case you want to know what is happening in the scripts, I leave the manual steps here so that you can verify the installation.
When the API is up and running, you can test out the API endpoints like api/on and api/off. If you verified the API works, you could create a start-up service. That way, each time you reboot the Raspberry Pi, it will automatically start. The steps I used for this are the following:
- Copy the service file via:
sudo cp busylight.service /etc/systemd/system/busylight.service. - Start the service
sudo systemctl start busylight(to see if it is correctly copied and can start). If you want, you can usesudo systemctl status busylightto verify the status of the service. - Enable the service:
sudo systemctl enable busylight.
That is all you need to do for the busy light API service.
Homebridge plugin
Homebridge is good, but I must confess, I have a little love/hate relationship with it. First of all, the installation for me went smoothly. The software is built on Node.js, which makes it easy for me to start building my integrations.
Sadly it is only available in JavaScript, and no definition files are available, but that did not prevent me. I had to do some digging through the code to understand how it internally all works. Luckily I already had a bit experience; a week or two before, I created a plugin already for stateful switches.
Important: You can find the source code of the plugin I wrote here: https://github.com/estruyf/homebridge-presence-switch-msgraph
This plugin is available as an NPM dependency as well. By providing it via an NPM dependency, it allows you to install it in Homebridge from its UI quickly.
- Go to your Homebridge site and log in
- Click on plugins
- Search for:
Homebridge Presence Switch Msgraph - Click on install
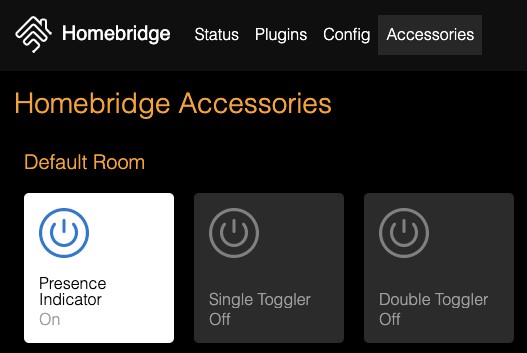
Once installed, go to the config section of Homebridge, and add a new accessory to the accessories array which looks like this:
{ "name": "Presence Indicator", "accessory": "presence-switch", "appId": "707e1e80-fd26-46dd-bdd1-6d8e1a585eea", "interval": 1, // Polling interval in minutes "setColorApi": "http://0.0.0.0:5000/api/switch", // API could be different in your case "offApi": "http://0.0.0.0:5000/api/off", // API could be different in your case "onApi": "http://0.0.0.0:5000/api/on", // API could be different in your case "startTime": "8:30", // Optional: Specify the time you start time "endTime": "18:00", // Optional: Specify the time your workday ends "weekend": false, // Optional: Specify if you want to turn on the LEDs in the weekend "statusColors": {}, // Optional: Allows you to set the status colors for available, away, busy "lightType": "", // Optional: Not yet implemented "debug": false}Important: The
appId(also known as the client id) defined in the config is multi-tenant enabled and will ask you for the following permission scopes:Presence.ReadandUser.Read.
After making any change to the config.json file, you have to restart the Homebridge service to allow it to recognize the new accessory.
sudo hb-service stopsudo hb-service start
OR
sudo hb-service restartIf the accessory gets recognized, you should see the following message appear in the console output of Homebridge:

The accessory will ask you to sign in via https://microsoft.com/devicelogin. Internally the accessory uses the Azure AD Device Flow. As you can only retrieve your presence via delegated permissions, the device flow is the cleanest way. Once you see this message appear, you have 15 minutes to sign in to the service.
When you signed in, it shows a message that an access token is acquired. The accessory will now start to poll the Microsoft Graph each minute or the number you defined in the config.
One more thing, in the Homebridge UI, you will have to turn on the Presence Indicator accessory. Otherwise, it will just call the OFF API.
Azure AD App (Optional)
If you want to create your own Azure AD app. All that it requires are the following actions:
- Create a new Azure AD App in your tenant. More information can be found here: Quickstart: Register an application with the Microsoft identity platform.
- Add the
Presence.Readpermission scope to the API permissions settings - On the Authentication page, enable Treat application as a public client (underneath advanced settings. You require to enable this setting for the device code flow.
- Once you performed these steps, you need the
appIdfor your presence accessory. You can find this ID by clicking on the overview tab and copy the Application (client) ID into the Homebridgeconfig.jsonfile.

That should be it. I hope this article helps you to get your kids/partner out of the office. Feel free to share your feedback/ideas/results.
Extra: If you want to test out the Microsoft Graph endpoints, you can make use of the Graph Explorer which is available here: https://developer.microsoft.com/en-us/graph/graph-explorer.
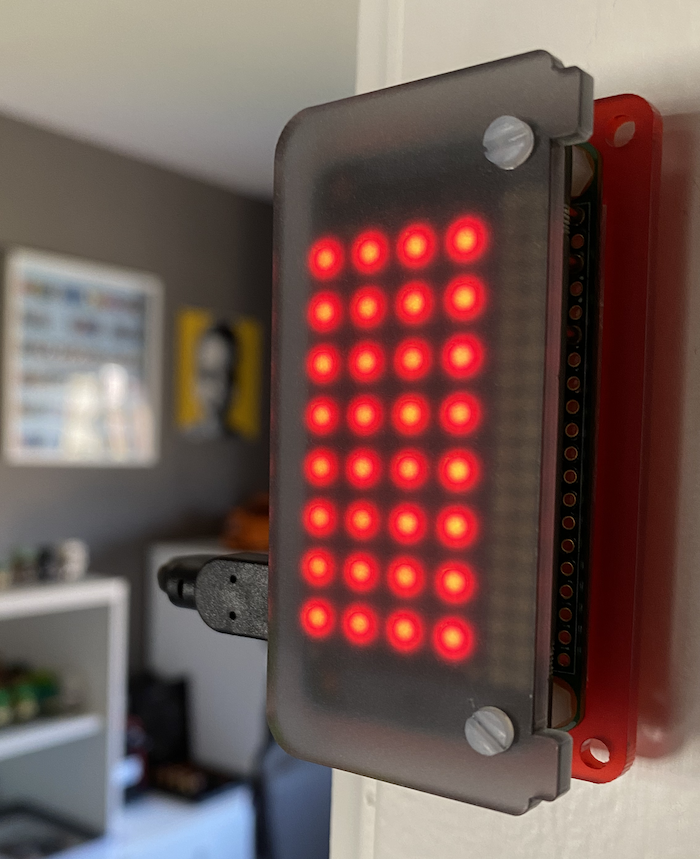
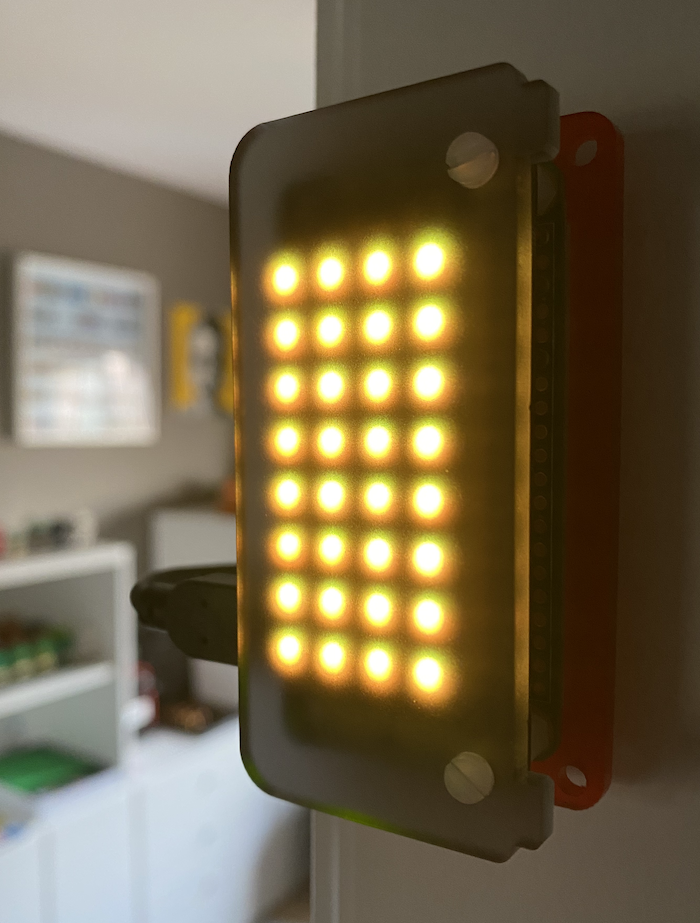
Results
When everything is up and running, the LED should automatically change color when your presence changes in Microsoft Teams.
Related articles
Creating all day events with the Microsoft Graph on Office 365
Building daemon or service app with the Microsoft Graph API
Things to know when creating subscriptions via the Microsoft Graph API
Report issues or make changes on GitHub
Found a typo or issue in this article? Visit the GitHub repository to make changes or submit a bug report.
Comments

Let's build together
Manage content in VS Code
Present from VS Code
Engage with your audience throughout the event lifecycle