SharePoint Designer Workflow Action: Retrieve the File Extension
This post is over a year old, some of this information may be out of date.
This week I was a experimenting with creating SharePoint Designer workflows. After some time I noticed that it was not possible to retrieve the file extension in a SPD Reusable Workflow. Because this is a very useful action, I am going to explain it in this blog post on how to create a SharePoint 2010 Designer Workflow Action.
Another possibility is working with the “If the file type is …” action, but then you will need to predefine the file extensions.
Create a custom activity
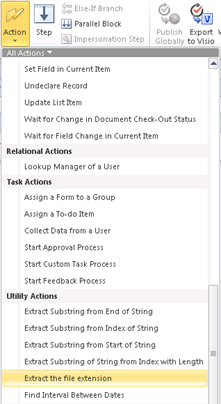
In the following steps I am going to explain you how to create a SPD custom activity. The end result will be:


Prepare the project
- Start by creating a new Empty SharePoint Project. I named my project: “estruyf.SPDActivity.GetFileExtension”; {{< caption-new “/uploads/2011/03/033011_1445_Developinga3.png” “Create an Empty SharePoint Project” “data/jpeg;base64,iVBORw0KGgoAAAANSUhEUgAAAAoAAAACCAIAAADuA9qHAAAACXBIWXMAAA7EAAAOxAGVKw4bAAAASUlEQVR4nAE+AMH/ALnBzMHG0crN2LK6y7O6zMnN2M/T38PH0661yrG60gDEzsLHyMDLyMXJyMTW1NDa2NPb2dTa2NPNy8fS0MyqDS9dTwklFgAAAABJRU5ErkJggg==” “461” “76” >}}
- Link it to the corresponding SharePoint site, and deploy it as a farm solution; {{< caption-new “/uploads/2011/03/033011_1445_Developinga4.png” “Link the Project to Your SharePoint Site” “data/jpeg;base64,iVBORw0KGgoAAAANSUhEUgAAAAoAAAAICAIAAABPmPnhAAAACXBIWXMAAA7EAAAOxAGVKw4bAAAA2klEQVR4nD3Cb0+CQBwA4Pv+XyJftDZXYRTKwU8GOw5+3IGnxKFcUGv9sanTtdV0vmvL1rOH9CzpwNQNVN/G82t+YSWWO7Hc4sab+aEks8o8dt1q+bJdv29Wr7vN8vC9239tj/vPj7dnAp531utTl0rkWcrn+t4s6rkuc8FZCESkDOjdb4dFkCWRRCZSJjFGHhGB8dgfsRAkxoXgEtnpRCYSGVG5wLhArkSqdFn8X+hpnnHS1GVndNtUf41ujX5oqqe2LpUgY38YBvQ0gBFQB6hjD67o8NYeXP4AmaG8KFJk0TAAAAAASUVORK5CYII=” “401” “319” >}}
- Add the following references to your project: {{< caption-new “/uploads/2011/03/033011_1445_Developinga5.png” “Insert the Following References” “data/jpeg;base64,iVBORw0KGgoAAAANSUhEUgAAAAoAAAADCAIAAAAlXwkiAAAACXBIWXMAAA7EAAAOxAGVKw4bAAAAZUlEQVR4nGMw8mrRdm5QtqmWM6+QMinj08wT0CmQt6wU0S9StqlmMPVu1nKqlTEt5dPI4VbL4lHP5tPMUbSqENbNV7auZDDwaNZxadR3b1KyruLTzGdXzuJSzZE2LePTzJc1rwAATeEXXH06KVwAAAAASUVORK5CYII=” “395” “119” >}}
Start coding
- Create a new class and call it “GetFileExtension”; {{< caption-new “/uploads/2011/03/033011_1445_Developinga6.png” “Create a New Class” “data/jpeg;base64,iVBORw0KGgoAAAANSUhEUgAAAAoAAAAFCAIAAADzBuo/AAAACXBIWXMAAA7EAAAOxAGVKw4bAAAAm0lEQVR4nC3L0QqCMBQAUP//P0qMlAVmGplkaJhG4qDIl6DCDCQMXc657fbSeT/KPo7y/HzMTuYyXPsHZAXICl0/TbLrNkyVtm2kEKTrq3cFIIUQHWlYTwGgLF/KLsFBjPHldn+UlFLKhrr+MMYAoCieCudCSPh2hJAGAKSUA+s55/+tzTwNuRPkjKYLVbeNuafqzthYBRE27c0PznKB+SMTf+gAAAAASUVORK5CYII=” “530” “282” >}}
- Make it the class “public” (when this class is not set to public, SharePoint Designer gives an error that the:
is inaccessible due to the protection level);
public class GetFileExtension{
}- Let your class inherit from the “System.Workflow.ComponentModel.Activity” class; {{< caption-new “/uploads/2011/03/033011_1445_Developinga8.png” “Inherit from the “System.Workflow.ComponentModel.Activity” Class” “data/jpeg;base64,iVBORw0KGgoAAAANSUhEUgAAAAoAAAABCAIAAABol6gpAAAACXBIWXMAAA7EAAAOxAGVKw4bAAAAKklEQVR4nAEfAOD/APf6+/j8/fL19dXW1t/e3+Lg4t/d397c3uPh4+vp66qtGxTkUnIrAAAAAElFTkSuQmCC” “447” “62” >}}
- Define the workflow fields that will be used in the SharePoint activity.;
// Fieldspublic static DependencyProperty __ContextProperty = DependencyProperty.Register("__Context", typeof(WorkflowContext), typeof(GetFileExtension));public static DependencyProperty StringValProperty = DependencyProperty.Register("StringVal", typeof(string), typeof(GetFileExtension));public static DependencyProperty SubstringVariableProperty = DependencyProperty.Register("SubstringVariable", typeof(string), typeof(GetFileExtension));The “StringValProperty” will be used as an input value for the document name property. The “SubstringVariableProperty” will be used as an output value that is stored in a workflow variable. 5. The next step is to override the “Execute” method;
// Methods protected override ActivityExecutionStatus Execute(ActivityExecutionContext executionContext){ if (this.StringVal == null && this.StringVal == "") { this.SubstringVariable = string.Empty; } else { try { this.SubstringVariable = Path.GetExtension(this.StringVal); this.SubstringVariable = this.SubstringVariable.Replace(".", ""); } catch (Exception) { this.SubstringVariable = string.Empty; } } return ActivityExecutionStatus.Closed;}- The only thing that needs to be added to the code, are the properties that are part of the Activity class.
// Properties[ValidationOption(ValidationOption.Optional)]public WorkflowContext __Context{ get { return (WorkflowContext)base.GetValue(__ContextProperty); } set { base.SetValue(__ContextProperty, value); }}
[ValidationOption(ValidationOption.Required)]public string StringVal{ get { return (string)base.GetValue(StringValProperty); } set { base.SetValue(StringValProperty, value); }}
[ValidationOption(ValidationOption.Required)]public string SubstringVariable{ get { return (string)base.GetValue(SubstringVariableProperty); } set { base.SetValue(SubstringVariableProperty, value); }}Create the workflow action xml
When your code file is created, you need to register the action to SharePoint. This can be done by creating an “Actions” file and place it in the “SharePoint Root/TEMPLATE/Language Code/Workflow” folder.
SharePoint will automatically read the new file and add the custom action into the memory.
- Create a mapped folder to the following location: “SharePoint Root/TEMPLATE/Language Code/Workflow”; {{< caption-new “/uploads/2011/03/033011_1445_Developinga9.png” “Mapped Folder” “data/jpeg;base64,iVBORw0KGgoAAAANSUhEUgAAAAoAAAAJCAIAAACExCpEAAAACXBIWXMAAA7EAAAOxAGVKw4bAAAA10lEQVR4nG3Nz4/BQBjG8fnbxbGSJVs2euQggoOzm4ul6IiDdHSq2mmnko1frVbpvLI7EYns9/p5n7xI1brlWrvy1VbrnY9qq6g0iqVmQWkon61er4+oiT06wbPREuuh71yinyw5ZMkhvezx7Bsx5qexsybG8RQDgBACnhnTMXJd77ynlMyjKAGAPM/FXwCA5zpiHotPtm3h2/21k/1yyMP8ym1rkV5v/3DgB1nCyGoS8N3b74UxRdxnIARnS0JWUZxJkEcby0QB8wBg6xJVaw6GpjTJDiUPTpzxFr/fu28AAAAASUVORK5CYII=” “295” “274” >}}
- Add a new XML file to the folder and name it: “GetFileExtension.actions”;
- Place the next code block into the Actions file;
<WorkflowInfo> <Actions Sequential="then" Parallel="and"> <Action Name="Extract the file extension" ClassName="estruyf.SPDActivity.GetFileExtension.GetFileExtension" Assembly="estruyf.SPDActivity.GetFileExtension, Version=1.0.0.0, Culture=neutral, PublicKeyToken=1f8a604908bb57cd" AppliesTo="all" Category="Utility Actions"> <RuleDesigner Sentence="Retrieve the file extension from the %1 string (Output to %2)"> <FieldBind Field="StringVal" Text="Document Name" Id="1" DesignerType="TextArea" /> <FieldBind Field="SubstringVariable" Text="File Extention String" Id="2" DesignerType="ParameterNames" /> </RuleDesigner> <Parameters> <Parameter Name="__Context" Type="Microsoft.SharePoint.WorkflowActions.WorkflowContext, Microsoft.SharePoint.WorkflowActions" Direction="In" DesignerType="Hide"/> <Parameter Name="StringVal" Type="System.String, mscorlib" Direction="In" DesignerType="TextArea" Description="This should be the document name." /> <Parameter Name="SubstringVariable" Type="System.String, mscorlib" Direction="Out" DesignerType="ParameterNames" Description="Workflow variable output by this action." /> </Parameters> </Action> </Actions></WorkflowInfo>If needed change the “Classname” and “Assembly” attributes to your settings. Check if the Parameter names are the same as defined in the code file.
Webapplication feature
When you deploy your project, you will notice that the custom activity cannot be used. To be able to use this activity, an “authorizedType” entry needs to be added in the “web.config”.
To make this process a little more user friendly, you can create a web application feature event receiver that adds this “web.config” “authorizedType” entry.
- Add a new feature to your project; {{< caption-new “/uploads/2011/03/033011_1445_Developinga10.png” “Web Application Feature” “data/jpeg;base64,iVBORw0KGgoAAAANSUhEUgAAAAoAAAADCAIAAAAlXwkiAAAACXBIWXMAAA7EAAAOxAGVKw4bAAAAX0lEQVR4nC3GwQ5AIBgA4N7/eRw4xKFVZs0vyjBU69dqXsLFd/pIw3YqDj5Y1hs+WKXPyXowblxuMI5U1LRi8wF9QBceTCXlF1OJT075JTU7uv6aV6/0LSeUgAKigD8fhmtLBwu4FHsAAAAASUVORK5CYII=” “518” “131” >}}
- Add an event receiver to the feature;
- Add the following code block to the “FeatureActivated” method.
public override void FeatureActivated(SPFeatureReceiverProperties properties){ SPWebApplication wappCurrent = (SPWebApplication)properties.Feature.Parent; SPWebConfigModification modAuthorizedType = new SPWebConfigModification(); modAuthorizedType.Name = "AuthType"; modAuthorizedType.Owner = "estruyf.SPDActivity.GetFileExtension"; modAuthorizedType.Path = "configuration/System.Workflow.ComponentModel.WorkflowCompiler/authorizedTypes"; modAuthorizedType.Type = SPWebConfigModification.SPWebConfigModificationType.EnsureChildNode; modAuthorizedType.Value = @"<authorizedType Assembly='estruyf.SPDActivity.GetFileExtension, Version=1.0.0.0, Culture=neutral, PublicKeyToken=1f8a604908bb57cd' Namespace='estruyf.SPDActivity.GetFileExtension' TypeName='*' Authorized='True' />"; wappCurrent.WebConfigModifications.Add(modAuthorizedType); wappCurrent.WebService.ApplyWebConfigModifications();}After this step you can deploy your project to SharePoint.
Troubleshooting
The custom activity is shown in the actions list, but you are not able to select it.
- Check if the “Actions” xml file contains the correct assembly and class name.
- Check if the web.config contains the “authorizedType” entry.
- Check the assembly name and Namespace in the “authorizedType” entry.
The is inaccessible due to the protection level
Check if you made your class public.
References
- SharePoint Designer 2010 Custom Workflow Activities Using Only 1 Solution
- Delivering Modular SharePoint Workflow Functionality Part 1
- Delivering Modular SharePoint Workflow Functionality Part 2
Sources
Related articles
Quick Tip: Custom Action Tokens in SharePoint 2010 Designer
SharePoint Designer 2010 – Start Approval Process Workflow Action Not Working In Other Languages
Order List Items Like in a Meeting Workspace: Part 2
Report issues or make changes on GitHub
Found a typo or issue in this article? Visit the GitHub repository to make changes or submit a bug report.
Comments

Let's build together
Manage content in VS Code
Present from VS Code