Using the Office 365 CLI in your Azure DevOps CI/CD pipelines for SharePoint Framework solutions
This post is over a year old, some of this information may be out of date.
Automating installation/deployment processes of any type of solutions is so great, and on Azure DevOps you can do this by a task-driven process. For many of the SharePoint Solutions I create, I have an automated CI/CD process behind the scenes running. So that once my code is ready, it will automatically deploy to my test environment.
Last year I documented my process in an article of how I achieved it: Configure a build and release pipeline for your SharePoint Framework solution deployments. That process makes use of a couple of gulp tasks to upload the solution package and deploy in your tenant
Office 365 CLI
The Office 365 CLI is a cross-platform CLI which allows you to manage various configuration settings on Office 365. The CLI evolved so rapidly, but one thing what was missing for easily integrating it into a build/release pipeline was to authenticate via a username and password.
As of version 1.2.0 of the Office 365 CLI, it is now possible to authenticate by providing user credentials which makes it a lot easier to use the CLI in VSTS.
Important: at the moment this v1.2.0 is in beta, so you will need to install it vianpm i -g @pnp/office365-cli@next.
Putting the default building blocks in place
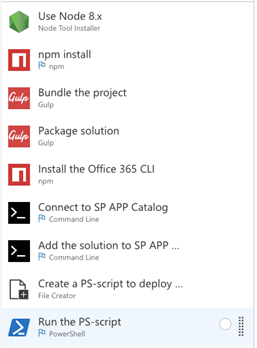
The first things to create is your build pipeline/definition in which you will install the project dependencies and create an SPFx solution package. This process is similar as in the first article I referenced, the build definition looks like this:
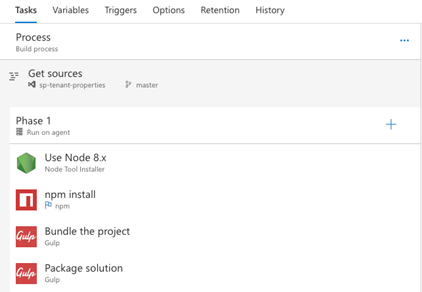
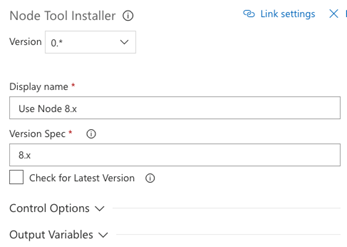
Node tool installer task
This task allows you to specify the Node version to use during the process. In my definition, I am defining it to version 8.x, which is the version the SPFx generator supports. By changing the Node version during the process, I saw that my builds were completed 2 minutes faster than before with Node v6.
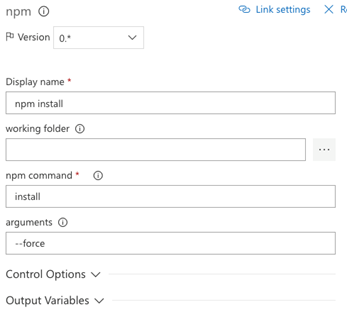
npm install
Default task to install the project dependencies.
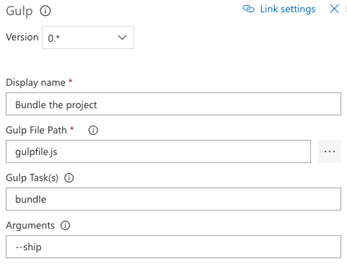
Bundle the project
Gulp task to bundle the SharePoint Framework Solution.
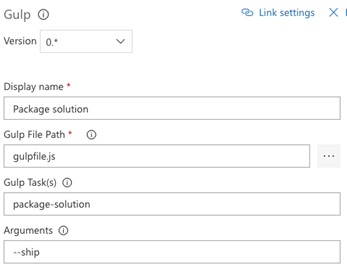
Package solution
Gulp task to package the solution.
Using the Office 365 CLI in your build/release pipelines
The next things to define are the tasks that will use the Office 365 CLI. You can configure the tasks in the same build definition, or if you want to release it to multiple environments, it might be better to create some release definitions.
These are the tasks which you require to add and deploy the solution package to your tenant:
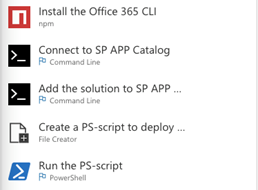
Install the Office 365 CLI
This is an npm task which has been set to command custom. The custom command allows you to define the npm command and arguments so that it allows you to install the Office 365 CLI as follows:
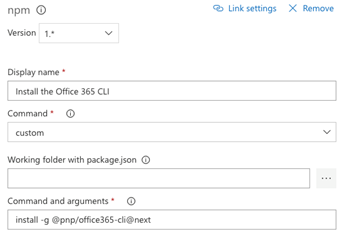
Important: I made use of @next, because the v1.2.0 was still in beta.
Connect to SP APP Catalog
This is a command line task which uses the Office 365 CLI to connect to the APP Catalog site with the following command: o365 spo connect https://estruyfdev2.sharepoint.com/sites/catalog --authType password --userName $(username) --password $(password)
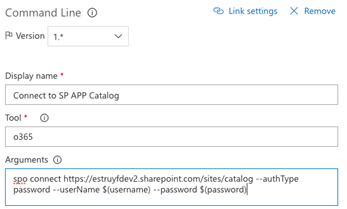
Note: username and password are variables which I configured in my build pipeline.
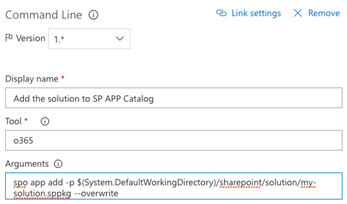
Add the solution to SP APP Catalog
This is a command line task which adds the created SharePoint solution package to the APP Catalog with the following command: o365 spo app add -p $(System.DefaultWorkingDirectory)/sharepoint/solution/my-solution.sppkg --overwrite
Create a PS-script to deploy the solution
For this task, I make use of the file creator task (https://marketplace.visualstudio.com/items?itemName=eliostruyf.build-task) which allows you to create a file during the build/release process. I use the task to create a PowerShell file which retrieves the list of available SharePoint apps, finds the one we are currently interested in, and deploys it.
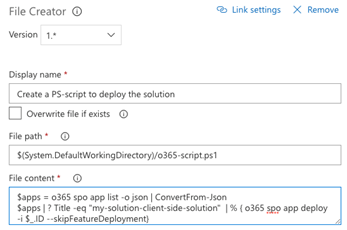
Note: I use the title of the solution, instead of the filename. You can find this in the package-solution.json file.
This is the content of the file content:
$apps = o365 spo app list -o json | ConvertFrom-Json$apps | ? Title -eq "my-solution-client-side-solution" | % { o365 spo app deploy -i $_.ID --skipFeatureDeployment}Info: it may be that this task is no longer necessary in the future: https://github.com/SharePoint/office365-cli/issues/404
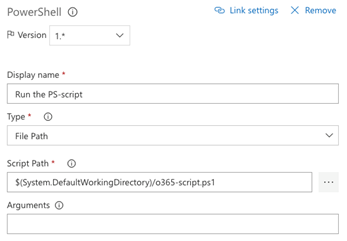
Run the PS-script
This is the last step in the process. You can use a PowerShell task to execute the script which was created in the previous task.
Build output
Here is the full build definition and its output:
Here you can see a run which completed successfully:

Related articles
Speed up your SharePoint Framework build and release process in Azure DevOps
Automate publishing process of MkDocs to Static Website hosting in Azure Storage with VSTS
Conditional publish packages to NPM via GitHub actions
Report issues or make changes on GitHub
Found a typo or issue in this article? Visit the GitHub repository to make changes or submit a bug report.
Comments

Let's build together
Manage content in VS Code
Present from VS Code
Engage with your audience throughout the event lifecycle