Configure a build and release pipeline for your SharePoint Framework solution deployments
This post is over a year old, some of this information may be out of date.
In the previous article, I wrote how I achieved to setup a build and release pipeline to automate the publishing process of my SharePoint Framework app package and JS file to my environments.
Info: Use build and release pipelines in VSTS to automate your SharePoint Framework deployments.
In this article, I will focus on explaining the steps in detail how you can achieve it yourself.
Source control
It all starts with your source control system. For this I made use of a new Git version controlled project on Visual Studio Team Services. Once you have such a project, there is some configuration required in your project solution itself.
Gulp tasks configuration
The first step is to create the custom gulp tasks that will be used by the release definition on VSTS.
Update manifest task
The first task which I added to the gulpfile.js file is one to update the manifest JSON file. This file holds the CDN location to where you will upload your project files.
build.task('update-manifest', { execute: (config) => { return new Promise((resolve, reject) => { const cdnPath = config.args['cdnpath'] '' ""; let json = JSON.parse(fs.readFileSync('./config/write-manifests.json')); json.cdnBasePath = cdnPath; fs.writeFileSync('./config/write-manifests.json', JSON.stringify(json)); resolve(); }); }});The task makes use of an argument **cdnpath **which you can pass as a command line argument. To call this gulp tasks, run: gulp update-manifest --cdnpath https://<your-cdn-location>.
Upload script files and solution package + deploy the latest solution package version
Next up is to create the two tasks for uploading the JS scripts files and solution package to SharePoint and another task for deploying the uploaded solution package to get it activated. For this, I made use of the approach I explained in the following blog posts: upload assets, upload app package and app package deployment.
One thing I changed to the gulp tasks is that it now also makes use of command line arguments which you can pass through by executing the gulp task. This way you can maintain the configuration of your environments within the build and release pipeline.
Here is are the steps to follow
- Install gulp-spsync-creds and node-sppkg-deploy as a developer dependency to your project:
npm install gulp-spsync-creds node-sppkg-deploy --save-dev --save-exact - Add the updated gulp upload tasks:
const environmentInfo = { "username": "<production-username>", "password": "<production-password>", "tenant": "<production-tenant>", "cdnSite": "<cdn-site-relative-path>", "cdnLib": "<cdn-relative-path>", "catalogSite": "<catalog-site-relative-path>"};
build.task('upload-to-sharepoint', { execute: (config) => { environmentInfo.username = config.args['username'] '' environmentInfo.username; environmentInfo.password = config.args['password'] '' environmentInfo.password; environmentInfo.tenant = config.args['tenant'] '' environmentInfo.tenant; environmentInfo.cdnSite = config.args['cdnsite'] '' environmentInfo.cdnSite; environmentInfo.cdnLib = config.args['cdnlib'] '' environmentInfo.cdnLib;
return new Promise((resolve, reject) => { const deployFolder = require('./config/copy-assets.json'); const folderLocation = `./${deployFolder.deployCdnPath}/**/*.*`;
return gulp.src(folderLocation) .pipe(spsync({ "username": environmentInfo.username, "password": environmentInfo.password, "site": `https://${environmentInfo.tenant}.sharepoint.com/${environmentInfo.cdnSite}`, "libraryPath": environmentInfo.cdnLib, "publish": true })) .on('finish', resolve); }); }});
build.task('upload-app-pkg', { execute: (config) => { environmentInfo.username = config.args['username'] '' environmentInfo.username; environmentInfo.password = config.args['password'] '' environmentInfo.password; environmentInfo.tenant = config.args['tenant'] '' environmentInfo.tenant; environmentInfo.catalogSite = config.args['catalogsite'] '' environmentInfo.catalogSite;
return new Promise((resolve, reject) => { const pkgFile = require('./config/package-solution.json'); const folderLocation = `./sharepoint/${pkgFile.paths.zippedPackage}`;
return gulp.src(folderLocation) .pipe(spsync({ "username": environmentInfo.username, "password": environmentInfo.password, "site": `https://${environmentInfo.tenant}.sharepoint.com/${environmentInfo.catalogSite}`, "libraryPath": "AppCatalog", "publish": true })) .on('finish', resolve); }); }});
build.task('deploy-sppkg', { execute: (config) => { environmentInfo.username = config.args['username'] '' environmentInfo.username; environmentInfo.password = config.args['password'] '' environmentInfo.password; environmentInfo.tenant = config.args['tenant'] '' environmentInfo.tenant; environmentInfo.catalogSite = config.args['catalogsite'] '' environmentInfo.catalogSite;
const pkgFile = require('./config/package-solution.json'); if (pkgFile) { // Retrieve the filename from the package solution config file let filename = pkgFile.paths.zippedPackage; // Remove the solution path from the filename filename = filename.split('/').pop(); // Retrieve the skip feature deployment setting from the package solution config file const skipFeatureDeployment = pkgFile.solution.skipFeatureDeployment ? pkgFile.solution.skipFeatureDeployment : false; // Deploy the SharePoint package return sppkgDeploy.deploy({ username: environmentInfo.username, password: environmentInfo.password, tenant: environmentInfo.tenant, site: environmentInfo.catalogSite, filename: filename, skipFeatureDeployment: skipFeatureDeployment, verbose: true }); } }});Info: whole content of my gulpfile.js. I also allowed you to specify these configuration parameters from within the gulpfile. So you can test things out publishing files to your development environment.
Info: these tasks are also available in the sp-dev-build-extensions repository: https://github.com/SharePoint/sp-dev-build-extensions.
Once these tasks are in place, the tasks can be executed with the following commands:
gulp upload-to-sharepoint --ship --username $(username) --password $(password) --tenant $(tenant) --cdnsite $(cdnsite) --cdnlib $(cdnlib)gulp upload-app-pkg --ship --username $(username) --password $(password) --tenant $(tenant) --catalogsite $(catalogsite)gulp deploy-sppkg --ship --username $(username) --password $(password) --tenant $(tenant) --catalogsite $(catalogsite)
Info: these commands already contain the variables which I am using in my release tasks. If you leave out these arguments, it will take the development configuration from within the file.
Build definition configuration
In your source control project on Visual Studio Team Services, go to the build & release section. There you will have the option to create a new build definition. When you create a new definition, you will be presented with a couple of templates. In the template option, you should have the NodeJS with Gulp template. This gives you a good start.
To the template, you should add two additional gulp tasks, which you can do by clicking on the add task link.
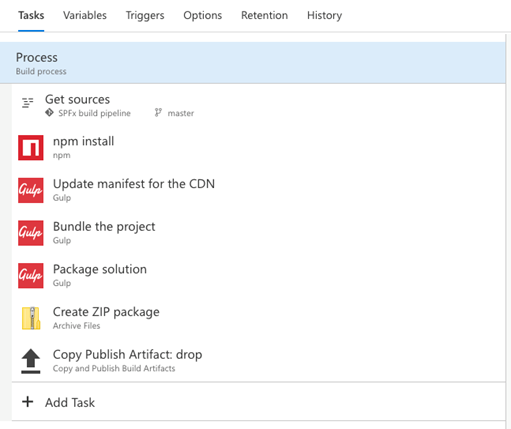
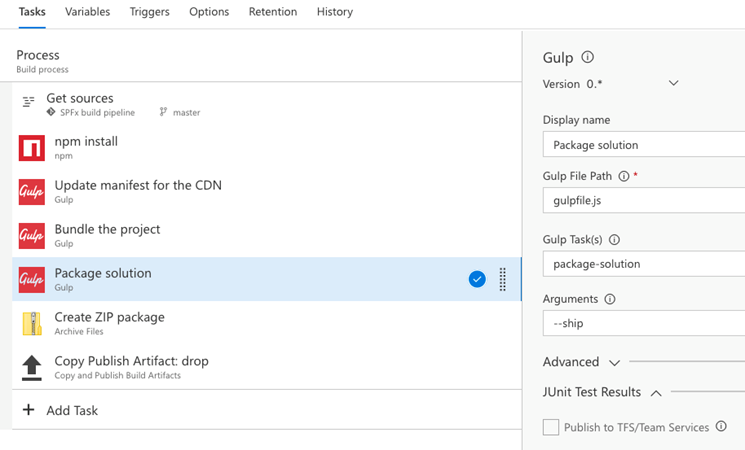
For the build definition, you should only have to configure the gulp tasks, all other tasks can be like they are configured by default.
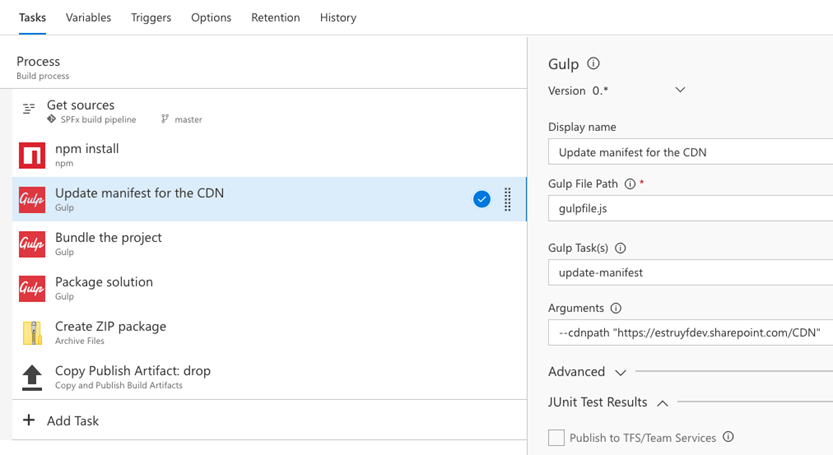
Update manifest for the CDN - task configuration
The CDN update task needs to be configured as follows:
- Gulp task: update-manifest
- Arguments: —cdnpath your-cdn-location
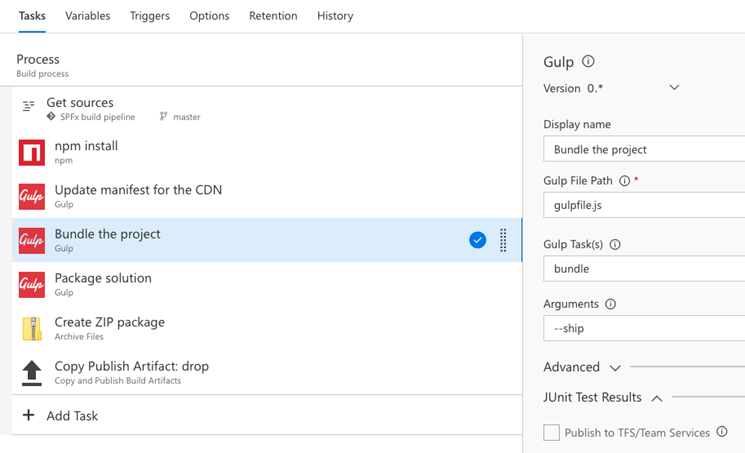
Bundle the project - task configuration
The project bundling tasks needs to be configured as follows:
- Gulp task: bundle
- Arguments: —ship
Package solution -** task configuration**
The last task in your build definition is the package solution task. This one needs to be configured as follows:
- Gulp task: package-solution
- Arguments: —ship
Save this configuration, but it is not done yet.
Build definition trigger configuration
To automatically trigger the build process when you do a push to the master branch source control system, you should configure this under the triggers tab:
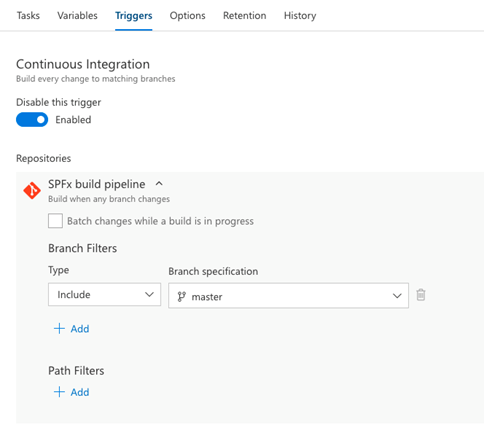
On the trigger page, just enable the continuous integration trigger. Once this is done, should do one more check.
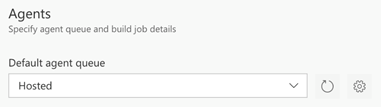
Underneath the options tab, check that the default agent queue is set to hosted. If this is not the case, it might happen that the agent which is going to run the build process, does not support npm and gulp and eventually, the process will fail. When you selected the gulp template, this should already be configured correctly.
If not, change it and finally save these settings and your build definition should now be completed. If you want, you can test it out by pushing a new commit to your master branch. This should automatically trigger the build process to start up.
Release definition configuration
Once the build definition is set up, the last step is to configure your release definition.
Info: if you want, you can also configure everything from within the build definition itself. By splitting things in a build and release definition you have better control over your environment publishing process. Choice is up to you.
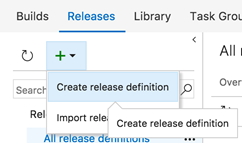
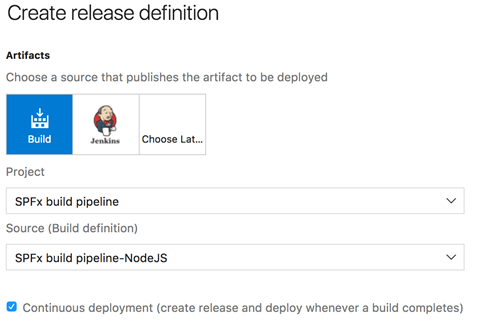
The first step is to go to the releases tab, which you can find under the Build & Release tab, and create a new release definition.
Best is to start with an empty template and click next. On the next page, you should choose the newly configured build definition as the source for to be used for the release definition. Also, check the continuous deployment option and click create.
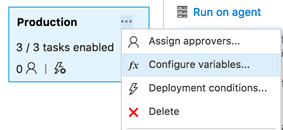
Once the release definition is created, click on the environment menu and choose to configure variables.
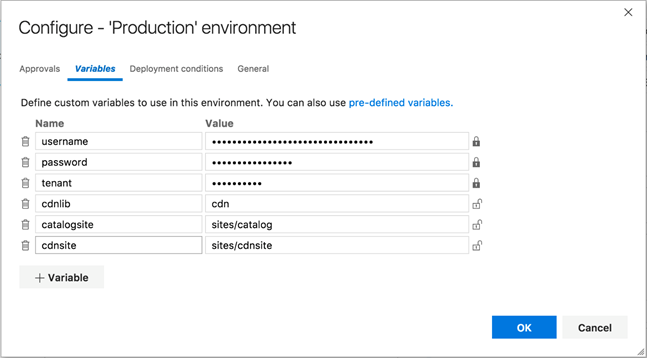
By setting up variables for the release, it makes your commands easier as you can easily change them for all your environments. These are the variables you must create:
- username: the username that will be used to upload the files to SharePoint;
- password: the password for the account;
- tenant: only the tenant name, will be used to concatenate your SharePoint URL: https://<tenant>.sharepoint.com
- cdnlib: name of the CDN library on the CDN site;
- catalogsite: relative path to your APP catalog site;
- cdnsite: relative path to the site on which you CDN library is located. If it is the root site, you do not have to specify this.
Configure the extract files task
The first task you must add to the definition is the extract files task. Configure it as follows:
- Archive file patterns: **/*.zip
- Destination folder: $(System.DefaultWorkingDirectory)/build/release
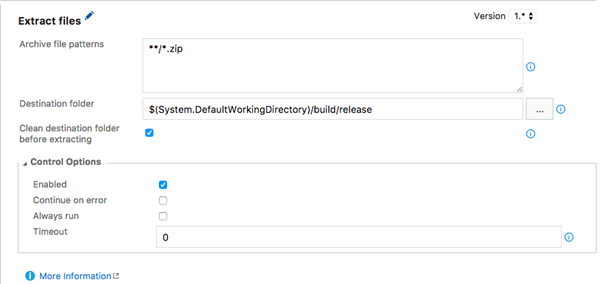
This task will extract the contents of the generated build package to a release folder. This is also the location we have to link to in the gulp tasks.
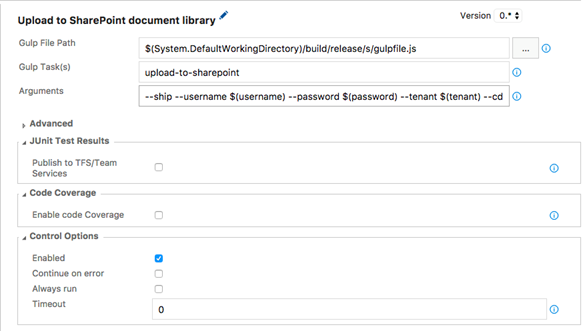
Upload to SharePoint document library
Add a gulp task to your release definition and configure the task as follows:
- Gulp file path: $(System.DefaultWorkingDirectory)/build/release/s/gulpfile.js
- Gulp tasks(s): upload-to-sharepoint
- Arguments: —ship —username $(username) —password $(password) —tenant $(tenant) —cdnsite $(cdnsite) —cdnlib $(cdnlib)
Upload app package to SharePoint
Add the task to upload the app package to the SharePoint app catalog site. For this you need to add another gulp task, and configure it as follows:
- Gulp file path: $(System.DefaultWorkingDirectory)/build/release/s/gulpfile.js
- Gulp tasks(s): upload-app-pkg
- Arguments: —ship —username $(username) —password $(password) —tenant $(tenant) —catalogsite $(catalogsite) {{< caption-new “/uploads/2017/05/051517_0930_Configureab14.png” “Upload app package to SharePoint task configuration” “data/jpeg;base64,iVBORw0KGgoAAAANSUhEUgAAAAoAAAAGCAIAAAB1kpiRAAAACXBIWXMAAB2HAAAdhwGP5fFlAAAAZklEQVR4nGXM2woDIQwEUP//S4WAtSauGmdCcWEf2p7XuaRSiojknEt5rbXmDcA1BiNS751kNxOR96ObXXOdWFWbtoggicfeG2REpFqriGBv/nEwtdZM1cG7/eWczzncHTjPP2uQHw2gruCmQMj7AAAAAElFTkSuQmCC” “587” “335” >}}
Deploy the solution package
The last task to configure is the one to deploy the solution package in the App Catalog site. For this you need to add another gulp task, and configure it as follows:
- Gulp file path: $(System.DefaultWorkingDirectory)/build/release/s/gulpfile.js
- Gulp tasks(s): deploy-sppkg
- Arguments: —ship —username $(username) —password $(password) —tenant $(tenant) —catalogsite $(catalogsite)
Other configuration steps
Right now, you did all the task configuration that is required for this release definition. To be able to run the release definition correctly, there are a couple of extra configuration steps.
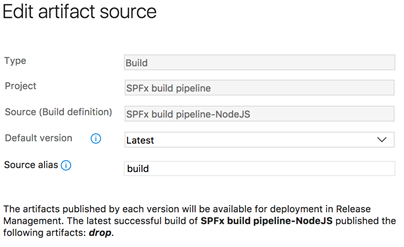
Go to Artifacts and check the default created source and edit it and rename the source alias to build.
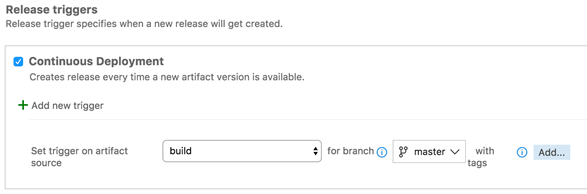
Go to the Triggers tab and set the branch in your continuous deployment trigger to your master branch (or any other if you are configuring it for other environments).
That was it, now your release definition is completed. After this step, it is time for you to test it out by pushing a new release to git and check that the build and release process get automatically triggered.
Updates
14/08/2017
Added the Gulp task to automate the deployment of the solution package.
Related articles
Use build and release pipelines in Azure DevOps to automate your SharePoint Framework deployments
Automate the deployment of your SharePoint solution package in the App Catalog
How to debug your SharePoint Framework web part
Report issues or make changes on GitHub
Found a typo or issue in this article? Visit the GitHub repository to make changes or submit a bug report.
Comments

Let's build together
Manage content in VS Code
Present from VS Code
Engage with your audience throughout the event lifecycle