Part 7: Working with Ranges in the Search Refiner Control
This post is over a year old, some of this information may be out of date.
This is an extra post for the search refiner control series. In this post I’ll explain how you could build a search refiner control that makes use of ranges.
The range operator can be used for the following search data types:
- DateTime
- Decimal
- Integer
The out-of-the-box refiner controls use this range operator for its slider controls, but it can easily be used within your custom refiner.
First let me explain the range operator.
Range operator
The range operator requires minimal two values, a start and an end value (Range Operator).
range(start, end)
It’s also possible to apply two optional parameters, an open and close start or end interval.
range(start, stop [,from=“GE”‘“GT”] [,to=“LE”‘“LT”])
With these optional start and end interval parameters, you could specify to include or exclude the start / end values.
From
- GE: Greater than or equal to the start value; This includes the start value (Default);
- GT: Greater than the start value. This excludes the start value.
To
- LE: Less than or equal to the end value; This includes the end value (Default);
- LT: Less than the end value. This excludes the end value.
The range operator can be used with numeric values (integer and decimal) and DateTime values. There are two important things were you should pay attention for:
- When using the range operator for DateTime refinement, you should format the dates in ISO format “2013-11-01T00:01:01Z”.
- When using the range operator for Decimal refinement, you should let the range operator know that it’s a decimal value. This can be done by using the decimal operator “decimal(10.10)”. Another useful thing, if you don’t want to specify a lower or upper bound, you could use the min or max reserved words as value.
Examples
Integer
// Results with the upper bound set to 94range(min, 94)// Results between 20 and 120 (20 and 120 included)range(20, 120)// Results starting from 20 with no upper boundrange(20, max)// Results greater than 20range(20, max, from="GT")// Results greater than 20 and less than 120range(20, 120, from="GT", to="LT")Decimal
// Results with the upper bound set to 100.21range(min, 100.21)// Results between 21.21 and 100.21 (21.21 and 100.21 included)range(21.21, 100.21)// Results starting from 100.21 with no upper boundrange(100.21, max)DateTime
// Results greater than or equal to November 1strange(2013-11-01T00:01:01Z, max)// Results less than or equal to December 2ndrange(min, 2013-12-02T00:01:01Z)// Results from November 1st, until December 2ndrange(2013-11-01T00:01:01Z, 2013-12-02T00:01:01Z)Creating Your Own Range Search Refiner Control
Now that you got a little bit of background information about how the range operator works, it’s time to build our own range search refinement control.
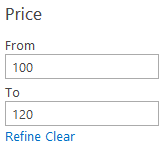
The end result will look like this:

For this search refiner we’ll start from scratch, because the code will be much different than the ones that were created in the previous posts.
The starter’s template looks like this:
<html xmlns:mso="urn:schemas-microsoft-com:office:office" xmlns:msdt="uuid:C2F41010-65B3-11d1-A29F-00AA00C14882"><head> <title>Range Filter</title> <!--[if gte mso 9]> <xml> <mso:CustomDocumentProperties> <mso:CompatibleManagedProperties msdt:dt="string"></mso:CompatibleManagedProperties> <mso:TemplateHidden msdt:dt="string">0</mso:TemplateHidden> <mso:CompatibleSearchDataTypes msdt:dt="string">;#DateTime;#Integer;#Decimal;#</mso:CompatibleSearchDataTypes> <mso:MasterPageDescription msdt:dt="string"></mso:MasterPageDescription> <mso:ContentTypeId msdt:dt="string">0x0101002039C03B61C64EC4A04F5361F385106604</mso:ContentTypeId> <mso:TargetControlType msdt:dt="string">;#Refinement;#</mso:TargetControlType> <mso:HtmlDesignAssociated msdt:dt="string">1</mso:HtmlDesignAssociated> <mso:CrawlerXSLFile msdt:dt="string"></mso:CrawlerXSLFile> <mso:HtmlDesignPreviewUrl msdt:dt="string"></mso:HtmlDesignPreviewUrl> </xml> <![endif]--> <script>
</script></head><body> <div id="RangeFilter"><!--#_ var listData = ctx.ListData; var hasControl = true;
// Check if the current Refinement Control exists if ($isNull(ctx.RefinementControl) '' $isNull(ctx.ClientControl)) hasControl = false;
if (hasControl) { // Check if listdata contains data if(!$isNull(listData) && !$isEmptyArray(listData)) { // ALL CODE WILL BE WRITTEN HERE } }_#--> </div></body></html>In this starter’s template you’ll find the CompatibleSearchDataTypes property, this property specifies for which kind of search data types that the control can be used. In this control the property is set to be used for DateTime, Integer, and Decimal search data types.
Next step is to create the ID variables for the elements that will be used, and the default refinement control classes.
// Element IDsvar controlID = ctx.RefinementControl.containerId + "_" + ctx.RefinementControl.propertyName;var fromInput = controlID + "_from";var toInput = controlID + "_to";var refineLink = controlID + "_refine";var clearLink = controlID + "_clear";
// Show the refinement titlevar isExpanded = Srch.Refinement.getExpanded(ctx.RefinementControl.propertyName);var iconClass = (isExpanded == "true"? "ms-ref-uparrow" : "ms-ref-downarrow");var refinerCatTitle = Srch.Refinement.getRefinementTitle(ctx.RefinementControl);// Display style > needed to hide the refinement list when collapsedvar displayStyle = (isExpanded == "true"? "" : "none");Now that the variables are created, you can add the HTML mark-up for the refiner. This looks like this:
_#--><div id='Container'> _#= Srch.U.collapsibleRefinerTitle(ctx.RefinementControl.propertyName, ctx.ClientControl.get_id(), refinerCatTitle, iconClass) =#_
<div class='ms-ref-unselSec' style='display:_#= $htmlEncode(displayStyle) =#_'> <label for='_#= fromInput =#_'>From</label> <input type='text' id='_#= fromInput =#_' name='from' /> <label for='_#= toInput =#_'>To</label> <input type='text' id='_#= toInput =#_' name='to' /> <a href='javascript:{}' id="_#= refineLink =#_">Refine</a> <a href='javascript:{}' id="_#= clearLink =#_">Clear</a> </div></div><!--#_The output after this will look the same as the end result, but without the functionality.

Adding the Click Events to the Hyperlinks
For the refinement and clear hyperlinks, we’ll add click events via JavaScript. This needs to be done from the moment the search refinement control is loaded. This can be done by using the ctx.OnPostRender functionality.
ctx.OnPostRender = [];ctx.OnPostRender.push(function () { // Retrieve the two hyperlinks var refineLinkElm = document.getElementById(refineLink); var clearLinkElm = document.getElementById(clearLink);
// Create an onclick event for the refinement link refineLinkElm.onclick = function () { // Retrieve the two input fields var fromInputElm = document.getElementById(fromInput); var toInputElm = document.getElementById(toInput);
// Check if the two input fields contains a value, otherwise nothing needs to be done if (fromInputElm.value.trim() !== "" '' toInputElm.value.trim() !== "") { // Retrieve the input values var fromValue = fromInputElm.value.trim() === "" ? "min" : fromInputElm.value.trim(); var toValue = toInputElm.value.trim() === "" ? "max" : toInputElm.value.trim();
// Refinement value if (ctx.ListData[0].filterTokenType === "decimal") { fromValue = fromValue === "min" ? fromValue : 'decimal(' + fromValue + ')'; toValue = toValue === "max" ? toValue : 'decimal(' + toValue + ')'; } // Create the refinement JSON value string var refinement = '{"'+ ctx.RefinementControl.propertyName +'":["range('+fromValue+','+toValue+')"]}'; $getClientControl(this).updateRefinersJSON(refinement); } };
// Create a onclick event to remove the refinement clearLinkElm.onclick = function () { // NULL Refinement value to remove the refinement var refinement = '{"'+ ctx.RefinementControl.propertyName +'":null}'; $getClientControl(this).updateRefinersJSON(refinement); };});Showing the Refiner Values in the Input Fields
The last step is to show the used refiner values in the input fields after you refined the results. Right now when you do a refinement, the input fields will get cleared.
To add this kind of functionality, we’ll have to retrieve these values from the current refinement category that is in place. This can be done the same way as explained in the previous post (multi-value search refiner control).
// Set input form valuesvar from = "";var to = "";var currentRefinementCategory = ctx.ClientControl.getCurrentRefinementCategory(ctx.RefinementControl.propertyName);// Check if the current control refinement is in useif(!Srch.U.n(currentRefinementCategory) && currentRefinementCategory.get_tokenCount() == 1) { // Parse the current filter token to find the current range condition var matchResults = Srch.U.parseTypedRangeToken(currentRefinementCategory.t[0], null); // check for a range token match with corresponding min and max if (matchResults != null && matchResults.length > 2) { var from = matchResults[1] === "min" ? "" : matchResults[1]; var to = matchResults[2] === "max" ? "" : matchResults[2]; }}This code needs to be added just before the HTML mark-up. The refinement values (start and end) that it retrieves will be stored in the from and to variables, and can be used for the input field values by adding a value attribute to the fields.
<label for='_#= fromInput =#_'>From</label><input type='text' id='_#= fromInput =#_' name='from' value='_#= from =#_' /><label for='_#= toInput =#_'>To</label><input type='text' id='_#= toInput =#_' name='to' value='_#= to =#_' />Result
The end result looks like this:
Download
This is the complete Range Search Refiner Control Template: Range Search Refiner Control
Blog posts in this series:
- Part 1: Create your first search refiner control template
- Part 2: Adding Refinement Actions to the Custom Search Refiner Control
- Part 3: Working with File Types in the Search Refiner Control Template
- Part 4: Create a dropdown refiner control
- Part 5: The Search Refiner Control Methods Explained
- Part 6: Create a Multi-Value Search Refiner Control
- Part 7: Working with Ranges in the Search Refiner Control
Related articles
Part 2: Adding Refinement Actions to the Custom Search Refiner Control
Part 3: Working with File Types in the Search Refiner Control Template
Part 4: Create a Dropdown Search Refiner Control
Report issues or make changes on GitHub
Found a typo or issue in this article? Visit the GitHub repository to make changes or submit a bug report.
Comments

Let's build together
Manage content in VS Code
Present from VS Code
Engage with your audience throughout the event lifecycle