Getting up to speed with webpack
This post is over a year old, some of this information may be out of date.

After the introduction of Node.js, npm, Gulp and Yeoman. It is time to spend some time on another tool called webpack. Webpack is a module bundler and is one of the tools which is used in the building process of a SharePoint Framework client-side web part.
In this article I will tell you more about webpack, what does it do for the SharePoint Framework and how you can use it for your own projects.
What is a module bundler?
As a SharePoint Dev. we or the most of us have included/injected JavaScript files in SharePoint to do various things. Most of the time these files had none or a few dependencies. This made it easy to maintain (if you knew what you were doing of course).
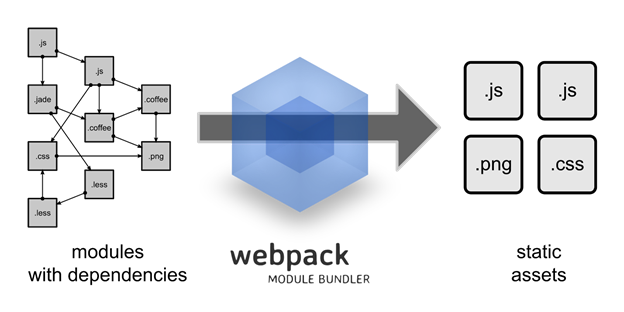
Nowadays when you start building applications with JavaScript or TypeScript and want to work in a structured way. You quickly end up with a lot of files and dependencies. Of course, you do not want to include all these files to your page, as this would result in a lot of HTTP requests. This is where a module bundler comes into play.
A module bundler like webpack can group files and “glue” them together in a bundled file by taking the dependencies into account. The outcome of using webpack would be to end up with a single file or a couple of bundled files. This results in fewer HTTP requests.
How webpack is used in the SharePoint Framework
When you open a SharePoint Framework project, you see the following files:
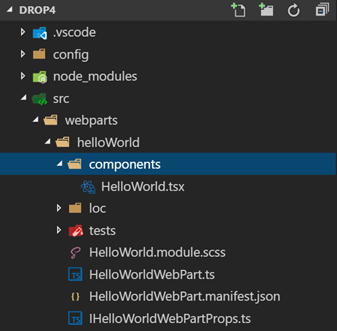
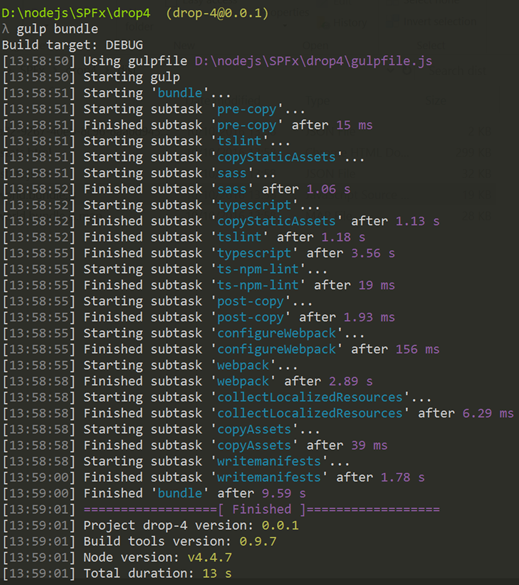
The default structure for a client-side React web part is clear. At the top of every file, you can see its dependencies. When you run the $ gulp bundle command, it kicks off the bundling process:
Info: you can also run $ gulp bundle —ship but this will also minify the JavaScript file.
Once the bundling process is completed, you end up with the following output (in the dist folder):
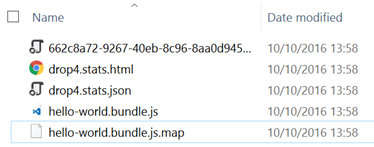
Only the JavaScript and map file are important for running your client-side web part. The other files are statistics of your generated bundle.
If you open the JavaScript file, you will see that are your file contents have been added to that one bundle file (even the CSS).
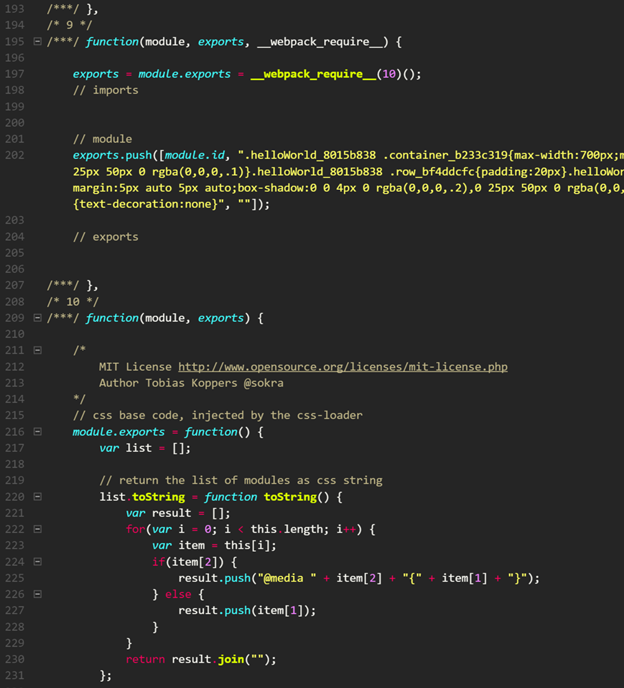
So as you can see, the advantage of using webpack in the SharePoint Framework is that only one bundled file is required (and a couple of external files like React, Office UI Fabric, etc.). Webpack has more to offer than bundling, it can also do things like asset hashing, file loaders, plugins and more.
Using webpack in your own applications
Of course, webpack is not limited to being used only within the SharePoint Framework, it can be used in any of your client-side dev applications.
Simple sample
Start by installing webpack. You can do this either globally or locally in the project. If you want to test it out from the command prompt, I would be recommended to install it globally:
$ npm install -g webpackFor installing it locally to the project, you have to do it like this:
$ npm install webpack --save-devInfo: notice the —save-dev flag which defines that it only needs webpack as a developer dependency.
Create a new file called app.js and add the following content:
var testing = require('./app');testing();Create a new file called index.js and add the following content:
var testing = function () { console.log("Webpack: Hi, how are you?");};
module.exports = testing;This is just a simple example in which you load a dependency and execute the function from within that file. Once you have these files in place and have installed webpack globally you could run the following command:
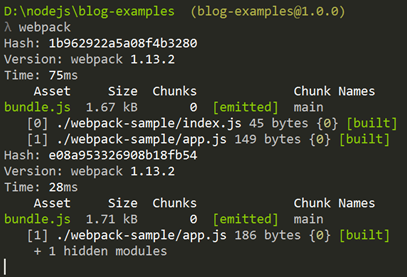
$ webpack index.js bundle.js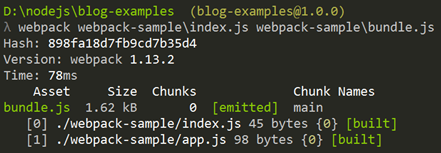
As you can see in the above screenshot, it will bundle the two files (index and app) together into one bundled file. To show you that the bundle file works, you can run:
$ node bundle.js
Using a webpack configuration file
Webpack can also make use of a configuration file to simplify the process. In the configuration file, you specify various things like the entry file, bundle file name, which loaders have to be used (will be explained in the next section), plugins, and more.
Start by creating a webpack.config.js file in your project with the following contents:
const path = require('path');
module.exports = { entry: "./webpack-sample/index.js", output: { path: path.join(__dirname, "webpack-sample"), filename: "bundle.js" }, module: {}};Once the configuration file is in place, you only have to run the following command:
$ webpack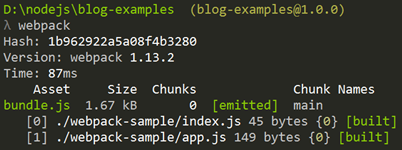
To make sure everything is still working, run:
$ node bundle.js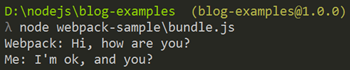
The current configuration requires that you manually run the webpack command to generate a bundle update. Of course, this process can be automated. You do this by adding the watch property to the configuration file:
const path = require('path');
module.exports = { entry: "./webpack-sample/index.js", output: { path: path.join(__dirname, "webpack-sample"), filename: "bundle.js" }, module: {} watch: true};When you run the webpack command once again. You will see that it now waits for file changes:
Introducing loaders
As I already showed in the SharePoint Framework output. You can also add CSS files into your bundle. By default, webpack only allows you to bundle JavaScript files. To be able to bundle other file types like CSS, you need to specify a loader.
A loader is a module for webpack that defines how webpack can bundle a specific type of file into the bundle.
As an example we will add a style.css file to the project folder with the following contents:
.someclass { background-color: darkblue; }.someclass p { color: white; }.anotherclass { padding: 50px; }In the index.js, add the require statement for including your style.css file like this:
var testing = require('./app');
require('./style.css');
testing();To show you that webpack is not able to bundle this, run:
$ webpack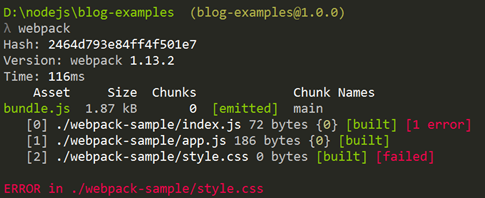
Right now we have to install the style and CSS loader in order to use them in webpack. Run the following command to install it into your project:
$ npm install style-loader css-loader --save-devInfo: there are a lot of loaders to bundle other assets like JSON, TypeScript files, React files, … Here is a full list of loaders: https://webpack.github.io/docs/list-of-loaders.html
Once installed, replace the module property in the configuration file, with the following code:
const path = require('path');
module.exports = { entry: "./webpack-sample/index.js", output: { path: path.join(__dirname, "webpack-sample"), filename: "bundle.js" }, module: { loaders: [ { test: /\.css$/, loader: "style!css" } ] }, watch: false};Info: test is a regular expression for specifying the type of files. In the loader you specify the loader to use for bundling the file. In this example we need the style and CSS loaders.
Run webpack again.

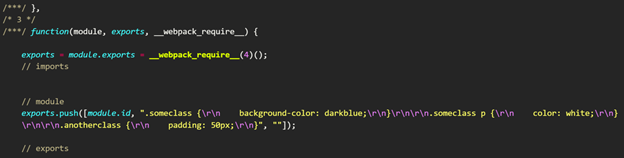
Open the bundle file and you will see that it now contains the CSS:
Using plugins
Oh, yes there are plugins. Plugins allow you to add functionality to the bundling process like creating the statistics, cleaning build folder before bundling, uglify / minify the bundle.
Info: here you can find a list of available plugins: https://webpack.github.io/docs/list-of-plugins.html.
As an example, we will test the UglifyJsPlugin plugin which minimizes the outputted bundle file.
Add the following line at the top of your webpack.config.js file:
const webpack = require('webpack');Info: make sure that webpack is installed as a developer dependency to be able to use it.
In configuration, add a new plugins property:
const path = require('path');const webpack = require('webpack');
module.exports = { entry: "./webpack-sample/index.js", output: { path: path.join(__dirname, "webpack-sample"), filename: "bundle.js" }, module: { loaders: [ { test: /\.css$/, loader: "style!css" } ] }, plugins: [ new webpack.optimize.UglifyJsPlugin({ compress: { warnings: false } }) ], watch: false};Once this is included, run webpack once again and you will see that the outputted bundle file is now minimized.
Ready to ship?
Are you ready do ship your application to production? All you have to do is run the following command:
$ webpack -pThis will bundle your project and minify the bundle file, this is similar to using the UglifyJsPlugin.
What is next?
Webpack can do and be used for many things. This was just a start to show you why webpack is being used in the SharePoint Framework and how you can leverage it. If you want, you can also run webpack from a gulp task in order to combine it with other tasks you might have defined: https://webpack.github.io/docs/usage-with-gulp.html
If you want to dig deeper, check out the following sites:
- Webpack: http://webpack.github.io
- Webpack documentation: http://webpack.github.io/docs/
- Webpack dev server: https://webpack.github.io/docs/webpack-dev-server.html > this starts a development server on your machine and automatically re-bundles, refreshes when you make changes to your files.
Getting up to speed series
The files used for this article can be found here: getting up to speed series on GitHub.
Other articles in this series:
- Getting up to speed with Node.js and npm
- Getting up to speed with Gulp
- Getting up to speed with Yeoman aka “yo”
- Getting up to speed with webpack
Related articles
Report issues or make changes on GitHub
Found a typo or issue in this article? Visit the GitHub repository to make changes or submit a bug report.
Comments

Let's build together
Manage content in VS Code
Present from VS Code
Engage with your audience throughout the event lifecycle