Creating a Sandboxed Visual Web Part from the To-do List
This post is over a year old, some of this information may be out of date.
In my previous blog post I showed you how to create a to-do list with ECMAscript, the only problem is that you need to append the HTML and JavaScript code to a Content Editor Web Part. This isn’t very flexible and therefore I made this blog post.
The purpose of this post is to show you how to add this code to a Sandboxed Visual Web Part. I choose a sandboxed solution, because of the advantage that you do not need to deploy it on the server. You can just add the solution to a site collection of your choice.
Before starting
There are some prerequisite:
- Install the SharePoint Power Tools for Visual Studio 2010: link;
- You will need this to be able to create sandboxed visual web parts;
- Visual Studio SP1: link;
- The SP beta repairs a bug with User Control’s. If you do not have this SP installed you are limited to around the 8000 characters inside a User Control. More info can be found here.
Creating a sandboxed solutions
Create an empty project
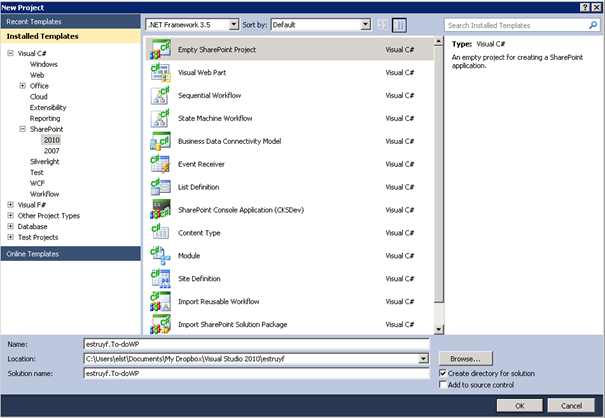
Open Visual Studio 2010 and start by creating a “Empty SharePoint Project”.
In the next window enter your SharePoint Site URL and check if the option “Deploy as a sandboxed solution” is checked.

Add a Sandboxed Visual Web Part to the project
If you installed the SharePoint Power Tools, you are now able to add a sandboxed visual web part to your project.
Right click on your project name and choose: “Add” —> “New Item…”.
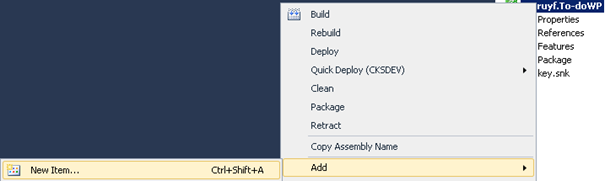
In the “Add New Item” window select “Visual Web Part (Sandboxed)” and add this to your project.

Add the HTML and JavaScript to the User Control
Now that you have created the visual web part it is time to add the HTML and JavaScript code from the to-do list blog post to the User Control.
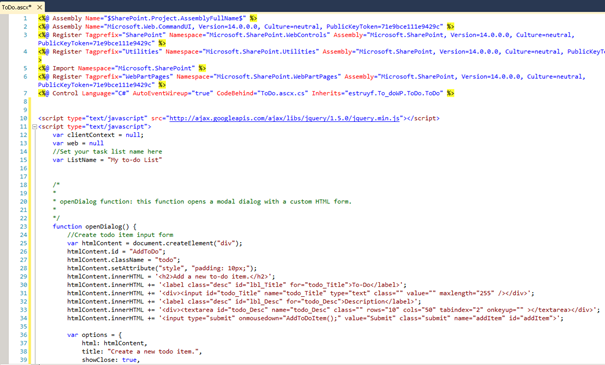
If you do not have the Visual Studio SP1 Beta installed, the User Control’s designer file (.ascx.g.cs) gets removed because of a bug in VS 2010 with User Control’s.
What do you have until now?
When you deploy the web part, it will look like this:
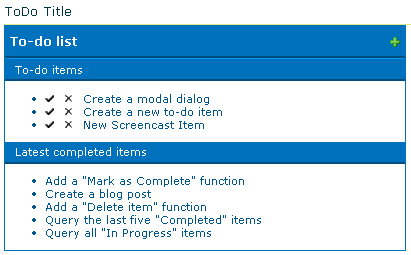
Right now you have a working to-do list, but you cannot choose which task list you want to use. In the next section I will show you how to create a custom tool part, so you can set the preferred task list.
Coding
Create a custom toolpart
Creating a custom toolpart for the Sandboxed Visual Web Part is not the same as creating it for a standard Visual Web Part.
A standard web part inherits from “Microsoft.SharePoint.WebPartPages.WebPart”.
The Sandboxed Visual Web Part inherits from “System.Web.UI.WebControls.WebParts.WebPart”, this means that the web part is handled like a ASP.NET Web Part. You can find more information about creating a custom toolpart (or EditorPart) here and here.
The code that you need to add to the code behind file looks like this:
#region Custom ASP.NET web part propertypublic override object WebBrowsableObject{ get { return this; }}
//Task list name stringprivate String _taskList = null;
[Personalizable(), WebBrowsable()]public String taskList{ get { return _taskList; } set { _taskList = value; }}
//Create an editor part to set the custom task listpublic override EditorPartCollection CreateEditorParts(){ ArrayList editorArray = new ArrayList(); CustomProperty edPart = new CustomProperty(); edPart.ID = this.ID + "_editorPart1"; editorArray.Add(edPart); EditorPartCollection editorParts = new EditorPartCollection(editorArray); return editorParts;}
//Create a custom EditorPart to edit the WebPart control.private class CustomProperty : EditorPart{ TextBox _tbTaskList;
public CustomProperty() { Title = "To-do list settings"; }
public override bool ApplyChanges() { SandboxedTodo part = (SandboxedTodo)WebPartToEdit; //Update the custom WebPart control with the task list part.taskList = tbTaskList.Text;
return true; }
public override void SyncChanges() { SandboxedTodo part = (SandboxedTodo)WebPartToEdit; String currentList = part.taskList; }
protected override void CreateChildControls() { Controls.Clear();
//Add a new textbox control to set the task list _tbTaskList = new TextBox();
Controls.Add(_tbTaskList);
}
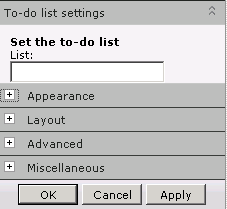
protected override void RenderContents(HtmlTextWriter writer) { writer.Write("**Set the to-do list**"); writer.WriteBreak(); writer.Write("List:"); writer.WriteBreak(); _tbTaskList.RenderControl(writer); writer.WriteBreak(); }
//Return the task list name from the textbox private TextBox tbTaskList { get { EnsureChildControls(); return _tbTaskList; } }}#endregionWhen you deploy this solution, the web part will contain a new toolpart section.
The last step is to make use of the inserted value by the JavaScript.
Making use of the toolpart setting in JavaScript
The easiest method is to use the ASP.NET binding expression ”<%= %>”. The only thing that needs to be changed is list name variable in JavaScript and that needs to be set to:
var ListName = '<%=taskList%>';This will work perfectly, but if you do not want to retrieve an error message when you haven’t inserted a list name value. You need to write the following if statement.
if (ListName != null && ListName != "") { ExecuteOrDelayUntilScriptLoaded(Initialize, "sp.js");}Files
Here is my Visual Studio Project. VS 2010 Project
If you only want the Sandboxed solution file you can download it here. Solution
Changes
Link Update: 27/04/2011
I have updated the Visual Studio SP1 Beta URL to that from the Visual Studio SP1 url.
Related articles
Sandboxed To-Do List Web Part on Office 365 – SharePoint Online
Task Status Manager With ECMAscript and jQuery UI
Creating a To-do List with ECMAscript
Report issues or make changes on GitHub
Found a typo or issue in this article? Visit the GitHub repository to make changes or submit a bug report.
Comments

Let's build together
Manage content in VS Code
Present from VS Code
Engage with your audience throughout the event lifecycle