Creating a To-do List with ECMAscript
This post is over a year old, some of this information may be out of date.
In one of my previous post I created a task manager with ECMAscript. In this post I will go a step further and create a to-do list. This to-do list that enables you to add new items, delete items and mark them as completed.
Things you need
The only thing that you need for creating this to-do list is a standard SharePoint task list. So you can uses an existing one or create a new one.
The code can be added on a new page or inside of a “Content Editor” web part. The choice is yours.
HTML & CSS Markup
First of all we need some markup to work with.
HTML
<div id="todo_list"> <div class="todo_header"> <h3>To-do list</h3> <a href="#" onclick="javascript:openDialog(); return false;" title="Add to-do item"><img src="/_layouts/images/advadd.png" alt="Add to-do Item"/></a> </div> <div id="todo_items"> <div class="todo_header"> <span>To-do items</span> </div> <ul> </ul> </div> <div id="todo_completed"> <div class="todo_header"> <span>Latest completed items</span> </div> <ul> </ul> </div></div>CSS
#todo_list { border: 1px solid #0072BB; width: 400px;}#todo_list a img { border: 0;}#todo_list h3 { color: #fff; height: 30px; line-height: 30px; margin: 0; padding: 0; width: 100%;}.todo_header { background: #0072BB; border-bottom: 2px solid #004F7F; padding: 0 5px; position: relative;}.todo_header a { position: absolute; right: 5px; top: 10px;}
#todo_items .todo_header { border-top: 1px solid #0094EF; }
#todo_items .todo_header, #todo_completed .todo_header { padding: 0 10px; }#todo_items span, #todo_completed span { color: #fff; height: 20px; line-height: 20px;}
#todo_items ul li a { margin-right: 10px; }#todo_items ul li a img { height: 9px; }Opening a modal dialog with custom HTML code
Opening a modal dialog in SharePoint is very easy. You can specify if you want to let it open a remote page or a specific HTML element.
I have already placed an anchor tag in the HTML markup that when clicked, calls the “openDialog” function. The “openDialog()” function would look like this:
function openDialog() { //Create todo item input form var htmlContent = document.createElement("div"); htmlContent.id = "AddToDo"; htmlContent.className = "todo"; htmlContent.setAttribute("style", "padding: 10px;"); htmlContent.innerHTML = '<h2>Add a new to-do item.</h2>'; htmlContent.innerHTML += '<label class="desc" id="lbl_Title" for="todo_Title">To-Do</label>'; htmlContent.innerHTML += '<div><input id="todo_Title" name="todo_Title" type="text" class="" value="" maxlength="255" /></div>'; htmlContent.innerHTML += '<label class="desc" id="lbl_Desc" for="todo_Desc">Description</label>'; htmlContent.innerHTML += '<div><textarea id="todo_Desc" name="todo_Desc" class="" rows="10" cols="50" tabindex="2" onkeyup="" ></textarea></div>'; htmlContent.innerHTML += '<input type="submit" onmousedown="AddToDoItem();" value="Submit" class="submit" name="addItem" id="addItem">';
var options = { html: htmlContent, title: "Create a new todo item.", showClose: true, allowMaximize: false, autoSize: true, dialogReturnValueCallback: DialogCallback }; //Open dialog window dlg = SP.UI.ModalDialog.showModalDialog(options);}I have chosen to create my own HTML object in this example, but you can also open the “New Form” page (~site/lists/<Task List>/NewForm.aspx) from the task list by specifying the “url” option.
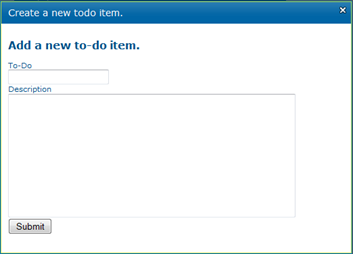
The result of this function is:
Creating a to-do item from the modal dialog
In the previous section you have created a function that opens a modal dialog with a custom HTML form. Currently the nothing will happen when the “Submit” button is clicked, so we need to implement some functionality to it.
When the submit button gets clicked, the unimplemented “AddToDoItem” function is called. The function looks like this:
function AddToDoItem() { // Retrieve the input values var itemTitle = $("#todo_Title").val(); var itemDesc = $("#todo_Desc").val(); // Check if the title field is filled in if(itemTitle.length > 0) { //Get the current SP context clientContext = new SP.ClientContext.get_current(); web = clientContext.get_web();
var list = web.get_lists().getByTitle(ListName);
var itemCreateInfo = new SP.ListItemCreationInformation(); this.listItem = list.addItem(itemCreateInfo);
//Item Title listItem.set_item('Title', itemTitle); //Item Description listItem.set_item('Body', itemDesc); //Set Status to In Progress listItem.set_item('Status', 'In Progress');
listItem.update();
clientContext.load(listItem); clientContext.executeQueryAsync(Function.createDelegate(this, this.onQuerySucceeded), Function.createDelegate(this, this.onQueryFailed)); } else { alert("Fill in the title field"); }}Items that are added to the task list will get the “In Progress” status. You can change this by whatever status you want it to be.
When the item is successfully added, the “onQuerySucceeded” function is called. This function will close the modal dialog and set the returned value to “To-do Item Created”.
function onQuerySucceeded() { SP.UI.ModalDialog.commonModalDialogClose(SP.UI.DialogResult.OK,'To-do Item Created');}When the items insertion failed, the “onQueryFailed” function will be called. This will also close the modal dialog and returns the error message.
function onQueryFailed(sender, args) { SP.UI.ModalDialog.commonModalDialogClose(SP.UI.DialogResult.cancel, 'To-do Item Creation Failed: ' + args.get_message());}To handle the result messages we can uses the modal dialog “dialogReturnValueCallback” option. The code looks like this:
function DialogCallback(result, returnedMessage) { // Check if the message length is larger than zero if(returnedMessage.length > 0 && returnedMessage != null) { //Show notification message SP.UI.Notify.addNotification(returnedMessage, false); Initialize(); }}When the item is added, it will close the modal dialog and that will create a callback to the “DialogCallBack” function. The “returnedMessage” variable can be used to display a message in the notification box from SharePoint.

Fill the HTML lists
Currently you are only able to add new items to the to-do list, but still there aren’t any items displayed in the HTML lists. We need to create a new function that will be utilized when the page is loaded.
First a call to the “ExecuteOrDelayUntilScriptLoaded” function needs to be created.
ExecuteOrDelayUntilScriptLoaded(Initialize, "sp.js");The JavaScript function “Initialize” inside the “ExecuteOrDelayUntilScriptLoaded” function is delayed until the SharePoint “sp.js” file is loaded.
The “Initialize” function looks like this:
function Initialize() { //Get the current SP context clientContext = new SP.ClientContext.get_current(); web = clientContext.get_web(); //Set the correct list var list = web.get_lists().getByTitle(ListName);
//Add the "In Progress" items to the list var camlQuery = new SP.CamlQuery(); //Retrieve only the items where the "Status" is equal to "In Progress" var q = "<View><Query><Where><Eq><FieldRef Name='Status' /><Value Type='Choice'>In Progress</Value></Eq></Where></Query></View>"; camlQuery.set_viewXml(q); this.listItems = list.getItems(camlQuery); //Only retrieve the "ID", "Title" fields. clientContext.load(listItems, 'Include(ID, Title)');
//Add the latest "Completed" items to the list var camlCompleteQuery = new SP.CamlQuery(); //Retrieve only the items where the "Status" is equal to "Completed" and show only the top 5 var q = "<View><Query><Where><Eq><FieldRef Name='Status' /><Value Type='Choice'>Completed</Value></Eq></Where><OrderBy><FieldRef Name='Modified' Ascending='False' /></OrderBy></Query><RowLimit>5</RowLimit></View>"; camlCompleteQuery.set_viewXml(q); this.listCompleteItems = list.getItems(camlCompleteQuery); //Only retrieve the "ID", "Title" fields. clientContext.load(listCompleteItems, 'Include(ID, Title)'); //Execute the listitem query clientContext.executeQueryAsync(Function.createDelegate(this, this.onListItemsLoadSuccess), Function.createDelegate(this, this.onListItemsLoadFailed));}Inside this function two query calls are created to the task list. One call to retrieve all the “In Progress” items and the other to retrieve the last five completed to-do items.
The “onListItemsLoadSuccess” will add the returned list items to the correct HTML lists. The looks like this:
function onListItemsLoadSuccess(sender, args) { //Add the "In Progress" list items //Remove current list items $('#todo_items ul li').remove(); var listEnumerator = this.listItems.getEnumerator(); //Iterate though all of the items while (listEnumerator.moveNext()) { //Retrieve the current list item var oListItem = listEnumerator.get_current(); //Add the items to the list var itemHtml = "<li ref='" + oListItem.get_item('ID') + "'>"; itemHtml += "<a href='#' title='Mark as completed' onClick='javascript:MarkAsComplete(" + oListItem.get_item('ID') + "); return false;'><img src='/_layouts/images/CHECK.GIF' /></a>"; itemHtml += "<a href='#' title='Delete to-do item' onClick='javascript:DeleteItem(" + oListItem.get_item('ID') + "); return false;'><img src='/_layouts/images/delete.GIF' /></a>"; itemHtml += oListItem.get_item('Title') + "</li>"; $("#todo_items ul").append(itemHtml); }
//Add the "Completed" list items //Remove current list items $('#todo_completed ul li').remove(); listEnumerator = this.listCompleteItems.getEnumerator(); //Iterate though all of the items while (listEnumerator.moveNext()) { //Retrieve the current list item var oListItem = listEnumerator.get_current(); //Add the items to the list $("#todo_completed ul").append("<li ref='" + oListItem.get_item('ID') + "'>" + oListItem.get_item('Title') + "</li>"); }}The “onListItemsLoadFailed” function will show a message in the SharePoint notification box.
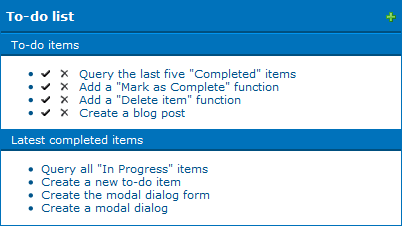
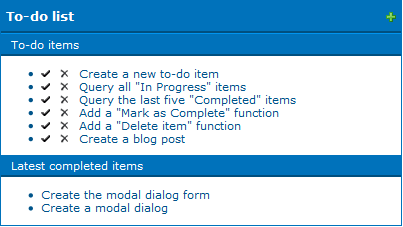
function onListItemsLoadFailed(sender, args) { SP.UI.Notify.addNotification("List items load failed: " + args.get_message(), false);}The result looks like this:
Mark the items as completed
The next function that needs to be created is the “MarkAsComplete” function. This function retrieves the item and updates its status to “Completed”.
function MarkAsComplete(itemID) { clientContext = new SP.ClientContext.get_current(); web = clientContext.get_web(); var list = web.get_lists().getByTitle(ListName);
this.listItem = list.getItemById(itemID);
//Set the new status listItem.set_item('Status', 'Completed');
listItem.update(); clientContext.load(listItem); //Execute the query clientContext.executeQueryAsync(Function.createDelegate(this, this.onUpdateSucceeded), Function.createDelegate(this, this.onUpdateFailed));}When the update succeeded the “onUpdateSucceeded” function is called. It will add a notification message and recall the “Initialize” function to update the HTML lists.
function onUpdateSucceeded() { SP.UI.Notify.addNotification("To-do Item Updated", false); Initialize();}The “onUpdateFailed” function shows a notification message.
function onUpdateFailed() { SP.UI.Notify.addNotification("To-do Item Updated Failed: " + args.get_message(), false);}Delete an item from the list
The last function that needs to be created is the “DeleteItem” function. The delete item function retrieves the current item and deletes it from the task list. The delegate functions that are being used are the same as from the “MarkAsComplete” function.
function DeleteItem(itemID) { clientContext = new SP.ClientContext.get_current(); web = clientContext.get_web(); var list = web.get_lists().getByTitle(ListName);
this.listItem = list.getItemById(itemID); listItem.deleteObject();
clientContext.executeQueryAsync(Function.createDelegate(this, this.onUpdateSucceeded), Function.createDelegate(this, this.onUpdateFailed));}Download
Related articles
Task Status Manager With ECMAscript and jQuery UI
Creating a Sandboxed Visual Web Part from the To-do List
Sandboxed To-Do List Web Part on Office 365 – SharePoint Online
Report issues or make changes on GitHub
Found a typo or issue in this article? Visit the GitHub repository to make changes or submit a bug report.
Comments

Let's build together
Manage content in VS Code
Present from VS Code
Engage with your audience throughout the event lifecycle