Getting up to speed with Gulp
This post is over a year old, some of this information may be out of date.
This is the next article of my getting up to speed series. This article is completely devoted to Gulp. In the previous article I explained Node.js and NPM, but I also mentioned Gulp a couple of time. As you get in this world of JavaScript focussed development, you will see that Gulp (or Grunt - depending on the developers’ preference) often used for various kind of things.

So what is Gulp exactly?
Gulp: Automate and enhance your workflow
As the official Gulp website states, Gulp is a tool to automate and enhance your workflow and is achieved via tasks. You can think of it as a JavaScript task runner. These tasks can be or do various kind of things. For example:
- Transpiling TypeScript to JavaScript
- Starting a web server (like you did in the previous article)
- Building a production package of your design files
- Running a watch on files to do something when the files have been changed
- Uploading files to SharePoint > in the Yeoman display templates generator Gulp tasks are used to upload files, set metadata to the files, and more.
The list can go on and on. When you go to https://www.npmjs.com/ and do a search for “gulp-”. You will see that there are a lot of plugins already available for Gulp. These plugins can save you some precious time when creation your own tasks. So when you are going to build your own tasks, it is always a good thing to check if something similar might exist.
Installing Gulp
Important: To install Gulp, you have to be sure that Node.js and npm are installed.
The first thing you need to do is globally install Gulp. The reason why Gulp needs to be globally installed is that it becomes available to be used as a command line utility.
Execute the following code to install Gulp:
$ npm install -g gulp-cliInfo: The -g flag is used to tell npm it needs to install Gulp globally. You can also use —global instead of -g.
After the command ran, you can try out the following command to check which version of Gulp is installed on your machine:
$ gulp -v
When Gulp is installed, you still have some work to do. Running Gulp without any parameters results in the following output:

When you executed the gulp command without parameters, you will see that it tells you that it did not find a local installation in the current project. When you want to run gulp tasks it will use the local instance to execute the tasks that you created.
Info 1: The same steps can be found on the getting started page of Gulp.
Info 2: There are cases in which you do not the global install, like if you running it via npm scripts and configure the scripts to run in the package.json file.
Creating your first Gulp task
Once you globally installed Gulp, you will also have to locally install it in your project. To install a local version, you have to run:
$ npm install gulpBut a better way would be to install it as a development or devDependencies to your project:
$ npm install gulp --save-devImportant: You will need to have a package.json inside your project. To quickly create this, you can execute npm init and answer the questions. More information can be found in the previous post: getting up to speed with Node.js and npm.
Once this is done, try running gulp again. You will get the following output:

Now Gulp tells you that it did not find a gulpfile. In the gulpfile you define all your development tasks. So the next step is to create such a file in your project root folder:
- Create a new file called gulpfile.js in your project folder;
- Open the file in the editor of your choice;
- Add the following code to the file:
'use strict';
// The script requires gulp to be loadedlet gulp = require('gulp');
// Define the "default" task > run it via: $ gulpgulp.task('default', () => { console.log('Hello, from your first gulp task.');});The code itself does not do anything special, right now it outputs the following text to the console: “Hello, from your first gulp task.”. You can try it yourself via executing gulp again in your console:
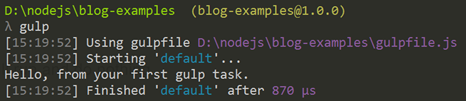
As you can see, you even get statistics about the task that started and when it ended.
Important: For the default task you do not require to specify the task name when running the gulp command. For other tasks, you will have to specify the name of the task in order to execute the right one.
Create a task to transpile TypeScript to JavaScript
That was a simple example of a Gulp task. Let’s create another one which is going to transpile TypeScript to JavaScript.
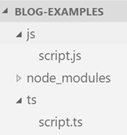
- Create a new TS folder;
- Create a file called script.ts in the TS folder;
- Add the following contents to the script.ts file:
class Greeter { greeting: string; constructor(message: string) { this.greeting = message; } greet() { return "Hello, " + this.greeting; }}
let greeter = new Greeter("world");
let button = document.createElement('button');button.textContent = "Say Hello";button.onclick = function() { alert(greeter.greet());}
document.body.appendChild(button);Info: this is a sample from the TypeScript site: https://www.typescriptlang.org/
To be able to transpile TypeScript to JavaScript, you can make use of a Gulp plugin called: gulp-typescript. Plugins for Gulp can be installed via npm as follows:
$ npm install gulp-typescript --save-dev- Once the TypeScript plugin is installed, open the gulpfile.js in your editor;
- Load the gulp-typescript plugin in the gulpfile with the following line:
let ts = require('gulp-typescript');- Add the transpile task to the gulpfile:
// This is the "transpile" task which transpiles all TypeScript files to JavaScriptgulp.task('transpile', () => { return gulp.src('ts/*.ts') .pipe(ts()) .pipe(gulp.dest('js'));});You can see a couple of new function being used in this code: gulp.src(), gulp.pipe(), gulp.dest().
gulp.src()
With the src() function you are able to load file(s). You can either specify an absolute path to a file or use wildcards to target all TypeScript files in a folder like in the transpile task example: “ts/*.ts”.
gulp.pipe()
The stream of data which is loaded via the src() function and will be processed through pipes. In pipe you specify what you want to do with your stream of data.
In this task, we specified to pass the stream to the ts function or gulp-typescript plugin. This will eventually convert TypeScript to JavaScript, but it will not instantly output the files to a folder. Instead, the new stream of data is kept in memory and will be passed to the next pipe. Which in this case is passed to the gulp.dest() function.
gulp.dest()
With the dest() function, you specify where the passed data stream needs to be stored. In this example, the data stream that the gulp-typescript plugin returns will be stored in the JS folder.
Running your task
You can run your task with the following command:
$ gulp transpile
Now if you go and check in your project folder there should be a new JS folder with a script.js file in it.
Watching files
The previous task is something you can make use of in your development process. At the moment you will have to run the “gulp transpile” command every time after you did a change to one of your TypeScript files. As Gulp is all about automation, you can speed up this process by making use of the gulp.watch() function.
gulp.watch()
Once you run the watch() function, it will watch for changes made to your files. The great thing about it is that you can define what needs to happen when changes are being made to your files.
The best way to show you this is via a new task:
// This is the "watch" task, every time you change the TS file, it will call the "transpile" taskgulp.task('watch', () => { gulp.watch('ts/*.ts', ['transpile']);});With the following command you can start the watch task:
$ gulp watch
Notice that the execution does not really ends. Instead it is in a watch state and waits for you to do file changes. So try to do a file change to the TypeScript file and notice what happens:
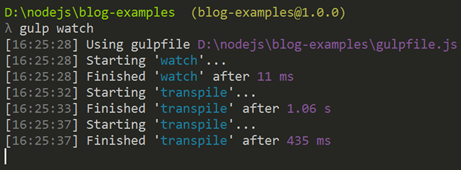
In this example I did two file changes (saved the file two times). The Gulp task automatically picks up the change and starts the “transpile” task.
Important: use ctrl+c to stop the watch task.
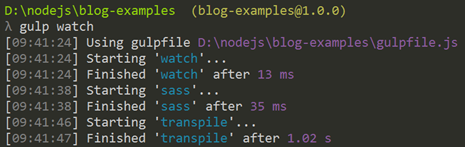
You can even specify multiple tasks in the watch:
How Gulp is used in the Yeoman display templates generator
You are not always going to create your own gulp tasks. When you download a project, the developer has probably created its own tasks of which you can make use. An example for this would be the Gulp tasks that I created for display templates generator: display templates gulpfile.js.
In that display templates Gulp file, you can see various tasks:
- Default
- Set-metadata
- Publish
- Watch
- Download
Default task
The default task looks like this:
gulp.task('default', function() { return gulp.src(folder).pipe( sp.sync(settings.get()) );});First, the task retrieves all the files from the specified folder and passes the stream of data to the pipe. In the pipe the gulp-spsync-creds plugin is used to upload the file stream to your SharePoint site.
Info: no dest function is defined because it does not have to write any files.
Watch task
The code of the watch task looks like this:
gulp.task("watch", function() { var crntSettings = settings.get(); crntSettings["cache"] = true;
gulp.watch(folder, function (event) { gulp.src(event.path, { base: mainFld }) .pipe(plumber({ errorHandler: onError })) .pipe(sp.sync(crntSettings)); });});This watch task is special. Instead of specifying a task name a function is defined. The reason is that we only need to upload the file that has been changed. As you can see in the src the path of the event is retrieved (this is the path to the file that got changed). Only that file will be passed to the gulp-spsync-creds plugin to get uploaded.
Info: if you would specify gulp.watch(folder, [‘default’]); This would also work, but will upload all the files from the specified folder to SharePoint.
There is more you can do with Gulp
You can do a lot with Gulp. Here are a couple of useful resources that can help you achieve more:
- Task dependencies: if you have various tasks in your gulp files and they need to run synchronously, you can specify dependencies and the order how they have to get executed: https://github.com/gulpjs/gulp/blob/master/docs/recipes/running-tasks-in-series.md
- Official Gulp getting started: https://github.com/gulpjs/gulp/blob/master/docs/getting-started.md
- Gulp documentation: http://gulpjs.org/
- Useful articles: https://github.com/gulpjs/gulp/blob/master/docs/README.md#articles
Getting up to speed series
The files used for this article can be found here: getting up to speed series on GitHub.
Other articles in this series:
- Getting up to speed with Node.js and npm
- Getting up to speed with Gulp
- Getting up to speed with Yeoman aka “yo”
- Getting up to speed with webpack
Related articles
Report issues or make changes on GitHub
Found a typo or issue in this article? Visit the GitHub repository to make changes or submit a bug report.
Comments

Let's build together
Manage content in VS Code
Present from VS Code
Engage with your audience throughout the event lifecycle