Writing unit tests for your SharePoint Framework components
This post is over a year old, some of this information may be out of date.
Last week I published a sample project on GitHub which shows how you can test your SharePoint Framework components with some predefined unit tests.
Info: here is a link to the repo - https://github.com/estruyf/spfx-testing-wp
The current sample is created with React. The unit tests are created only to test the actual component instead of the main web part.
Info: At this moment, there is a dependency issue when you try to create unit tests for the actual web part. Read more about this here: https://github.com/SharePoint/sp-dev-docs/issues/526
Now, when you are working with React and components, it actually makes more sense to do intensive testing of the components itself. This gives you much more control over the component tests and the outcomes you want to test. For example, you can change the state, trigger function calls, faking click events and more. Of course, once the dependency issue is gets fixed, you can also write some tests for the actual web part.
If you want to write some test yourself, you will have to go through a couple of steps which will be explained in this article.
First some configuration
When you created a new SPFx project, you automatically get a tests folder in the web part folder.
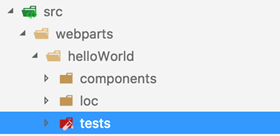
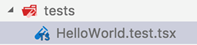
In the folder, you find a sample test file:
Installing a couple of developer dependencies
Once you changed the file extension of the test file. You have to install the following addition developer dependencies:
- enzyme: https://github.com/airbnb/enzyme
- enzyme-adapter-react-15
- react-test-renderer
- react-addons-test-utils: https://facebook.github.io/react/docs/test-utils.html
Enzyme is a set of test utilities created for React (developed by Airbnb) and requires the react-addons-test-utils. Enzyme makes it easy to assert, manipulate your components’ output.
To install these two dependencies, execute the following command: npm install enzyme react-addons-test-utils enzyme-adapter-react-15 react-testrenderer --save-dev --save-exact
Writing tests for your React components
Now you are ready to write some tests. Override the contents of the test file, with the following code:
/// <reference types="mocha" />/// <reference types="sinon" />
import * as React from 'react';import { assert, expect } from 'chai';import { mount, configure } from 'enzyme';import HelloWorld from '../components/HelloWorld';
configure({ adapter: new Adapter() });
declare const sinon;
describe('<HelloWorld />', () => { const descTxt = "TestingThisOneOut"; let componentDidMountSpy; let renderedElement;
before(() => { componentDidMountSpy = sinon.spy(HelloWorld.prototype, 'componentDidMount'); renderedElement = mount(<HelloWorld description={descTxt} />); });
after(() => { componentDidMountSpy.restore(); });
// Write your tests here});The code you see above does not contain any tests yet. The before function is the first once which gets called and it loads the component.
At the end of the tests, the after function restores all components.
You can also do something before and after each test by writing beforeEach and afterEach functions.
Tests are written by it() (it should do something) functions. Here are a couple of examples:
it('<HelloWorld /> should render something', () => { // Check if the component contains a paragraph element expect(renderedElement.find('p')).to.be.exist;});
it('<HelloWorld /> should render the description', () => { // Check if the component renders the description you provided expect(renderedElement.find('p.description').text()).to.be.equals(descTxt);});
it('<HelloWorld /> should render an ul', () => { // Check if the component contains an UL element expect(renderedElement.find('ul')).to.be.exist;});
it('<HelloWorld /> state results should be null', () => { // State should be null when the component gets loaded expect(renderedElement.state('results')).to.be.null;});
it('<HelloWorld /> should call componentDidMount only once', () => { // Check if the componentDidMount is called once expect(componentDidMountSpy.calledOnce).to.equal(true);});
it('<HelloWorld /> should render an ul with 3 items (using the mock data)', (done) => { // New instance should be created for this test due to setTimeout // If the global renderedElement used, the result of "ul li"" will be 10 instead of 3 // because the state changes to 10 in the last test and // the last test is executed before this one bacause of setTimeout let renderedElement1 = mount(<HelloWorld description={descTxt} />); // Wait for 1 second to check if your mock results are retrieved setTimeout(() => { // Trigger state update renderedElement1.update(); expect(renderedElement1.state('results')).to.not.be.null; expect(renderedElement1.find('ul li').length).to.be.equal(3); done(); // done is required by mocha, otherwise the test will yield SUCCESS no matter of the expect cases }, 1000);});
it('<HelloWorld /> should render 10 list items (triggering setState from the test)', () => { // Change the state of the component renderedElement.setState({ results: { value: [ { Title: "Mock List 1", Id: '1' }, { Title: 'Mock List 2', Id: '2' }, { Title: 'Mock List 3', Id: '3' }, { Title: 'Mock List 4', Id: '4' }, { Title: 'Mock List 5', Id: '5' }, { Title: 'Mock List 6', Id: '6' }, { Title: 'Mock List 7', Id: '7' }, { Title: 'Mock List 8', Id: '8' }, { Title: 'Mock List 9', Id: '9' }, { Title: 'Mock List 10', Id: '10' } ] } });
expect(renderedElement.update().state('results')).to.not.be.null; expect(renderedElement.update().find('ul li').length).to.be.equal(10);});More information about JavaScript unit testing;
- Mocha: https://mochajs.org/
- Chai: http://chaijs.com/
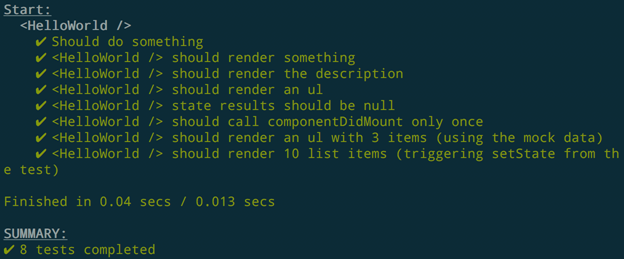
Running your tests
You can run your tests via this command: gulp test. When you run the command with the sample project, you should get the following result:
Info: the sample web part also contains a mock HTTP client which simulates an async call to retrieve items from a list. The web part renders the following output;

Related articles
SharePoint Framework unit-tests with Jest
SharePoint Framework code coverage reports for unit-tests
Extend Karma to get better code coverage and test reports for your SharePoint Framework solutions
Report issues or make changes on GitHub
Found a typo or issue in this article? Visit the GitHub repository to make changes or submit a bug report.
Comments

Let's build together
Manage content in VS Code
Present from VS Code