Testing the UI of your SPFx solution with Puppeteer and Jest
This post is over a year old, some of this information may be out of date.
When building any type of solutions which involve a UI. One of the most time-consuming things is to test how your solution is rendered, and if everything is still working as it should be. If you are doing these changes yourself. The process is very simple and easy to maintain/test. When you are working in a larger team, things will get more complex and more manual work is involved in order to test it.
Manual testing/validation of how your solutions render and work is always a good thing, but it is very time consuming and probably means the user needs to repeat the same steps over and over again. In order to win back some of this testing time, I looked around to see what the best approach would be to get this process automated.
My criteria for the tools which were going to be used in order to automate this process should be aligned with the tools my team was already familiar with. In this case, I choose to use Node.js.
Luckily, I did not have to look very far to find a good Node.js tool. I knew that the Chrome team built a library called Puppeteer. Puppeteer is a Node library which provides control over Chrome or Chromium dev tools and allows you to start up a headless browser, open pages, interact with them, take screenshots and many more. The best part of using Puppeteer is the way you interact with your pages. It feels like normal web development, so writing code for it can be done in a fairly simple way. Of course, it always requires to get familiar a bit with the tools and its APIs.
More info: https://github.com/GoogleChrome/puppeteer
In this post, I will describe the steps you need to take in order to set up a project to test out a SharePoint Framework solution.
The dependencies
This project involves various dependencies, the most important once (besides Puppeteer) are highlighted here:
Jest (https://jestjs.io)
Jest is my favorite JavaScript testing platform. It requires almost no configuration in order to run. Combining this with Puppeteer makes it an excellent candidate to get test results.
node-sp-auth (https://www.npmjs.com/package/node-sp-auth)
This is a Node.js authentication library which we will use to authenticate a user against SharePoint and use the authenticated context to render pages.
Creating the initial project
To make it easy, what you could do is clone the following project: https://github.com/estruyf/spfx-ui-tests-sample
After you cloned the project, run a npm install in order to install all the required dependencies on your machine.
As loading pages only work by a user account and not with an app-only client id and secret, you have to provide a username and password. Ideally this would run in a service like Azure DevOps where you can abstract it away from the user, but for now, you will have to create a config.json file (you can use the base contents from the config.sample.json file) in the root of the project.
To make it a bit “safer” I added a dependency called cpass in order to encode and decode the passwords. In the project, you find an encoder.js file which you can use to encode your username and password. Add your username and password in it, and run node encoder.js, after this you can remove the file.

Copy these encoded username and password values and put them in the config.json file.
The sample configuration and tests
You will find the sample configuration and tests in the src/tests folder. The actual magic happens in the beforeAll method. In that method, Jest authenticates to SharePoint and uses the retrieved headers to open the URL/page. After these steps, the tests will run.
Writing your own tests
Tests can be written by creating files in the src/tests folder with the following naming convention: your-choice.test.ts or your-choice.spec.ts. Take the contents of the provided sample as the base, as all the required configuration is already in place.
When it comes to writing your own tests. There is one important thing how to correctly retrieve your elements from the page.
Important: _._caption !== _._caption_8f70350b
In SharePoint Framework when you are using class names from your sass.module.scss file.
Info: you can read more about it here: https://docs.microsoft.com/en-us/sharepoint/dev/spfx/css-recommendations#use-css-modules-to-avoid-styling-conflicts
The class names get a unique suffix per change. This means that you cannot simply fetch element by their class name, as that changes each time you will do updates to your web part. A better way for this is to provide your own data-* attribute to the elements you want to test. In my sample, I choose to work with data-ui-test-id, but this can be anything you want it to be.

Once you put these testing IDs in place, you can retrieve your elements as follows:
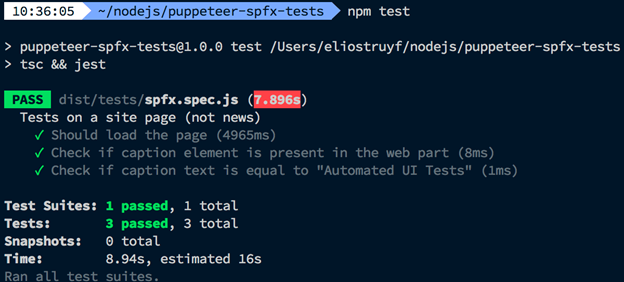
Running the project
Once you put the config.json file in place, you only have to run npm test in order to run the UI tests.
In the next post, I will cover how you can run these tests in Azure DevOps.
Happy UI testing!
Related articles
Setting up Puppeteer to run on Azure DevOps for your automated UI tests
How to debug your SharePoint Framework web part
Search web part created with the SharePoint Framework
Report issues or make changes on GitHub
Found a typo or issue in this article? Visit the GitHub repository to make changes or submit a bug report.
Comments

Let's build together
Manage content in VS Code
Present from VS Code
Engage with your audience throughout the event lifecycle