What if you could manage your task statuses by just a drag and drop action? Wouldn’t that be cool? This was the idea that a colleague and I had last week.
Concept
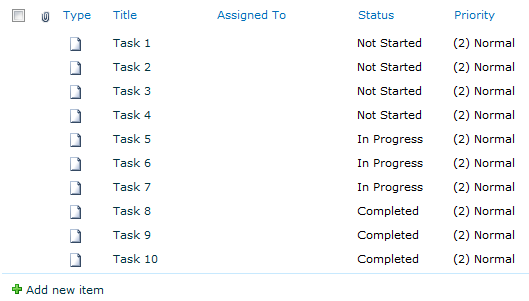
For this concept I am only going to use the following task statuses:
- Not Started
- In Progress
- Completed
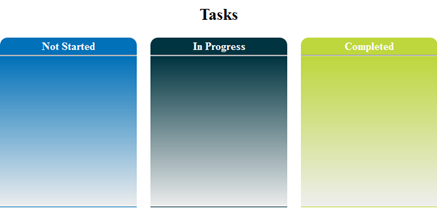
To visualise the task items, I have created three task status blocks.
The task items will be retrieved with the SharePoint 2010 ECMAscript client object model.
jQuery and jQuery UI will be used to place the task items on the page and be able to drag and drop them.
How it is worked out
The task list that I am going to use contains the following items:
On a new page I added my conceptual layout to the page and the jQuery and jQuery UI script references inside a “Content Editor” web part. To be a more flexible, I also added another script reference that will contain the code for this solution.
 1
 2
 3
 4
 5
 6
 7
 8
 9
10
11
12
13
14
15
16
17
18
19
20
21
22
23
24
25
26
27
28
29
30
31
32
33
34
35
36
37
38
| <script src="jquery.min.js" type="text/javascript"><!--mce:0--></script>
<script src="jquery-ui-1.8.9.custom.min.js" type="text/javascript"></script>
<script src="EcmaTest.js" type="text/javascript"></script>
<link href="/_layouts/styles/tasks/EcmaTest.css" rel="stylesheet" type="text/css"/>
<div id="taskbox">
### Tasks
<div id="task-blocks">
<div class="block col">
<div class="task-status notstarted">
**Not Started**
</div>
<div id="notstarted" class="task-items">
</div>
</div>
<div class="block col">
<div class="task-status inprogress">
**In Progress**
</div>
<div id="inprogress" class="task-items">
</div>
</div>
<div class="block col">
<div class="task-status completed">
**Completed**
</div>
<div id="completed" class="task-items">
</div>
</div>
<div class="clear"></div>
</div>
</div>
|
Retrieve the task list items
The first thing that needs to be done is retrieving all the task items from the task list.
 1
 2
 3
 4
 5
 6
 7
 8
 9
10
11
12
13
14
15
16
17
18
19
20
21
22
23
24
25
26
27
| var clientContext = null;
var web = null;
ExecuteOrDelayUntilScriptLoaded(Initialize, "sp.js");
//Retrieve all the task items
function Initialize() {
//Get the current SP context
clientContext = new SP.ClientContext.get_current();
web = clientContext.get_web();
//Set the correct list
var list = web.get_lists().getByTitle("Tasks");
var camlQuery = new SP.CamlQuery();
var q = "<Where></Where>";
camlQuery.set_viewXml(q);
this.listItems = list.getItems(camlQuery);
//Only retrieve the "ID", "Title" and "Status" fields.
clientContext.load(listItems, 'Include(ID, Title, Status)');
//Execute the listitem query
clientContext.executeQueryAsync(Function.createDelegate(this, this.onListItemsLoadSuccess), Function.createDelegate(this, this.onQueryFailed));
}
//If the ecmascript failed, output the error in an alert.
function onQueryFailed(sender, args) {
alert('request failed ' + args.get_message() + '\n' + args.get_stackTrace());
}
function onListItemsLoadSuccess(sender, args) { }
|
The “onListItemsLoadSuccess” function will be used to place the task items to the correct task status blocks.
 1
 2
 3
 4
 5
 6
 7
 8
 9
10
11
12
13
14
15
16
17
18
19
20
21
| //On success, put the task items to the correct list
function onListItemsLoadSuccess(sender, args) {
var listEnumerator = this.listItems.getEnumerator();
//Iterate though all of the items
while (listEnumerator.moveNext()) {
//Retrieve the current list item
var oListItem = listEnumerator.get_current();
var status = oListItem.get_item('Status');
//Add the items to the correct list
if (status == "Not Started") {
$("#notstarted").append("<div class='item' ref='" + oListItem.get_item('ID') + "'>" + oListItem.get_item('Title') + "</div>");
}
else if (status == "In Progress") {
$("#inprogress").append("<div class='item' ref='" + oListItem.get_item('ID') + "'>" + oListItem.get_item('Title') + "</div>");
}
else if (status == "Completed") {
$("#completed").append("<div class='item' ref='" + oListItem.get_item('ID') + "'>" + oListItem.get_item('Title') + "</div>");
}
}
}
|
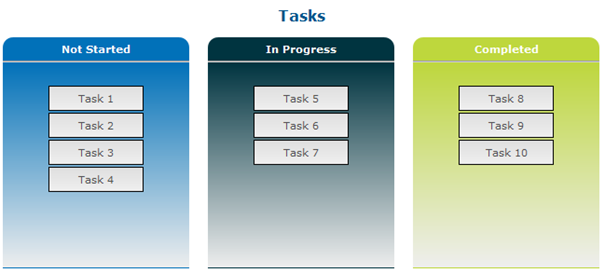
This piece of code will result in:
Each task item contains its “ID” in a “ref” attribute.
1
| <div ref="1" class="item">Task 1</div>
|
Enable drag and drop
The task items are added with JavaScript to the page, this means that you cannot directly add the “draggable” handler to the task items. A solution for this problem is to live bind the “draggable” handler to the task items. The following jQuery helper function can be used to solve this problem.
 1
 2
 3
 4
 5
 6
 7
 8
 9
10
11
| //This are the jQUery Live plugins.
//This plugin enable you to bind the draggable event to the items that are placed by an Ajax call.
(function ($) {
jQuery.fn.liveDraggable = function (opts) {
this.live("mouseover", function () {
if (!$(this).data("init")) {
$(this).data("init", true).draggable(opts);
}
});
};
})(jQuery);
|
When this function is added to the JavaScript file, the jQuery code can be written.
- Attach the “draggable” handler to the task items;
- Make it possible to drop items on the status blocks;
- Add a new item to the status block when dropped;
- Remove the dropped item, otherwise two task items will exists;
- Create a call to the update function.
 1
 2
 3
 4
 5
 6
 7
 8
 9
10
11
12
13
14
15
16
17
18
19
20
21
| $(function () {
//Attach the draggable handler to the task items
$(".item").liveDraggable({ containment: "#task-blocks", scroll: false });
//Make it possible to drop items on the status boxes
$("#notstarted, #inprogress, #completed").droppable({
drop: function (event, ui) {
$("<div></div>").attr('class', 'item').attr('ref', ui.draggable.attr('ref')).text(ui.draggable.text()).appendTo(this);
deleteItem(ui.draggable);
changeItemToStatus(ui.draggable.attr('ref'), $(this).attr("id"));
}
});
});
//Delete the dropped item when it is placed on a new list.
function deleteItem($item) {
$item.fadeOut();
}
//Change the moved task item
function changeItemToStatus(itemID, newStatus) {}
|
Currently it is only possible to drag around the items and drop them on another status block. The next step is to write update function.
Update the task item status
The update function will make use of the SharePoint ECMAscript client object model.
 1
 2
 3
 4
 5
 6
 7
 8
 9
10
11
12
13
14
15
16
17
18
19
20
21
22
23
24
25
26
27
28
29
| //Change the moved task item
function changeItemToStatus(itemID, newStatus) {
clientContext = new SP.ClientContext.get_current();
web = clientContext.get_web();
var list = web.get_lists().getByTitle("Tasks");
this.listItem = list.getItemById(itemID);
//Set the new status
if (newStatus == "notstarted") {
listItem.set_item('Status', 'Not Started');
}
else if (newStatus == "inprogress") {
listItem.set_item('Status', 'In Progress');
}
else if (newStatus == "completed") {
listItem.set_item('Status', 'Completed');
}
listItem.update();
clientContext.load(listItem);
//Execute the query
clientContext.executeQueryAsync(Function.createDelegate(this, this.onQuerySucceeded), Function.createDelegate(this, this.onQueryFailed));
}
//Show an alert if the item is successfully updated.
function onQuerySucceeded() {
alert('Item updated!');
}
|
The “onQueryFailed” function is reused from the “Retrieve the task list items” section.
Download
Download the source files.