Take your SharePoint social features to the next level with “I like it” and “Tags” counters: Part 3
This post is over a year old, some of this information may be out of date.
In the previous parts I showed you how to retrieve all tags for a specific page/item.
In this part (the last one) I will show you how you can integrate these tags into your design.
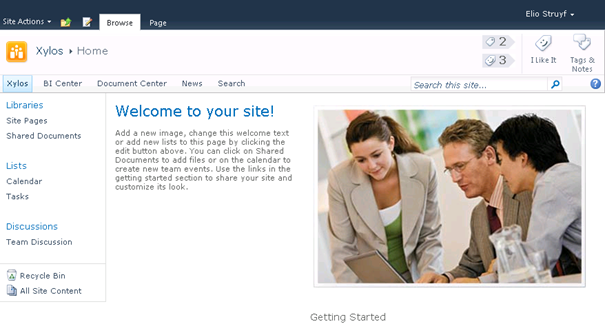
This will be the final result:

User Control
You have various possibilities to show these tag results on your page. One of these possibilities, which I am going to explain, is a user control.
The advantage of creating an user control is that you can add the control into your master page, and so it will be displayed on all the pages that uses this master page.
My user control looks like this:
<style> .tagging { height: 50px; min-width: 48px; } .tagging>div { height: 20px; padding-left: 24px; } .tagging .number { font-size: 16px; font-weight: bold; float:left; } .tags { background: #E7E7E8 url(/_layouts/images/socialtag.png) no-repeat 4px center; margin-bottom: 7px; } .likes { background: #E7E7E8 url(/_layouts/images/QuickTagILikeIt_16.png) no-repeat 4px center; } .border-left { width: 0; height: 0; border-top: 10px solid white; border-bottom: 10px solid white;
border-left:10px solid #E7E7E8; float: right; }</style>
<div class="tagging"> <div class="tags"> <div class="number"><asp:Label ID="lblTags" runat="server" Text="0"></asp:Label></div> <div class="border-left"></div> </div> <div class="likes"> <div class="number"><asp:Label ID="lblLikes" runat="server" Text="0"></asp:Label></div> <div class="border-left"></div> </div></div>And this is the content of the code behind:
using System;using System.Linq;using System.Web.UI;using System.Web.UI.WebControls;using System.Web.UI.WebControls.WebParts;using Microsoft.Office.Server.SocialData;using Microsoft.SharePoint;using Microsoft.SharePoint.Utilities;
namespace estruyf.SocialTaggingControl.ControlTemplates.estruyf.SocialTaggingControl{ public partial class Tags : UserControl { private string _tags = string.Empty; private string _likes = string.Empty;
protected void Page_Load(object sender, EventArgs e) { }
protected override void OnInit(EventArgs e) { base.OnInit(e); GetTags();
lblTags.Text = _tags; lblLikes.Text = _likes; }
private void GetTags() { try { SPSecurity.RunWithElevatedPrivileges(delegate() { using (SPSite site = new SPSite(SPContext.Current.Site.Url)) using (SPWeb web = site.OpenWeb()) { var type = typeof(SocialTagManager); var methods = type.GetMethods(System.Reflection.BindingFlags.DeclaredOnly ' System.Reflection.BindingFlags.NonPublic ' System.Reflection.BindingFlags.Instance); var method = methods.FirstOrDefault(m => m.ToString() == "Microsoft.Office.Server.SocialData.SocialTag[] GetTags(System.Uri, Int32, Microsoft.Office.Server.SocialData.SocialItemPrivacy)"); if (method == null) throw new MissingMethodException("Social Tag method not found.");
SPServiceContext serviceContext = SPServiceContext.GetContext(site); SocialTagManager stm = new SocialTagManager(serviceContext);
// Check if the current page is the homepage Uri uri = System.Web.HttpContext.Current.Request.Url; SPFolder root = web.RootFolder; if (uri.AbsoluteUri.Contains(root.WelcomePage)) { uri = new Uri(SPContext.Current.Web.Url); }
var itemTags = (SocialTag[])method.Invoke(stm, new object[] { uri, 1000, SocialItemPrivacy.PublicOnly });
_tags = itemTags.Count(t => t.Term.Name.ToLower() != "i like it").ToString(); _likes = itemTags.Count(t => t.Term.Name.ToLower() == "i like it").ToString(); } }); } catch (Exception) { } } }}Master Page
When you deploy your (or mine, can be downloaded at the bottom) user control to SharePoint, you need to reference it in your master page.
Step 1
Open your master page in SharePoint Designer and add the user control reference at the top of the master page.
<%@ Register TagPrefix="estruyf" TagName="SocialTags" src="~/_controltemplates/estruyf/Tags.ascx" %>Step 2
Find the place where you want to add the user control.
In my example I added a new table column next to the social data buttons. You can do this by doing a search for the following class s4-socialdata-notif and change the HTML to this:
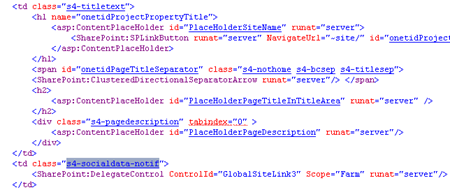
<td> <!-- Social Tag Control --> <estruyf:SocialTags runat="server"/></td><td class="s4-socialdata-notif"> <SharePoint:DelegateControl ControlId="GlobalSiteLink3" Scope="Farm" runat="server"/></td>Save and publish your master page. When you now go to a SharePoint page, you should have the following result.
Download
Related articles
Take your SharePoint social features to the next level with “I like it” and “Tags” counters: Part 4
Take your SharePoint social features to the next level with “I like it” and “Tags” counters: Part 1
Take your SharePoint social features to the next level with “I like it” and “Tags” counters: Part 2
Report issues or make changes on GitHub
Found a typo or issue in this article? Visit the GitHub repository to make changes or submit a bug report.
Comments

Let's build together
Manage content in VS Code
Present from VS Code
Engage with your audience throughout the event lifecycle