Running .NET Azure Functions on macOS and Visual Studio Code
This post is over a year old, some of this information may be out of date.
TypeScript is typically my go-to language for building any solution, but sometimes, you must use what is best for the job. In my current project, I am using .NET Core to build Azure Functions, and I had to get myself familiar with using .Net Core and Azure Functions on macOS.
As the Microsoft documentation only explained it with Visual Studio for Mac, I had to figure out how to get it working with Visual Studio Code. This post will describe getting .NET Core and Azure Functions working on macOS with Visual Studio Code.
Prerequisites
To start building. NET-based Azure Functions, you need to install the .NET SDK and Azure Functions Core Tools on your machine.
Installing .NET SDK on macOS
The .NET-supported versions are found on the following download .NET page.
I went for the binaries of the .NET 8.0 SDK for macOS download .NET 8.0.201 SDK for macOS Arm64.
If you go for the binary download, once downloaded, you can move the files from the tar file to the directory of your choice. On the .NET download page, they recommend using the $HOME/dotnet directory. In my case, I moved the files to the $HOME/.dotnet directory.
cd ~/Downloadsmkdir -p $HOME/.dotnet && tar zxf dotnet-sdk-8.0.201-osx-arm64.tar.gz -C $HOME/.dotnetAfter moving the files, you must add the .NET SDK to your shell profile or any other profile you use.
In my case, I am using zsh, so I added the following to my .zshrc file and the .zprofile file.
- Shell profile:
~/.profile - Bash profile:
~/.bash_profile,~/.bashrc - Zsh profile:
~/.zshrc,~/.zprofile
In those files, you need to add the following lines:
export DOTNET_ROOT=$HOME/.dotnetexport PATH=$PATH:$HOME/.dotnetAfter adding it, restart your terminal or run the following commands to apply the changes:
# Change the file to the profile you are usingsource ~/.zshrcOnce your profile has been reloaded, you can check if the .NET SDK is installed by running the following command:
dotnet --infoInstalling Azure Functions Core Tools
The documentation for installing the Azure Functions Core Tools on macOS is up to date. You can find it in the Install the Azure Functions Core Tools section of the Core Tools Development documentation.
# When Homebrew is installedbrew tap azure/functionsbrew install azure-functions-core-tools@4
# To update the Azure Functions Core Toolsbrew upgrade azure-functions-core-tools@4To check if the Azure Functions Core Tools are installed, you can run the following command:
func --versionCreating a new Azure Functions project
You can create a new Azure Functions project after installing the .NET SDK and Azure Functions Core Tools. You have the option of creating a new project from your terminal or Visual Studio Code with the Azure Functions extension.
Using the terminal
To create a new Azure Functions project, you can use the following command:
func initThis command will ask you a few questions to set up the project. You can choose the following options:
- Select the runtime:
dotnet (isolated process) - Select the language:
C#
If everything is installed correctly, it should create a new Azure Functions project in the current directory.
New Azure Functions can be added to the project by running the following command:
func newUsing Visual Studio Code
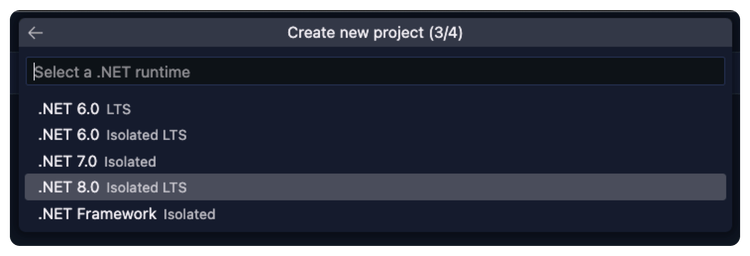
Suppose you have installed the Azure Functions extension in Visual Studio Code. In that case, you can create a new Azure Functions project by clicking on the Azure icon in the sidebar and then clicking the Create New Project button in the workspace section.
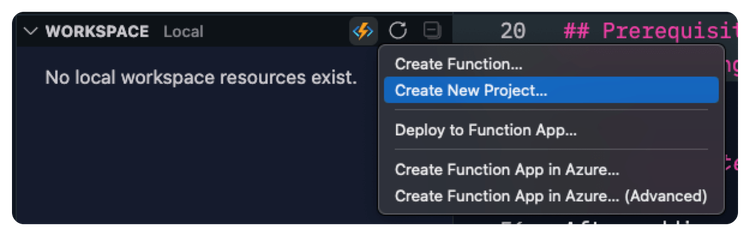
It will ask you similar questions as the terminal command to set up the project.
Running the Azure Functions
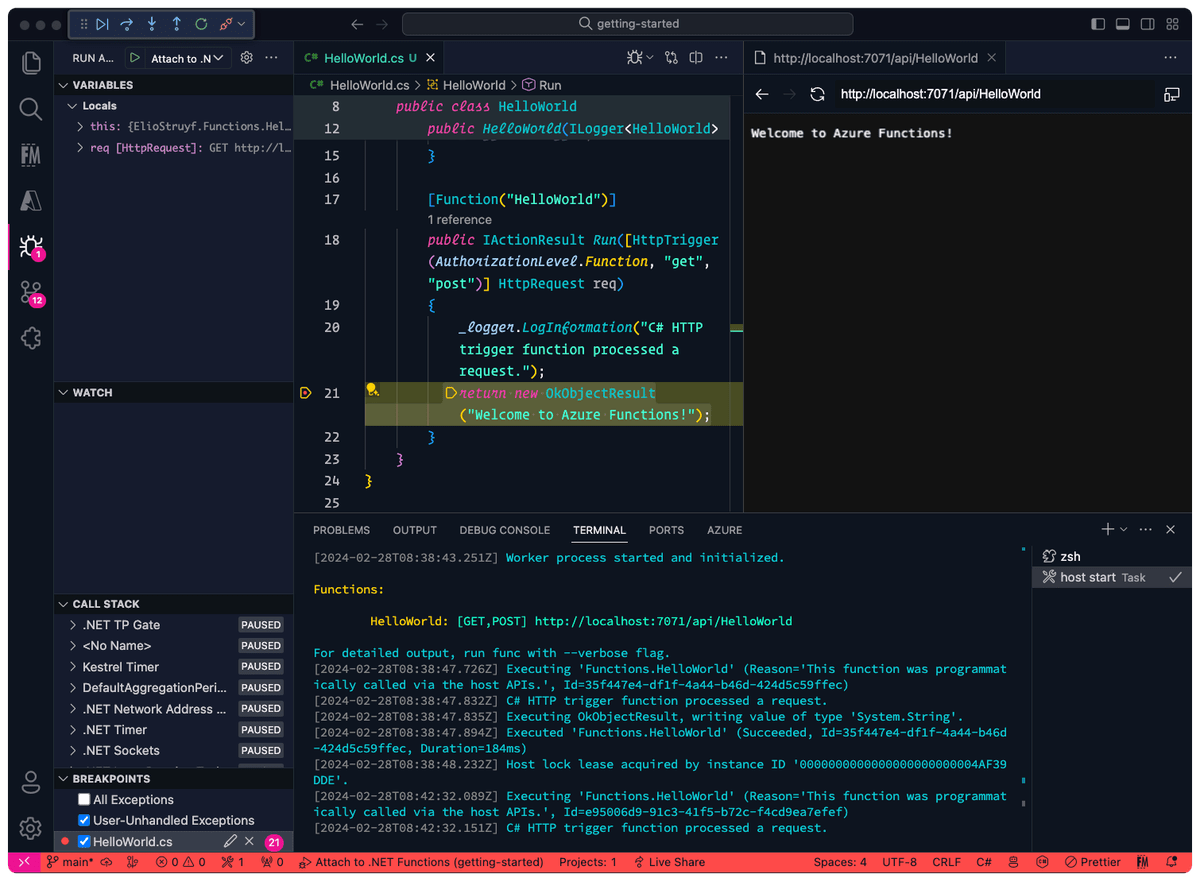
Now that you have created the Azure Functions project, you can run the Azure Functions locally. Start by opening the project in Visual Studio Code if you haven’t already. It should suggest installing the C# extension, which is required to debug the Azure Functions.
You only need to press F5 to debug the Azure Functions. It will start the Azure Functions Core Tools and run the Azure Functions locally.
Extra: Installing Azurite for local development
Azurite is a local emulator for Azure Storage. You can install Azurite with the following command:
npm install -g azuriteTo run it locally, you can use the following command:
azuriteRelated articles
Why does your timer trigger Azure Function run at unforeseen times?
How to make local Azure Static Web App development easier
Which service? Netlify vs Vercel vs Azure Static Web App
Report issues or make changes on GitHub
Found a typo or issue in this article? Visit the GitHub repository to make changes or submit a bug report.
Comments

Let's build together
Manage content in VS Code
Present from VS Code
Engage with your audience throughout the event lifecycle