Making an Image Gallery Inside the Asset Library: Part 1
This post is over a year old, some of this information may be out of date.
Recently I was at a client that wanted to have something more useable for storing and showing their event pictures. The only thing that is possible out-of-the-box in SharePoint 2010 is working with a slideshow web part and the old picture library. That gave me the idea to implement a jQuery image gallery into the Asset Library.
My first approach was to create a new thumbnail view for the asset library, but from the moment you save this new view in SharePoint Designer, it is unusable. Without changing anything in this view, the view returns an error that is unable to be displayed, so this approach was not working.
The other approach was to manipulate the standard thumbnail view with JavaScript. The first thing to do is checking if the HTML structure of the view is sufficient to work with.
I wanted to use the library to store multiple events, so each event will have its own folder. Each folder contains the event pictures. So three things needed to be found:
- HTML structure of an image in the thumbnail view;
- HTML structure of a folder in the thumbnail view;
- The image section ID or class. The bad:
Neither folders nor images contain a class to easily distinguish them.
The good:
- There is a difference between a folder and an image. Folders contain an onmousedown attribute, which images do not have.
- The image section has an ID which is: pickerimages.
Implementation
For the implementation of the image gallery, I chose to work with the jQuery Galleria image Gallery because I already used it in the past, but it can also work with an image gallery of your choice. The only thing is that the code examples in this post cannot be used.
Another very important thing to notice is that I will be using jQuery instead of the well know $ (Dollar sign) prefix. The asset library makes use of the CMSSiteManager.js and it uses the $ (Dollar sign) as prefix for its functions, so that is why I will make use the jQuery prefix.
Step 1
First thing to do is download the Galleria sources from their site and put them on your SharePoint environment. This could be in the Style Library or Layouts folder.
Step 2
Add a reference to jQuery and the Galleria JavaScript files in your master page. This can also be added in a Content Editor Web Part or HTML Form Web Part.
<script type="text/javascript" src="/_layouts/styles/estruyf/jquery.js"></script><script type="text/javascript" src="/_layouts/styles/estruyf/Galleria/galleria-1.2.7.min.js"></script><script type="text/javascript"> jQuery(function() {
});</script>Step 3
Now that the JavaScript files are added, you can start manipulating the HTML structure.
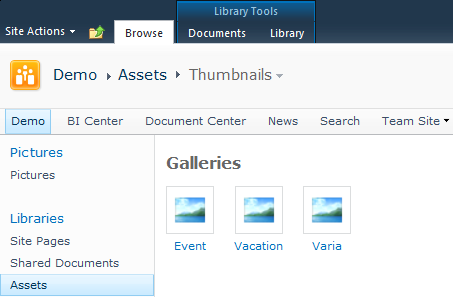
First thing to do is adding a galleries section and a galleria section before the pickerimages list, and hide the list.
The galleries section will be used to display all the available folder/galleries in the library. The galleria section will be used to display the image gallery itself.
// Add the galleries and galleria section, and hide the standard imagesjQuery("#pickerimages").before("<div id='galleries'><h2>Galleries</h2></div><div id='galleria'></div>").hide();Step 4
When the two sections are created, it is time to add all the folders/galleries to the galleries section.
// Show the picture galleriesjQuery('#pickerimages .ms-assetpicker-tiled-mediumprops a[onmousedown]').each(function() { var elm = jQuery(this); var gallery = elm.text(); jQuery("#galleries").append(elm.html("<img src='/_layouts/images/ImagePreviewHH.PNG' alt='Gallery' /><span>"+gallery+"</span>"));});// Only show the Galleries section when it contains anchorsjQuery('#galleries').has('a').show();Step 5
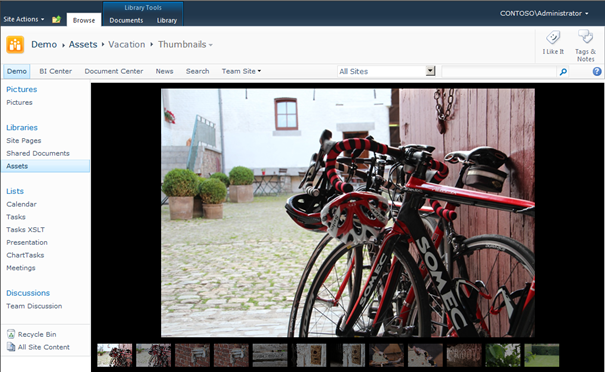
Now that the galleries section is filled up, we can start filling the Galleria section. This can be done the same way we did before; the only thing that is different is the onmousedown selector.
// Add all the pictures to the galleria divjQuery('#pickerimages .ms-assetpicker-tiled-mediumprops a:not([onmousedown])').each(function() { jQuery("#galleria").append("<img src='" + jQuery(this).attr("href") + "' />");});
// Load Galleriaif(jQuery('#galleria').has("img").length) { jQuery('#galleria').show(); Galleria.loadTheme('/_layouts/styles/estruyf/Galleria/themes/classic/galleria.classic.min.js'); Galleria.run('#galleria');}More information about using Galleria can be found here.
Step 6
The only thing that rests is the styling.
a img { border: 0; }#galleries { display: none; margin-bottom: 10px; margin-left: 10px; min-height:50px;}#galleries > a { display: inline-block; height: 50px; margin-right: 20px; text-align: center;}#galleries img { border: 1px solid #DBDDDE; display: block; height: 40px; margin: 0 auto 5px; max-height: 40px; padding: 3px;}#galleria { display: none; height:500px; width:100%;}Result
Sources
jQuery(function() { jQuery("#pickerimages").before("<div id='galleries'><h2>Galleries</h2></div><div id='galleria'></div>").hide();;
// Add all the pictures to the galleria div jQuery('#pickerimages .ms-assetpicker-tiled-mediumprops a:not([onmousedown])').each(function() { jQuery("#galleria").append("<img src='" + jQuery(this).attr("href") + "' />"); });
// Show the picture galleries jQuery('#pickerimages .ms-assetpicker-tiled-mediumprops a[onmousedown]').each(function() { var elm = jQuery(this); var gallery = elm.text(); jQuery("#galleries").append(elm.html("<img src='/_layouts/images/ImagePreviewHH.PNG' alt='Gallery' /><span>"+gallery+"</span>")); }); jQuery('#galleries').has('a').show();
// Load Galleria if(jQuery('#galleria').has("img").length) { jQuery('#galleria').show(); Galleria.loadTheme('/_layouts/styles/estruyf/Galleria/themes/classic/galleria.classic.min.js'); Galleria.run('#galleria'); }});Changes
Update: 18/08/2012
Updated the Galleria code block. I forgot to add the “jQuery(‘#galleria’).show();” line.
Related articles
Making an Image Gallery from the Asset Library: Part 2
List Of All font-family and font-size Attributes Used in SharePoint 2010 StyleSheets
Fix: Search Box Suggestions Layout Problem When Used Outside a Search Center
Report issues or make changes on GitHub
Found a typo or issue in this article? Visit the GitHub repository to make changes or submit a bug report.
Comments

Let's build together
Manage content in VS Code
Present from VS Code
Engage with your audience throughout the event lifecycle