Localization of Webviews in Visual Studio Code Extensions
This post is over a year old, some of this information may be out of date.
In the previous post, I showed how to localize the extension commands/settings and code. In this post, I want to show how to localize the webviews in Visual Studio Code extensions, as this is a bit more complicated and not yet documented.
First, webviews allow you to create fully customizable views for your extensions. I like to use them for Front Matter CMS to display the content/media/… dashboards. The webviews are created with HTML, CSS, and JavaScript. Developing webviews is like web application development running within Visual Studio Code.
To localize these webviews, we can use the @vscode/l10n dependency.
In this article, I will tell you more about how you can get started with localizing your webviews in Visual Studio Code extensions.
Assumptions for your webviews
The contents of this article are written for more advanced webviews where you will use frameworks/libraries like React, Vue, … to render your views.
If you are using the static HTML approach as shown in the documentation sample, you can rely on the vscode.l10n.t() function to localize your strings.
When you are using a framework/library, you will need to do some extra work to get the localization working in your webviews, and this is what I will explain in this article.
Prerequisites
First of all, follow the steps that were mentioned in the “localizing the strings used in your source files” section of the previous localization article. You must ensure you have configured the l10n property in your package.json file.
{ "l10n": "./l10n"}Next, we will use the @vscode/l10n dependency. This dependency is used internally by the vscode.l10n.t() function, but this function is not available in the webview context.
To get started, you will need to install the dependency:
npm install @vscode/l10nLocalizing your webview
Once the @vscode/l10n dependency is installed, you can localize your webview’s strings.
Open one of your webview files and import the @vscode/l10n dependency:
import * as l10n from '@vscode/l10n'Next, you must update all your hardcoded strings with the l10n.t() function.
Example:
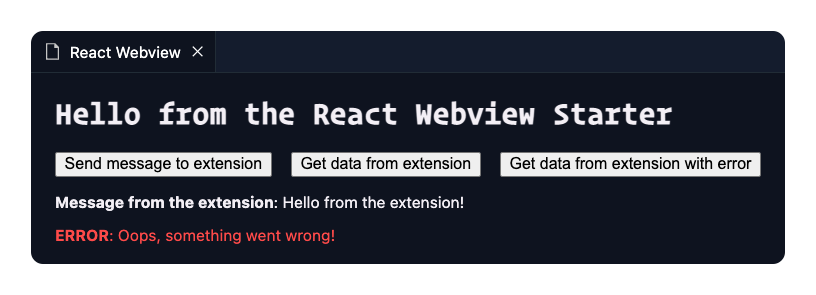
<div className='app'> <h1>{l10n.t("Hello from the React Webview Starter")}</h1>
<div className='app__actions'> <button onClick={sendMessage}> {l10n.t("Send message to extension")} </button>
<button onClick={requestData}> {l10n.t("Get data from extension")} </button>
<button onClick={requestWithErrorData}> {l10n.t("Get data from extension with error")} </button> </div>
{message && <p><strong>{l10n.t("Message from the extension")}</strong>: {message}</p>}
{error && <p className='app__error'><strong>{l10n.t("ERROR")}</strong>: {error}</p>}</div>Once all these hardcoded strings are replaced, you can start using the @vscode/l10n-dev CLI tool to export all your strings to the bundle.l10n.json file. You can do this by running the following command:
npx @vscode/l10n-dev export -o ./l10n ./srcIn my case, when I run the tool, I get the following output:
{ "Hello from the extension!": "Hello from the extension!", "Oops, something went wrong!": "Oops, something went wrong!", "Received data from the webview {0}": "Received data from the webview {0}", "Your extension got activated with the {0} language!": "Your extension got activated with the {0} language!", "Hello from the React Webview Starter": "Hello from the React Webview Starter", "React Webview": "React Webview", "Send message to extension": "Send message to extension", "Get data from extension": "Get data from extension", "Get data from extension with error": "Get data from extension with error", "Message from the extension": "Message from the extension", "ERROR": "ERROR"}I translated all the strings to the pseudo-language locale pqs-ploc for this example. The contents of my bundle.l10n.qps-ploc.json file look like this:
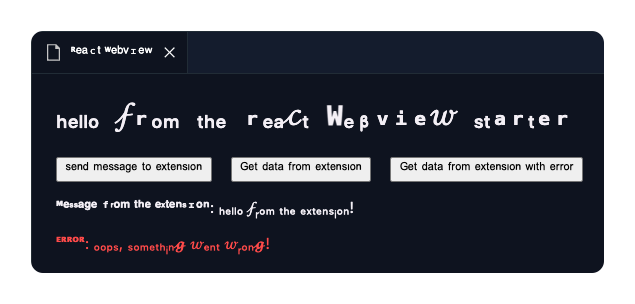
{ "Hello from the extension!": "ₕₑₗₗₒ 𝒻ᵣₒₘ ₜₕₑ ₑₓₜₑₙₛᵢₒₙ!", "Oops, something went wrong!": "ₒₒₚₛ, ₛₒₘₑₜₕᵢₙ𝓰 𝓌ₑₙₜ 𝓌ᵣₒₙ𝓰!", "Received data from the webview {0}": "ᵣₑ𝒸ₑᵢᵥₑ𝒹 𝒹ₐₜₐ 𝒻ᵣₒₘ ₜₕₑ 𝓌ₑᵦᵥᵢₑ𝓌 {0}", "Your extension got activated with the {0} language!": "Yₒᵤᵣ ₑₓₜₑₙₛᵢₒₙ 𝓰ₒₜ ₐ𝒸ₜᵢᵥₐₜₑ𝒹 𝓌ᵢₜₕ ₜₕₑ {0} ₗₐₙ𝓰ᵤₐ𝓰ₑ!", "React Webview": "ᴿᵉᵃᶜᵗ ᵂᵉᵇᵛᶦᵉʷ", "Hello from the React Webview Starter": "ₕₑₗₗₒ 𝒻ᵣₒₘ ₜₕₑ ᵣₑₐ𝒸ₜ Wₑᵦᵥᵢₑ𝓌 ₛₜₐᵣₜₑᵣ", "Send message to extension": "ˢᵉⁿᵈ ᵐᵉˢˢᵃᵍᵉ ᵗᵒ ᵉˣᵗᵉⁿˢᶦᵒⁿ", "Get data from extension": "ᴳᵉᵗ ᵈᵃᵗᵃ ᶠʳᵒᵐ ᵉˣᵗᵉⁿˢᶦᵒⁿ", "Get data from extension with error": "ᴳᵉᵗ ᵈᵃᵗᵃ ᶠʳᵒᵐ ᵉˣᵗᵉⁿˢᶦᵒⁿ ʷᶦᵗʰ ᵉʳʳᵒʳ", "Message from the extension": "ᴹᵉˢˢᵃᵍᵉ ᶠʳᵒᵐ ᵗʰᵉ ᵉˣᵗᵉⁿˢᶦᵒⁿ", "ERROR": "ᴱᴿᴿᴼᴿ"}Once the strings have been translated, you must implement some logic to get this correctly loaded in your webview. Unfortunately, the @vscode/l10n dependency will not automatically retrieve the localized strings for you in your subprocesses like the webview.
Retrieve the localization strings for the webview
To stay as close as possible to the logic of how Visual Studio Code handles the localization in extensions, I came up with the following solution.
- From the webview, request the localization strings from the extension host via a
postMessagecall; - The extension host listens for this message and returns the localized strings;
- The webview receives the localized strings and registers them with the
@vscode/l10ndependency.
To simplify the postMessage calls, I will use my @estruyf/vscode dependency as it provides a messageHandler which allows you to async/await these calls.
Extension host listener for the webview messages
The code for your extension host webview listener looks like this:
panel.webview.onDidReceiveMessage( (message) => { const { command, requestId, payload } = message;
if (command === "GET_LOCALIZATION") { // Check if a l10n path is configured, if not, we will use the default language if (vscode.l10n.uri?.fsPath) { readFile(vscode.l10n.uri?.fsPath, "utf-8").then((fileContent) => { panel.webview.postMessage({ command, requestId, // The requestId is used to identify the response payload: fileContent, } as MessageHandlerData<string>); }); } else { // No localization file means we should use the default language panel.webview.postMessage({ command, requestId, // The requestId is used to identify the response payload: undefined, } as MessageHandlerData<undefined>); } } }, undefined, context.subscriptions);Webview message handler
On the webview side, you will need to implement the following message handler:
const [ready, setIsReady] = React.useState<boolean>(false);
React.useEffect(() => { messageHandler.request<string | undefined>('GET_LOCALIZATION') .then((fileContents) => { if (fileContents) { l10n.config({ contents: fileContents })
setIsReady(true); } }).catch((err) => { // On error, we can still continue with the default language setIsReady(true); });}, []);Results
Once you have implemented the logic, you should be able to see the following results:
Default language
Localized webview (using the pseudo-language)
Related articles
Localization of Visual Studio Code Extensions
Learn how to localize your Visual Studio Code extensions! Explore localization of commands, settings, and strings in TypeScript files.
Publishing web projects from Visual Studio Code to Azure with Git
Using the SFPx library component for simplifying the localization experience
Report issues or make changes on GitHub
Found a typo or issue in this article? Visit the GitHub repository to make changes or submit a bug report.
Comments

Let's build together
Manage content in VS Code
Present from VS Code
Engage with your audience throughout the event lifecycle