Define custom server side rendering for catalog items with XSLT
This post is over a year old, some of this information may be out of date.
XSLT and SharePoint 2013, didn’t thought I was going to use it now that we have display templates. Almost everything can be done with display templates and JavaScript these days, but you need to be careful that you don’t build everything with JavaScript, because it could slow down the client experience. Another thing about rendering with JavaScript is that the html that it outputs won’t be indexed by search engines.
When working with the page layouts for catalog items, depending on the quantity of managed properties you want to show on the page, you could quickly end up with a couple of catalog item reuse web part and / or content by search web parts. The catalog item reuse web part renders the values server side, the downside about it is that you are limited with the value render options. If you need some custom value rendering, the option you have is to switch to client side rendering. In one of my previous blog posts I explained how you could client side render values with the catalog item reuse web part: Client side managed property value formatting for catalog item page layouts.
In my case, I needed to define some custom rendering for email values, so that they rendered as a link instead of just the email address as text value, and I also needed some date time formatting because the default didn’t fulfill. This can easily be done by using a content by search web part and custom display templates, but as I mentioned, this will not be available for the search engines.
In this post I’ll explain the steps that I did to define some custom server side rendering for the managed properties, so that not everything is loaded with JavaScript.
Solution
You could do it either by using the catalog item reuse web part or the content by search web part. I’ll explain this by using the catalog item reuse web part (because it requires a bit less code), at the end of the post I’ll add the code for the content by search web part.
The first step is to add a web part to your page layout with the value you want to render. I used the method I explained in this post: Client side managed property value formatting for catalog item page layouts to specify custom display templates for the catalog item reuse web part.
<cc1:CatalogItemReuseWebPart runat="server" AlwaysRenderOnServer="False" UseServerSideRenderFormat="False" NumberOfItems="1" UseSharedDataProvider="True" SelectedPropertiesJson="["ContactEmailOWSTEXT"]" RenderTemplateId="~sitecollection/_catalogs/masterpage/Display Templates/System/Control_CatalogDefault.js" ItemTemplateId="~sitecollection/_catalogs/masterpage/tests/Item_Catalog_Email.js"></cc1:CatalogItemReuseWebPart>As you can see, I specified a custom item template via the ItemTemplateId property to do my custom rendering for an email value.
The code for this item display template looks like this:
<html xmlns:mso="urn:schemas-microsoft-com:office:office" xmlns:msdt="uuid:C2F41010-65B3-11d1-A29F-00AA00C14882"><head><title>Catalog Email Item</title>
<!--[if gte mso 9]><xml><mso:CustomDocumentProperties><mso:TemplateHidden msdt:dt="string">0</mso:TemplateHidden><mso:ManagedPropertyMapping msdt:dt="string">'Text':'ContactEmailOWSTEXT'</mso:ManagedPropertyMapping><mso:TargetControlType msdt:dt="string">;#Content Web Parts;#</mso:TargetControlType><mso:MasterPageDescription msdt:dt="string"></mso:MasterPageDescription><mso:ContentTypeId msdt:dt="string">0x0101002039C03B61C64EC4A04F5361F385106603</mso:ContentTypeId><mso:HtmlDesignAssociated msdt:dt="string">1</mso:HtmlDesignAssociated><mso:CrawlerXSLFile msdt:dt="string">http://elio.dev/_catalogs/masterpage/tests/email.xsl, http://elio.dev/_catalogs/masterpage/tests/email.xsl</mso:CrawlerXSLFile><mso:HtmlDesignPreviewUrl msdt:dt="string"></mso:HtmlDesignPreviewUrl></mso:CustomDocumentProperties></xml><![endif]--></head><body> <div id="Item_CatalogEmail">
<!--#_ var email = $getItemValue(ctx, "Text");_#-->
<div class='cbs-Item'><!--#_ if (!$isNull(email)) {_#--> <a href="mailto:_#= email =#_">_#= email =#_</a><!--#_ }_#--> </div> </div></body></html>Nothing very special in this template, it will just retrieve the value and format it as an anchor tag. The most important part of this template it the CrawlerXSLFile property, this property defines which XSL template will be used for sever side rendering. This property can also be filled in the SharePoint UI.
When editing the display template in the SharePoint UI, you’ll find the Crawler XSL File property.
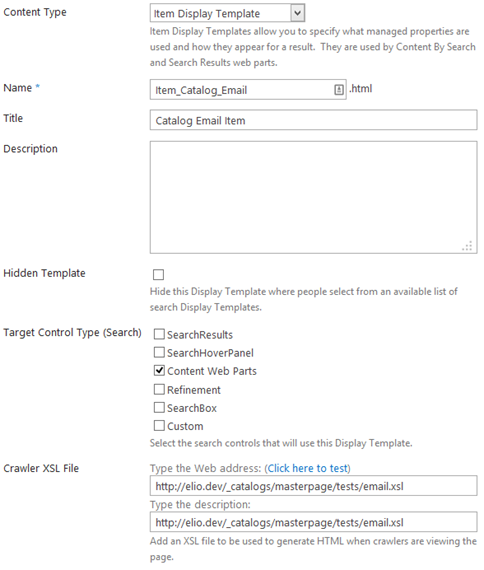
If this property is filled in, the XSL template can be created. The default XSL template can be found under ”/_catalogs/masterpage/Server Style Sheets/ServerRenderTemplate.xsl”. I made a copy of this file to my custom location, and started to strip everything out of this XSL file which I didn’t need. This is how my XSL file content looks like:
<xsl:stylesheet version='1.0' xmlns:xsl='http://www.w3.org/1999/XSL/Transform' xmlns:ddwrt='http://schemas.microsoft.com/WebParts/v2/DataView/runtime'> <xsl:template match='/'> <xsl:apply-templates /> </xsl:template>
<xsl:template match='ResultTable'> <xsl:apply-templates select='Rows'/> </xsl:template>
<xsl:template match='Rows'> <xsl:apply-templates select='Row' /> </xsl:template>
<xsl:template match='Row'> <xsl:for-each select='*'> <xsl:if test="name(.) = 'ContactEmailOWSTEXT'"> <a> <xsl:attribute name="href"> <xsl:text>mailto:</xsl:text> <xsl:value-of select="." /> </xsl:attribute> <xsl:value-of select="." /> </a> </xsl:if> </xsl:for-each> </xsl:template></xsl:stylesheet>The last thing to do is to configure the web part to make sure that it renders the values server side instead of client side. The configuration for this is really simple, the only thing you need to change is the AlwaysRenderOnServer property to True and you are done.
<cc1:CatalogItemReuseWebPart runat="server" AlwaysRenderOnServer="True" UseServerSideRenderFormat="False" NumberOfItems="1" UseSharedDataProvider="True" SelectedPropertiesJson="["ContactEmailOWSTEXT"]" RenderTemplateId="~sitecollection/_catalogs/masterpage/Display Templates/System/Control_CatalogDefault.js" ItemTemplateId="~sitecollection/_catalogs/masterpage/tests/Item_Catalog_Email.js"></cc1:CatalogItemReuseWebPart>The end result looks like this:

The content by search web part way
This is the code of how you could achieve this with a content by search web part:
<cc1:ContentBySearchWebPart runat="server" AlwaysRenderOnServer="True" ResultType="" SelectedPropertiesJson="["ContactEmailOWSTEXT"]" DataProviderJSON="{"QueryTemplate":"owstaxidSliceCategory:{URLTOKEN.1}","PropertiesJson":"{'Tag':'{Term}'}"}" BypassResultTypes="False" NumberOfItems="1" FrameType="None" QueryGroupName="Default" RenderTemplateId="~sitecollection/_catalogs/masterpage/Display Templates/Content Web Parts/Control_List.js" ItemTemplateId="~sitecollection/_catalogs/masterpage/tests/Item_Catalog_Email.js" />The biggest difference when using the content by search web part to achieve it is the DataProviderJSON property, this isn’t needed if you are using the catalog item reuse web part, because it reuses the dataprovider.
Related articles
Fix: People Search Box Has Layout Problems When Used Outside a Search Center
Programmatically Setting the Fetched Properties to an Extended Search Core Result Web Part
Use Fiddler In Combination With SharePoint Designer to Retrieve Data Source Information
Report issues or make changes on GitHub
Found a typo or issue in this article? Visit the GitHub repository to make changes or submit a bug report.
Comments

Let's build together
Manage content in VS Code
Present from VS Code
Engage with your audience throughout the event lifecycle