Creating a Twitter Data View Web Part: SPSBE Part 3
This post is over a year old, some of this information may be out of date.
The last XSLT demo I gave on SharePoint Saturday Belgium was about creating a Twitter web part by using a data view web part.
Step 1
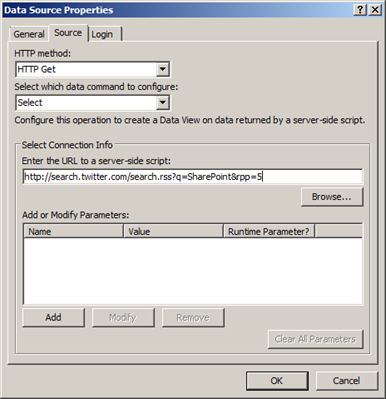
First of all you need to retrieve the Twitter search results as RSS feed. This can be done by navigating to the following URL: http://search.twitter.com/search.rss?q=YOUR-QUERY& rpp=TOTAL-RESULTS
- Change YOUR-QUERY by your search value;
- Change TOTAL-RESULTS by any number of results you want to retrieve. More information about this can be found here.
Step 2
The next step is to create a new data source in SharePoint Designer which will consume the Twitter RSS feed as source.
Open your site in SharePoint Designer and go to Data Sources. Click on REST Service Connection and enter your URL.
Under the general tab you can set the name of your data source.
Step 3
Create a new web part page and add an empty data view web part on it.
Step 4
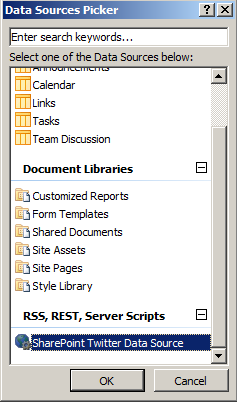
Select your Twitter Data Source.
Step 5
In the data source select the following fields to be added to the data view web part:
- Item/google;
- Item/author;
- Item/description;
- Item/pubDate. {{< caption-new “/uploads/2012/05/051812_0726_CreatingaTw3.png” “Select Fields” “data/jpeg;base64,iVBORw0KGgoAAAANSUhEUgAAAAoAAAAMCAIAAADUCbv3AAAACXBIWXMAAA7EAAAOxAGVKw4bAAABYklEQVR4nDWNW0vCYACGv/9rdOOVomA3oYVXYnVRgSWatZY582KSp2JzqCwpPDd0ubmDO+n81G1mGPXy3D3wvKBQIYsv1HOZyJdIvETiBQIvkbVmu95sV8gG6DGjdo9pdQetHsOw/HAsjjhJVIypbk5kHXQHwzr99t7qdvoMywnCVFN0k5dUTlRYTgRz0+QmPM8LCwjNBVzAJVyuNM0wjNknwwDbceByraiqbVs7rLVtWZa13n5vprK80wu4Ok8UgxHMf4T6Q4gviHgPbw/C6Y/WADiOY8J15AJ3BxIuT2zPe+XyxPZ9cXfghm52f+Nw1emNxpz8xcnsWGLHEi9osjLv9/t/38kH4iiaPT55Cp/lwqe5UBSLXOZJqg5se6OrApqtxO/KCEalMlTqkUqmq2iuUavTwLad+UzL4tQ9VkUwMoESCZS4Rl5TGapWo8FyZUFTl0RekiaGrm42zvZ/nU77Byi1KOKXVXVPAAAAAElFTkSuQmCC” “260” “320” >}}
When the fields are selected, click Insert Selected Fields as and choose Multiple item view.
Step 6
Right know you should have a data view web part filled with five records. The first thing is to make the user image visible.
Click on the image link and switch to code view, this will bring you to the correct location in the code.
To make the image visible you need to change:
<xsl:value-of select="google:image_link"/>To this:
Notice the brackets { }, this can be used as short notation for selecting your data.
Step 7
The next step is to make the username clickable. The result string that you retrieve from Twitter is something like this: [email protected] (Elio Struyf).
So what you need to do is retrieve the username (eliostruyf) and create a new link that references http://twitter.wom/Username
The users’ full name will be used for the text to display.
To do this you could change:
<xsl:value-of select="author"/>Into this:
<a><xsl:attribute name="href">http://twitter.com/<xsl:value-of select="substring-before(author, '@twitter')" /></xsl:attribute><xsl:value-of select="substring-before(substring-after(author, '('), ')')" /></a>Step 8
In this step you will change the output rendering of the description field so that it renders HTML.
To let the description be rendered as HTML you will need to change:
<xsl:value-of select="description"/>Into this:
<xsl:value-of select="description" disable-output-escaping="yes"/>The disable-output-escaping parameter indicates that HTML characters like ”<” and ”>”, will be output as is. No is the default value and they will be converted ”<” and ”>”.
Step 9
The last step is to remove the +0000 value from the date. This can be easily done by the substring-before function.
Change:
<xsl:value-of select="pubDate"/>Into this:
<xsl:value-of select="substring-before(pubDate, '+0000')"/>Result
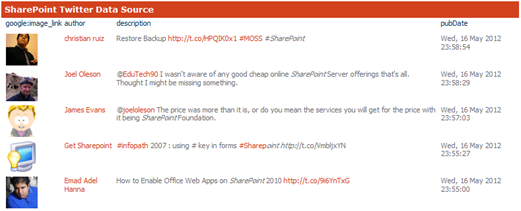
Your results should be something similar to this:
Related articles
Using XSLT Statements: SPSBE Part 2
Selecting Data With XSLT: SPSBE Part 1
Use Fiddler In Combination With SharePoint Designer to Retrieve Data Source Information
Report issues or make changes on GitHub
Found a typo or issue in this article? Visit the GitHub repository to make changes or submit a bug report.
Comments

Let's build together
Manage content in VS Code
Present from VS Code
Engage with your audience throughout the event lifecycle