Creating a NuGet Package to Automate the SharePoint Solution Creation Process.
This post is over a year old, some of this information may be out of date.
In this blog post I will talk about how to automate the SharePoint solution creation process by making use of NuGet. As an example I will use NuGet to automate the SharePoint Branding process in Visual Studio.
NuGet is a package management system for your develop environment. NuGet makes the process of importing .NET libraries into your current project a lot easier. You can find more information about NuGet on: http://www.nuget.org
The idea to automate some processes came from the fact that, for me, every branding project starts with the same manual operations to prepare my Visual Studio project. These steps include:
- Adding a SharePoint Module for my masterpage and theme;
- Adding mapped folders to the “Images” folder and “Styles” folder.
Requirements
Before you can start, you will need to download the following files:
- NuGet Visual Studio add-in: http://www.nuget.org
- Install this to your Visual Studio environment.
- NuGet command line program: http://nuget.codeplex.com/releases/view/58939
- Make sure NuGet.exe is added to your path.
Creating a NuGet package
Creating a NuGet manifest file
The first thing you need to do is creating a “nuspec” or NuGet manifest file. This can be done by opening a command console, and run the following command:
nuget spec EStruyfSP2010BrandingThis command creates the “nuspec” file in the current path.

When you open the file you have something like this:
<?xml version="1.0"?><package xmlns="http://schemas.microsoft.com/packaging/2010/07/nuspec.xsd"> <metadata> <id>EStruyfSP2010Branding</id> <version>1.0</version> <authors>elst</authors> <owners>elst</owners> <licenseUrl>http://LICENSE_URL_HERE_OR_DELETE_THIS_LINE</licenseUrl> <projectUrl>http://PROJECT_URL_HERE_OR_DELETE_THIS_LINE</projectUrl> <iconUrl>http://ICON_URL_HERE_OR_DELETE_THIS_LINE</iconUrl> <requireLicenseAcceptance>false</requireLicenseAcceptance> <description>Package description</description> <tags>Tag1 Tag2</tags> <dependencies> <dependency id="SampleDependency" version="1.0" /> </dependencies> </metadata></package>This is my cleaned up version:
<?xml version="1.0"?><package xmlns="http://schemas.microsoft.com/packaging/2010/07/nuspec.xsd"> <metadata> <id>EStruyfSP2010Branding</id> <version>1.0</version> <title>SP2010 Branding Starter Files</title> <authors>E.Struyf</authors> <owners /> <requireLicenseAcceptance>false</requireLicenseAcceptance> <description>This package contains the starter files for a SP2010 Branding project.</description> <summary /> <language /> </metadata></package>Adding SharePoint Content
When the NuGet manifest file is created, your next step will be to build the NuGet package by adding the SharePoint Content. An easy way to do this is by creating a new Visual Studio Project and adding the necessary SharePoint Modules, Mapped Folders, etc.
My branding project looks like this:
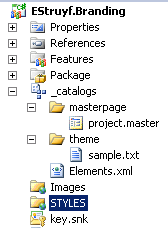
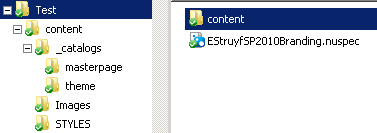
In my example I have copied the “_catalogs” module, the mapped “Images” folder, and the mapped “STYLES” folder to my NuGet “content” folder. Be sure that you also copied the “*.spdata” files. If you did not copy them, Visual Studio will recognize the content as common folders.
Build the NuGet Package
When everything is added to the content folder, you are ready to build your package. Go back to the command console, and run the following command:
Nuget pack EStruyfSP2010Branding.nuspecWhen the command is complete, you end up with a new file named: EStruyfSP2010Branding.1.0.nupkg.
To check the package you can rename the “nupkg” extension to “zip” and open it. {{< caption-new “/uploads/2011/05/051711_1620_CreatingaNu4.png” “NuGet Package Content” “data
/jpeg;base64,iVBORw0KGgoAAAANSUhEUgAAAAoAAAAFCAIAAADzBuo/AAAACXBIWXMAAA7EAAAOxAGVKw4bAAAAgUlEQVR4nE3KuwrCMBQA0Pz//4iKbtIhpJJ4E2y8FlHBFJfE5uHVTEId9MyHxfvqiPp8uaYUvQ8/j+BDYOMwP3RqBzrGsdY3Eb3+sOE06/ZKtFvnbrXW5+SbiIitF8tWCG2MtdZMEDGllHMupbBm03DO+75XSgGA1lpKiYgA4Jz7APdmhQxJUqWZAAAAAElFTkSuQmCC” “182” “88” >}}Testing the NuGet Package
Adding a package source
NuGet allows you to add new Package Sources in Visual Studio. These sources can be linked to a local folder on your server/PC, so you do not need to publish them to the NuGet site.
To add a new Package Source, open Visual Studio with NuGet installed. Click “Tools” -> “Options” -> “Package Manager” -> “Package Sources”.
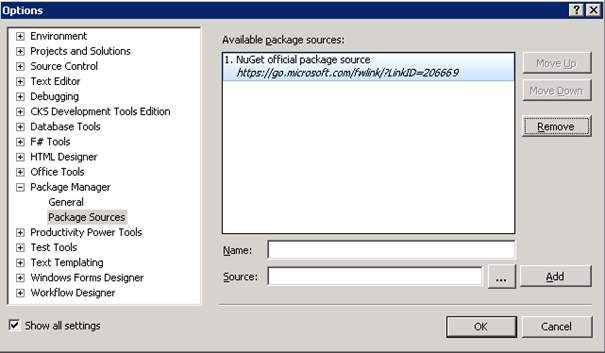
In this window you can add your local folder as a Package Source for NuGet. {{< caption-new “/uploads/2011/05/051711_1620_CreatingaNu6.png” “Custom NuGet Package Source” “data
/jpeg;base64,iVBORw0KGgoAAAANSUhEUgAAAAoAAAAECAIAAAA4WjmaAAAACXBIWXMAAA7EAAAOxAGVKw4bAAAAgUlEQVR4nAXB3Q6CIBgAUN7/RbprLZufQ9MuLH40UUSdZhaClG69Q+cgDB6cDhi8wD8mURCHIO6sU2Vbi1YJpGqZccY5o5Rwxm7XNOOsFMWyGGNm1I9TpTrZ9EI2j0m77Te79amt/WzGrSjM30CG/VnsfApkiAuN+Ziqb5S/LpX9Aw04YMOk4z8ZAAAAAElFTkSuQmCC” “208” “83” >}}Testing the package
Start a new empty SharePoint project, and right click on “References” -> “Add Library Package Reference”. {{< caption-new “/uploads/2011/05/051711_1620_CreatingaNu7.png” “Add Library Package Reference” “data
/jpeg;base64,iVBORw0KGgoAAAANSUhEUgAAAAoAAAAECAIAAAA4WjmaAAAACXBIWXMAAA7EAAAOxAGVKw4bAAAAe0lEQVR4nE3CQQuCMBQA4P3/f9KlQ9BN6VQsLHqIKBk4Uqdkz01Hbkqw18FLHx/LivR4OgfhQQhBRN57+sO01ts93+z4C0c1GPOx1i2TnddsUG0Sc+ya/B4DRFkKVflQWOu+Vtgw8t/ZTc6UKG9dBe3zKsXlLWEZc2eKHzRGbCoaOOPqAAAAAElFTkSuQmCC” “337” “118” >}} This step opens the NuGet Package manager window.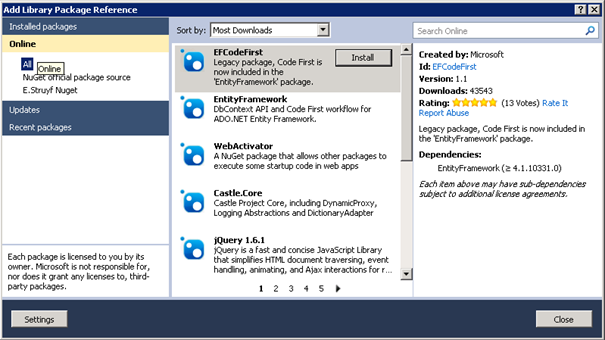
Under the official NuGet package source you can see your custom package source. Open your package source and install the package. {{< caption-new “/uploads/2011/05/051711_1620_CreatingaNu9.png” “Custom NuGet Package” “data
/jpeg;base64,iVBORw0KGgoAAAANSUhEUgAAAAoAAAACCAIAAADuA9qHAAAACXBIWXMAAA7EAAAOxAGVKw4bAAAASUlEQVR4nAE+AMH/AJG+16O5w6ylnqaloaakoK2rpq2rp8G+us/Nx8jPwADGy87HyMjIxb/Fwr3Fw77MycTW087Sz8vU0czY09Ay6iyv43dEHwAAAABJRU5ErkJggg==” “303” “60” >}} This should have added your files to the project. {{< caption-new “/uploads/2011/05/051711_1620_CreatingaNu10.png” “Content added by NuGet” “data/jpeg;base64,iVBORw0KGgoAAAANSUhEUgAAAAoAAAAHCAIAAAC+zks0AAAACXBIWXMAAA7EAAAOxAGVKw4bAAAAtElEQVR4nE3L3QqCMBgA0L3/c3RRz9BlUGLkz/InP3OyatQcmDTLXLYvEoLO/SFVJe+dcdbhTd93WR4EvhACEa21iEiMMU3TXJSWfLVP3SQFSkM2stYSRFRKXRt9TmZ5OM/ykhV7KaVS6rsRsW3b7ml44VJ/GUVJHEda68eI9L15v1843DyovLiELAUAxhjnvK5rcjiK/lEHm2mcbn1vAwD4h5zEuWvVwpkUB05DCgDDMNifD26Zvfh+mQI4AAAAAElFTkSuQmCC” “137” “100” >}}Download
Related articles
Report issues or make changes on GitHub
Found a typo or issue in this article? Visit the GitHub repository to make changes or submit a bug report.
Comments

Let's build together
Manage content in VS Code
Present from VS Code
Engage with your audience throughout the event lifecycle