Create a “% Complete” Progress Bar with JS Link in SharePoint 2013
This post is over a year old, some of this information may be out of date.
SharePoint 2013 has a lot new features and functionalities that it can do out-of-the-box. One of these new functionalities is the JS Link web part property. With this property you are able to control the rendering of the web part. This will mostly be used in combination with List View Web Part.
I see this new functionality to replace the Data View Web Part from SharePoint 2010. No more server side XSLT rendering (XSL Link), but client side JavaScript (JS Link).
The possibilities are endless, so I’m going to show you a simple and useful example what you can do with this.
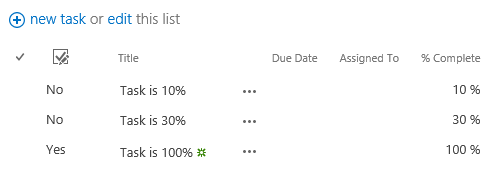
The example I’m going to explain in this post is how you could render the Completed Percentage field of a task as a progress bar.
Creating a progress bar
The first thing you need to do is creating a new Task list with a view where the ”% Complete” field is shown.
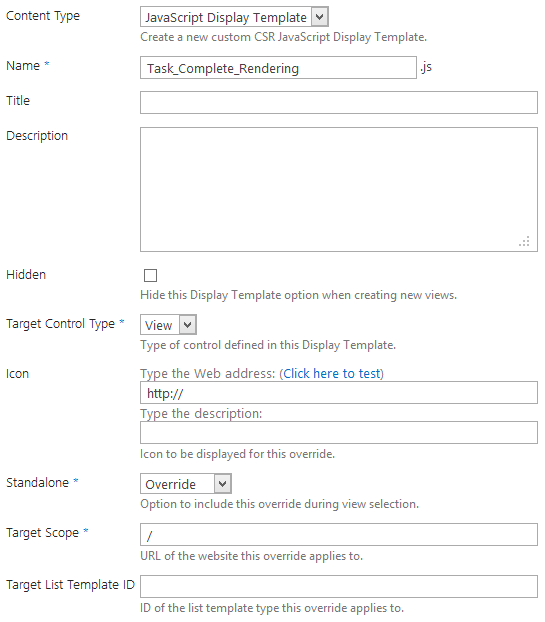
When you created this list, create a new JavaScript file and call is something like: Task_Complete_Rendering.js
Paste the following code to your JavaScript file.
(function () { // Intialize the variables for overrides objects var overrideCtx = {}; overrideCtx.Templates = {};
// Override field data overrideCtx.Templates.Fields = { // PercentComplate = internal name of the % Complete // View = you want to change the field rendering of a view // <div ... = here we define what the output of the field will be. 'PercentComplete': { 'View' : '<div style="background: #F3F3F3; display:block; height: 20px; width: 100px;"><div style="background: #0072C6; height: 100%; width: <#=ctx.CurrentItem.PercentComplete.replace(/ /g,"")#>;"></div></div>' } };
// Register the override of the field SPClientTemplates.TemplateManager.RegisterTemplateOverrides(overrideCtx);})();Important: I’m using
<#=ctx.CurrentItem.PercentComplete#>to render the % Completed value inside my script.
Save the file and upload it to the Master Page Gallery (Site Settings > Master pages and page layouts), fill in the required metadata field.
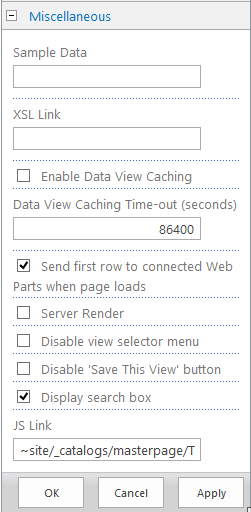
Now that the file is uploaded to your SharePoint environment, go back to your Task List View you created. Once you are on the page, put the page in edit mode and edit the web part.
In the web part properties under Miscellaneous you can find the new JS Link property. Fill in the URL to the file like this: ~site/_catalogs/masterpage/Task_Complete_Rendering.js
You can also use the ~sitecollection URL token, this one should be used when working with sub-sites.
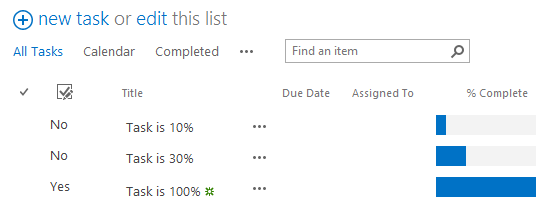
Store the web part changes and save the page, now you are done. Just refresh the page and you should see the following result.
References
You can find more information about the JS Link property on Wes Preston its blog.
Changes
7/01/2013
“~sitecollection” URL token can best be used for sub-sites.
19/07/2013
I created a new post that describes a problem when you apply a JS Link reference on the task list web part. Read all about it over here: Applying JS Link on Task Lists Breaks the Default Rendering of the Checkboxes
Related articles
Report issues or make changes on GitHub
Found a typo or issue in this article? Visit the GitHub repository to make changes or submit a bug report.
Comments

Let's build together
Manage content in VS Code
Present from VS Code
Engage with your audience throughout the event lifecycle