Using CLI for Microsoft 365 in TypeScript Azure Functions
This post is over a year old, some of this information may be out of date.
The CLI for Microsoft 365 allows you to manage your Microsoft 365 tenant settings and data. It provides a powerful and flexible way to automate tasks for Microsoft 365, and lately, I have been using it in my Azure Functions to automate a couple of tasks.
In this article, I will show you how to use the CLI for Microsoft 365 in TypeScript Azure Functions by explaining the following:
- Configuring certificate-based authentication
- Using the certificate logging in the Azure Function for CLI for Microsoft 365
- Using CLI for Microsoft 365 in TypeScript Azure Functions
Prerequisites
To follow along with this article, you will need the following:
Local development environment
- Node.js
- Azure Functions Core Tools
- Azure CLI: The Azure CLI is used to authenticate with the Azure Key Vault locally
Microsoft 365 tenant and Azure subscription
- Azure subscription
- Azure Key Vault
- Microsoft 365 tenant
Useful Visual Studio Code extensions
Configuring certificate-based authentication
I chose to use certificate-based authentication for the authentication, as it is a secure way to authenticate with Microsoft 365 services and because my Azure subscription is not linked to my Microsoft 365 tenant. Certificate-based authentication can also be used for multi-tenant applications.
First, you must create a certificate instead of generating this locally, as I used the Azure Key Vault. We can use the Azure Key Vault to generate a self-signed certificate, so we do not have to create it locally and upload the certificate.
Create a self-signed certificate in Azure Key Vault
On your Azure portal, navigate to your Azure Key Vault (or create one if you do not have one). Then, follow the steps below to make a self-signed certificate:
- Click on the
Certificatesin the left menu - Click on
Generate/Importin the top menu - Fill in the form with the following details:
- Method:
Generate - Certificate Name:
cli-m365-cert(or any name you prefer) - Type:
Self-signed certificate - Subject:
CN=cli-m365-cert(or any name you prefer) - Validity:
12 months(or any duration you prefer) - Key type:
PKCS #12
- Method:
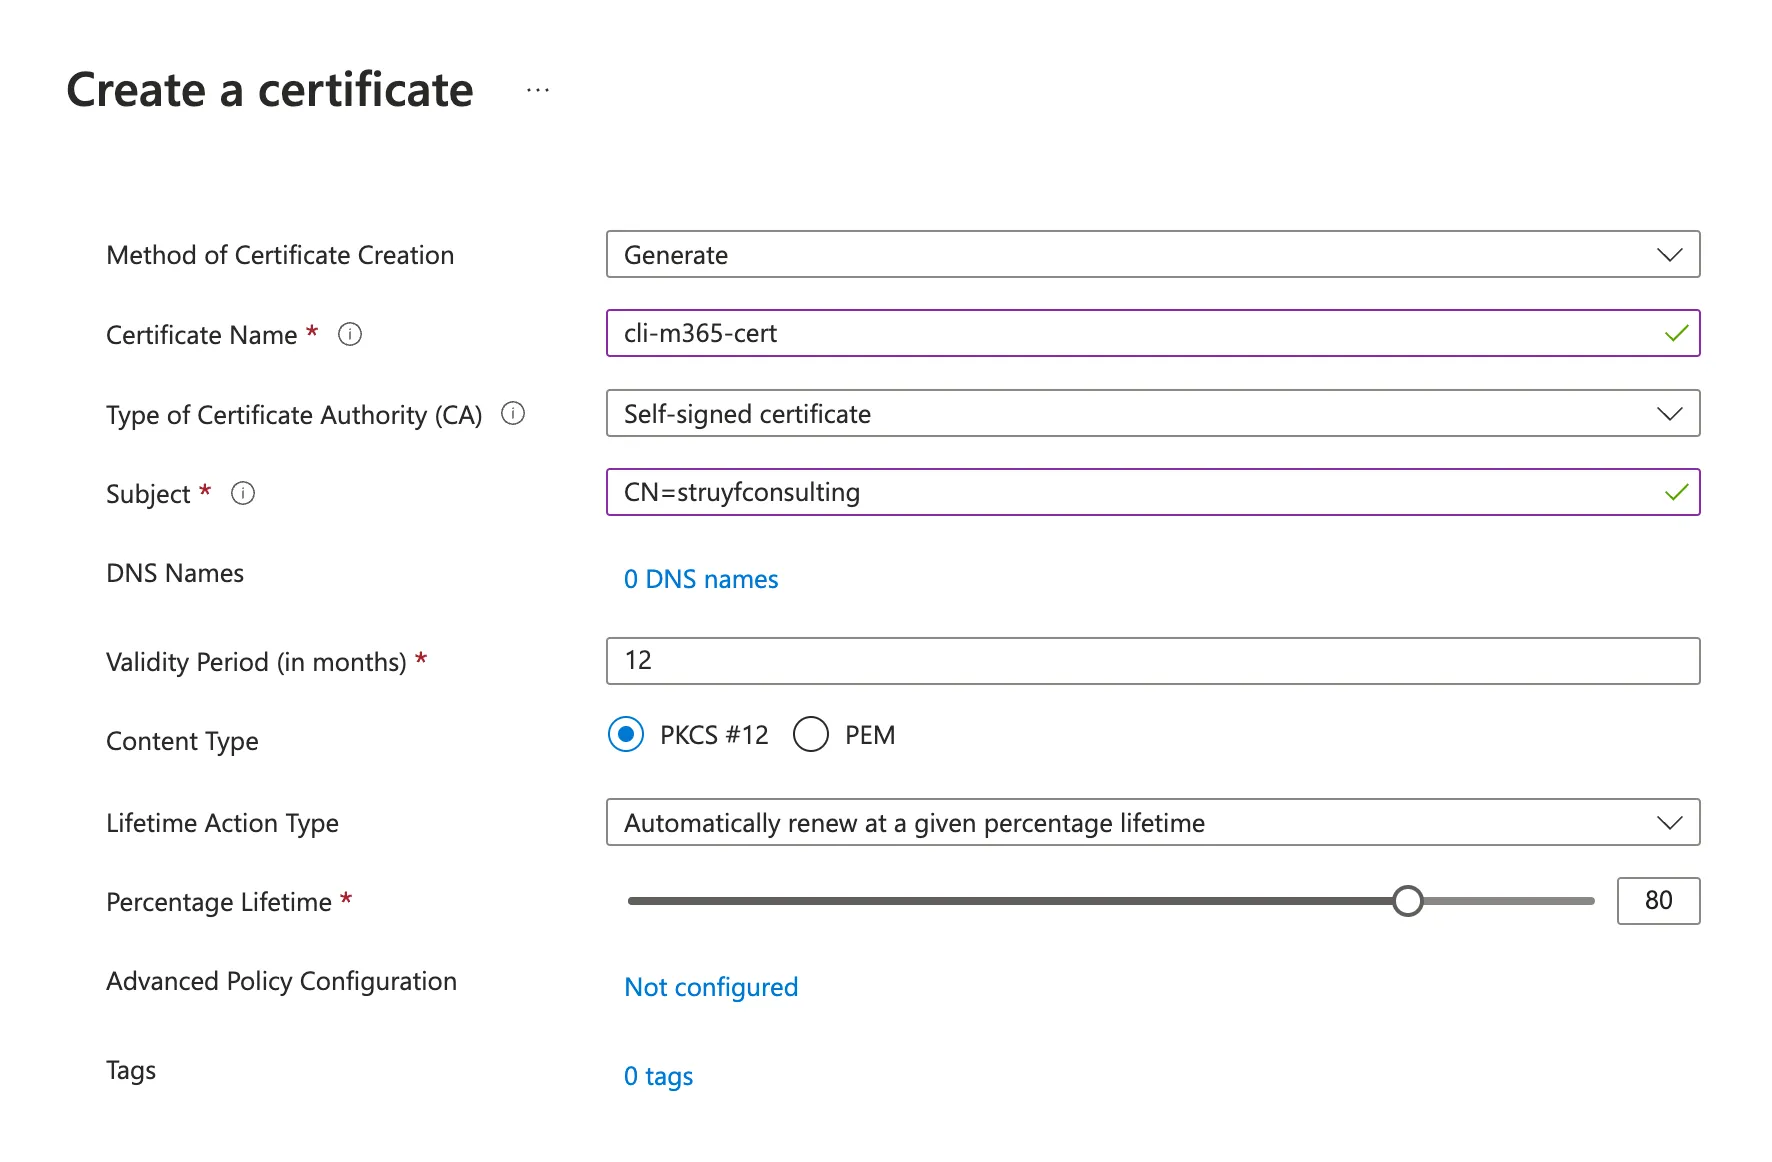
- Click on
Create
Please give it a couple of seconds to generate the certificate. Once the certificate is generated, click on the certificate name and follow the steps to download the certificate:
- Click on the certificate under the
current versioncolumn - Click on
Download in CER formatin the top menu
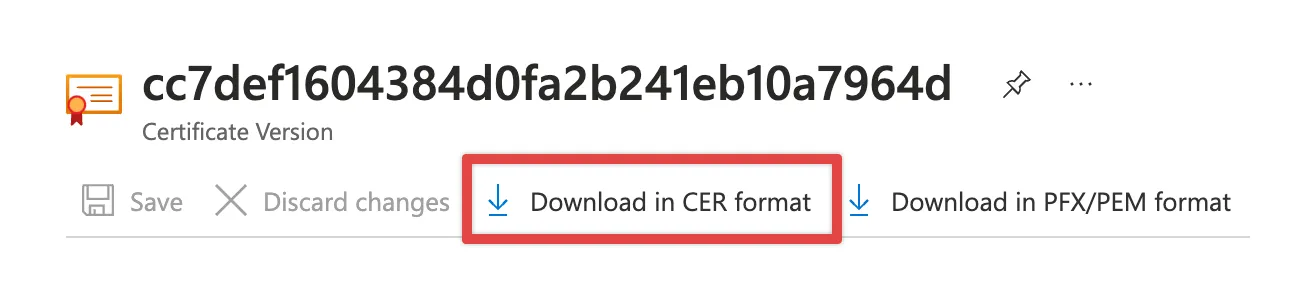
- Keep the downloaded file safe, as we will use it in one of the upcoming steps
Create a Microsoft Entra ID - App registration
Next, we need to create an app registration for the Azure portal. The App registration will be used to authenticate with the CLI for Microsoft 365 to your tenant.
On the CLI for Microsoft 365 documentation, you can follow the Use your own Microsoft 365 Entra ID identity steps to create a new App registration.
When you followed the steps on the documentation, you should have done the following:
- Created a new App registration
- Configured the authentication for console applications
- Enabled the public client flows
You did have to stop at the permissions because we will assign the permissions in the next step ourselves. The permissions in the documentation are for user-based (delegate) permissions, but we will use application-based permissions.
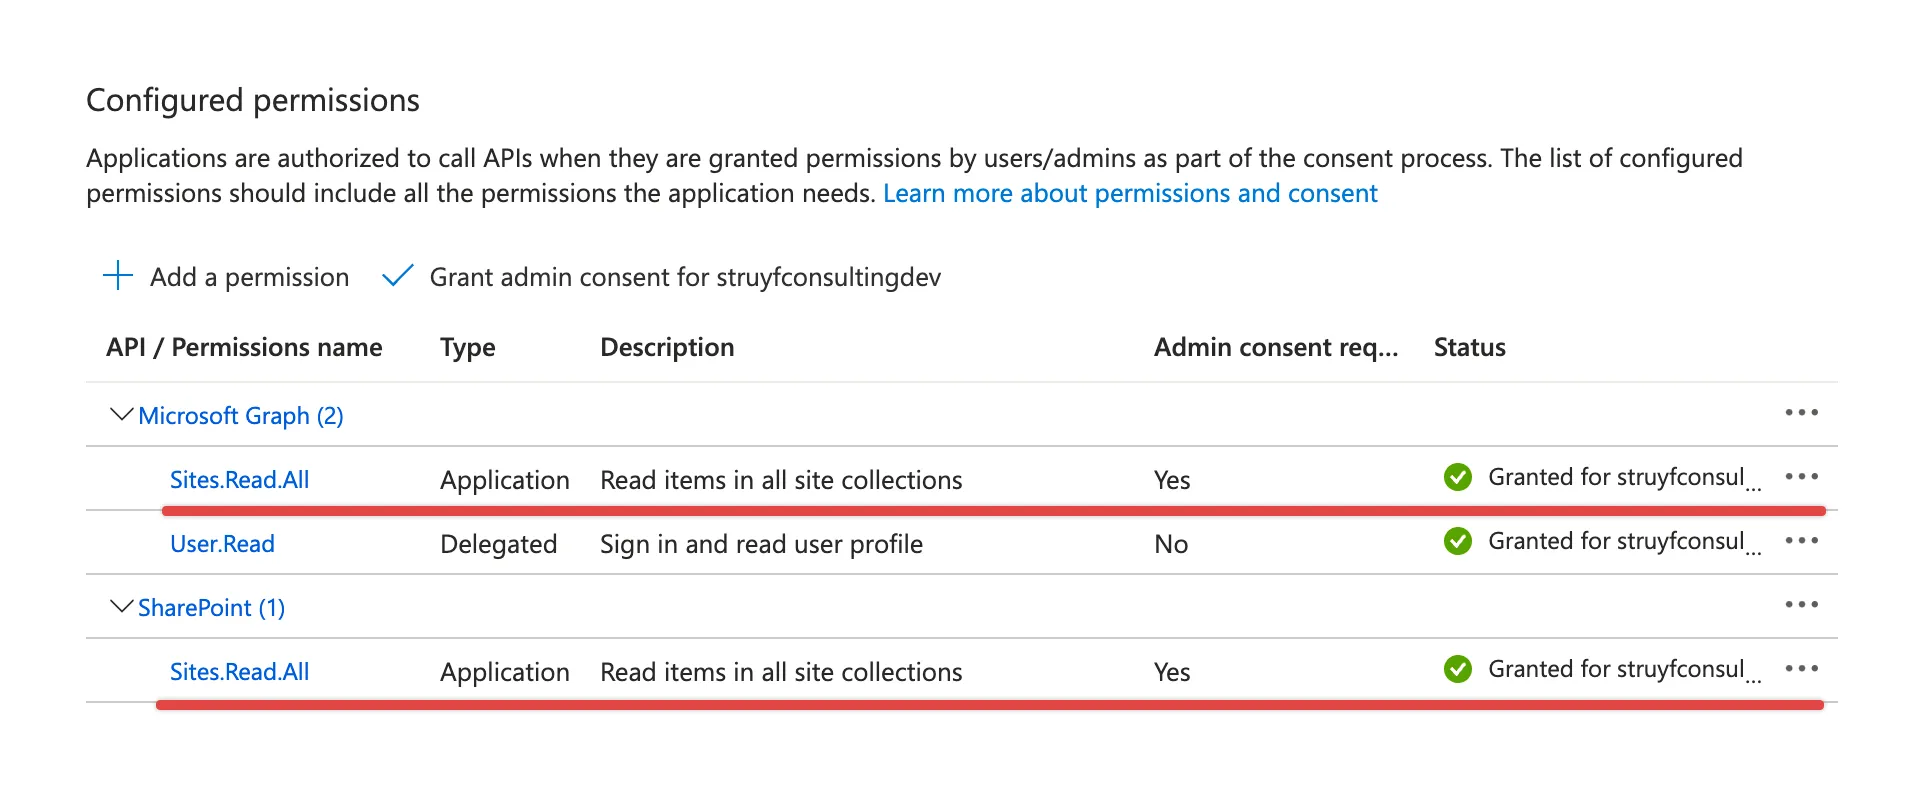
Assign the permissions to the App registration
For this example, I will use the minimum permissions required to read the sites in the Microsoft 365 tenant:
- Microsoft Graph:
Sites.Read.All - SharePoint:
Sites.Read.All
To assign the permissions to the App registration, follow the steps below:
- Navigate to the App registration you created
- Click on
API permissionsin the left menu - Click on
Add a permissionin the top menu - Click on
Microsoft Graphin the list - Click on
Application permissions - Search for
Sitesand select theSites.Read.Allpermission - Click on
Add permissions - Click on
Add a permissionin the top menu - Click on
SharePointin the list - Click on
Application permissions - Search for
Sitesand select theSites.Read.Allpermission - Click on
Add permissions
Once you have added the permissions, you need to grant admin consent to the permissions. To do this, click on Grant admin consent for <your tenant> in the top menu.
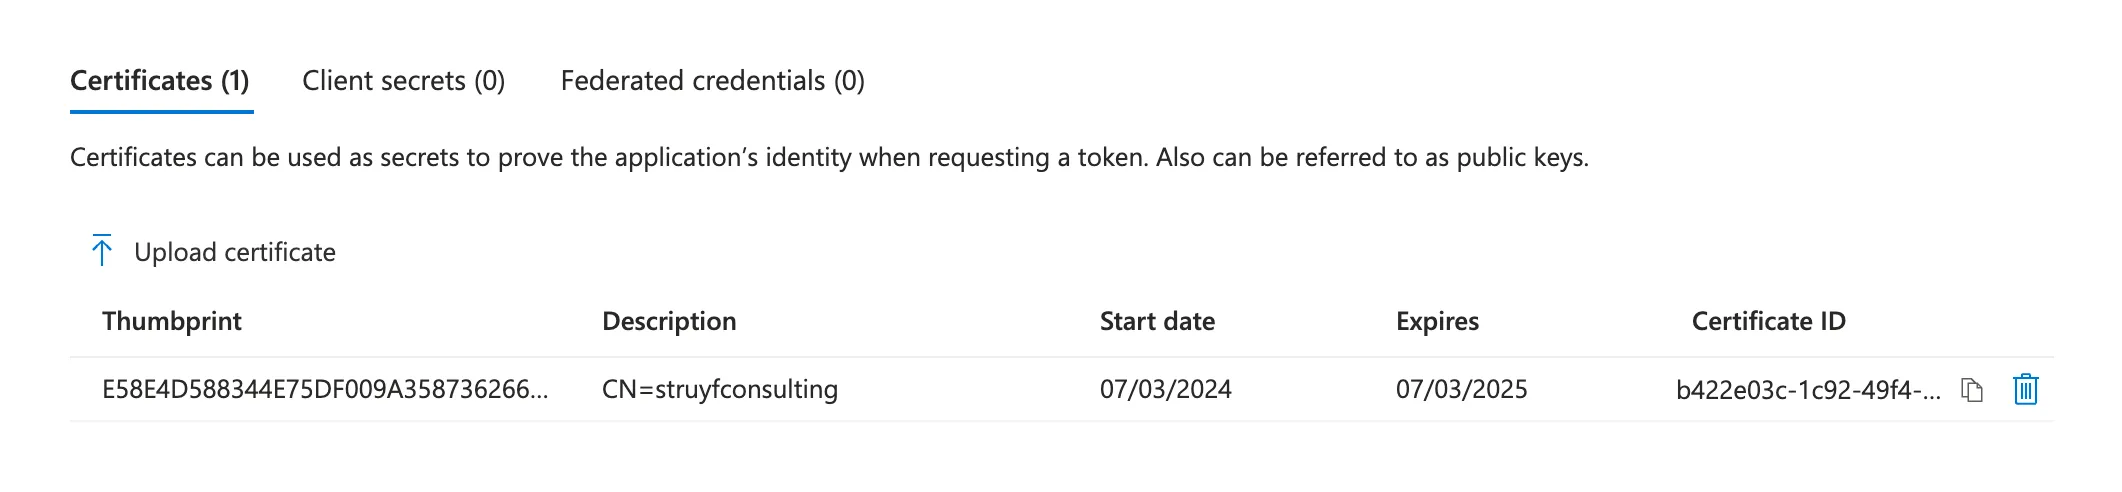
Configure the certificate in the App registration
Now that we have the app registration and the permissions configured, we need to configure the certificate for the app registration. By adding the previously created certificate to the App registration, we can use it to authenticate with the CLI for Microsoft 365. Follow the next steps to configure the certificate:
- Navigate to the App registration you created
- Click on
Certificates & secretsin the left menu - Click on
Upload certificatein the top menu - Click on
Choose fileand select the downloaded CER file - Click on
Add
Once you have uploaded the certificate, you will see the certificate in the list.
Creating the Azure Functions project
The previous configuration was required to start building our Azure Functions project. We will use the Azure Functions Core Tools to create the Azure Functions project.
Initialize the Azure Functions project
I created a new Azure Functions project using the following command:
func init cli-m365-azurefunctions-sample --typescriptInstall the required packages
Next, navigate to the created project and install the required packages:
npm i @azure/identity @azure/keyvault-secrets @pnp/cli-microsoft365We installed the @pnp/cli-microsoft365 package to the Azure Functions project instead of globally installing it.
Configure the required settings
Open the project in Visual Studio Code and navigate to the local.settings.json file. Add the following settings to the file:
KeyVaultUrl: The URL of the Azure Key VaultCertificateName: The name of the certificate in the Azure Key VaultTenantId: The ID of your Microsoft 365 tenant. You can find the Tenant ID on the Microsoft Entra ID overview page.ClientId: The Application (client) ID of the App registration you created
The settings should look similar to this:
{ "IsEncrypted": false, "Values": { "FUNCTIONS_WORKER_RUNTIME": "node", "AzureWebJobsFeatureFlags": "EnableWorkerIndexing", "AzureWebJobsStorage": "", "KeyVaultUrl": "https://<key vault name>.vault.azure.net/", "CertificateName": "cli-m365-cert", "TenantId": "<tenant-id>", "ClientId": "<client-id>", }}Why not use the Azure Key Vault references?
In the settings, we use the Azure Key Vault URL and certificate’s name to retrieve the certificate. Another way would be using key vault references like: @Microsoft.KeyVault(SecretUri=<certificate identifier>).
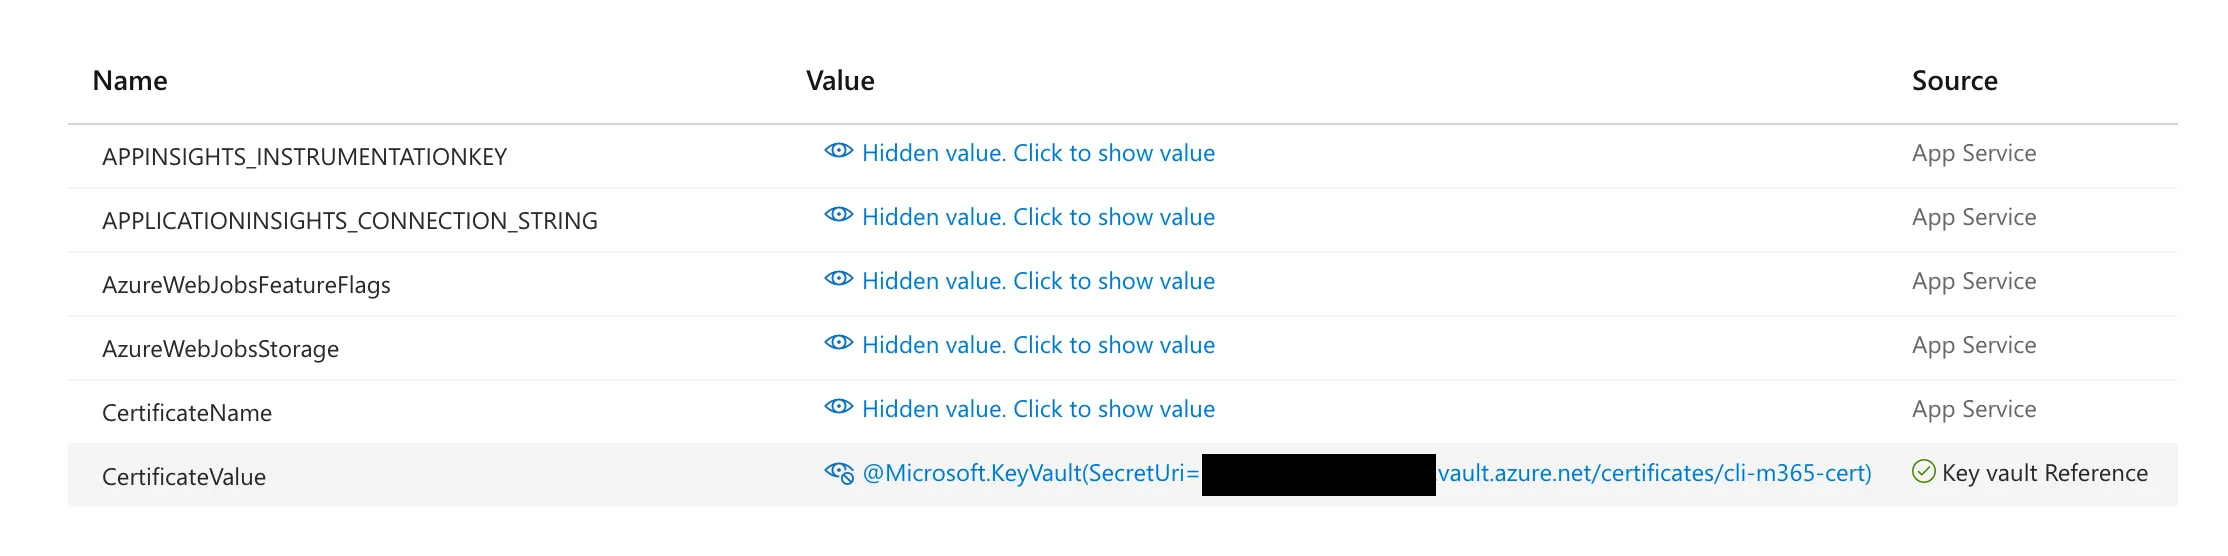
The downside of this approach is that you have to store the certificate value in the local.settings.json file, which is not recommended. By using the certificate name, we control everything in the Azure Key Vault.
Using ESM modules in Azure Functions
As the latest version of CLI for Microsoft 365 uses ESM modules, we need to configure the Azure Functions project to use ESM modules.
In the package.json file, add the following line:
{ "type": "module"}Update the tsconfig.json file to the following:
{ "compilerOptions": { "module": "ESNext", "target": "ESNext", "moduleResolution": "Node", "outDir": "dist", "rootDir": ".", "sourceMap": true, "strict": false }}Create a new Azure Function
I created a new Azure Function using the following command:
func new --name getSiteTitle --template "HTTP trigger"Implement the Azure Function
Open the ./src/functions/getSiteTitle.ts file and replace the content with the following code:
import { app, HttpRequest, HttpResponseInit, InvocationContext } from "@azure/functions";import { AzureCliCredential, ChainedTokenCredential, DefaultAzureCredential, TokenCredential } from "@azure/identity";import { SecretClient } from "@azure/keyvault-secrets";import { executeCommand } from "@pnp/cli-microsoft365";
export async function getSiteTitle(_: HttpRequest, __: InvocationContext): Promise<HttpResponseInit> { const keyVaultUrl = process.env.KeyVaultUrl; const certificateName = process.env.CertificateName; const tenantId = process.env.TenantId; const clientId = process.env.ClientId;
if (!keyVaultUrl || !certificateName || !tenantId || !clientId) { return { status: 500, body: "Missing environment variables", }; }
const creds: TokenCredential[] = [ new DefaultAzureCredential(), new AzureCliCredential() ]; const credentialChain = new ChainedTokenCredential(...creds);
const client = new SecretClient(keyVaultUrl, credentialChain); const certificate = await client.getSecret(certificateName);
if (!certificate || !certificate.value) { return { status: 500, body: "Certificate not found", }; }
const login = await executeCommand("login", { interactive: false, authType: "certificate", tenant: tenantId, appId: clientId, certificateBase64Encoded: certificate.value, });
if (login.error) { return { status: 500, body: `Error logging in: ${login.error.message}`, }; }
const site = await executeCommand("spo web get", { url: "https://struyfconsultingdev.sharepoint.com", }); const siteInfo = JSON.parse(site.stdout);
return { status: 200, jsonBody: siteInfo.Title, };}
app.http("getSiteTitle", { methods: ["GET", "POST"], authLevel: "anonymous", handler: getSiteTitle,});The Azure Function will authenticate with the CLI for Microsoft 365 using the certificate-based authentication and retrieve the title of the specified site.
Locally running the Azure Function
To run the Azure Function, we need to be able to authenticate with the Azure Key Vault to fetch the certificate. On Azure, we will use a managed identity, but locally, we can use the Azure CLI authentication. The great thing about the @azure/identity package is that you can chain credentials, which allows you to use multiple authentication methods. The first one that succeeds will be used.
In the above sample, you can see the following credentials:
DefaultAzureCredential: This credential will be used for the managed identity on AzureAzureCliCredential: This credential will be used for the Azure CLI authentication
To run the Azure Function locally, you first have to sign in to the Azure CLI:
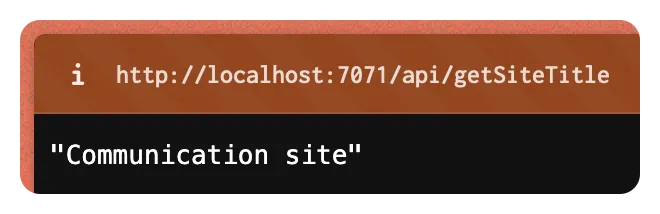
az loginOnce logged in, you can run the Azure Function using the following command or press F5 in Visual Studio Code:
npm run build && func startThe Azure Function will start, and you can navigate to http://localhost:7071/api/getSiteTitle to see the result.
Running the Azure Function on Azure
Assuming you have published the code to your Azure Functions, you must perform some configuration steps to make the function work.
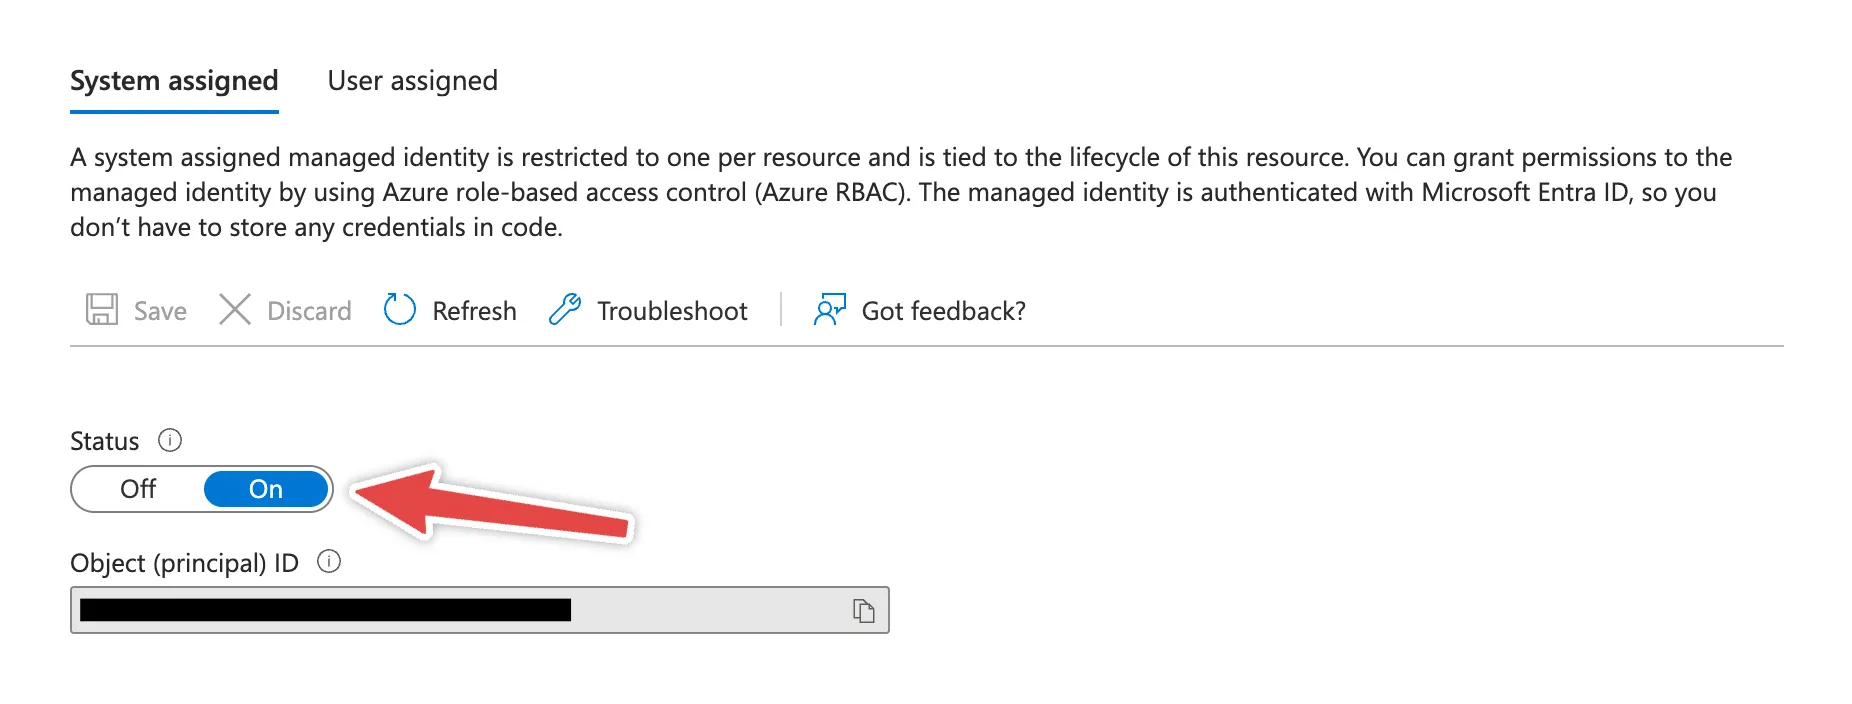
Managed Identity
First, you must configure the managed identity for the Azure Function. This managed identity will be used to authenticate with the Azure Key Vault and retrieve the certificate.
Open the Azure Function in the Azure portal and follow the steps below:
- Navigate to the
Identitytab - Enable the
System assignedidentity
Key Vault access policy
Next, you must configure the access policy for the managed identity on the Azure Key Vault. Follow the steps below:
- Navigate to the Azure Key Vault
- Click on
Access policiesin the left menu - Click on
Createin the top menu - Select the following permissions:
GetforSecret permissionsGetforCertificate permissions
- Click on
next - Search for your Azure Function by its name or use the object ID
- Click on
nextandcreate

Azure Function configuration
Finally, you will need to configure the Azure Functions settings. Follow the steps below:
- Navigate to the Azure Function
- Click on
Configurationin the left menu - Add the following settings:
KeyVaultUrl: The URL of the Azure Key VaultCertificateName: The name of the certificate in the Azure Key VaultTenantId: The ID of your Microsoft 365 tenant. The tenant ID can be found on the Microsoft Entra ID overview page.ClientId: The Application (client) ID of the App registration you created
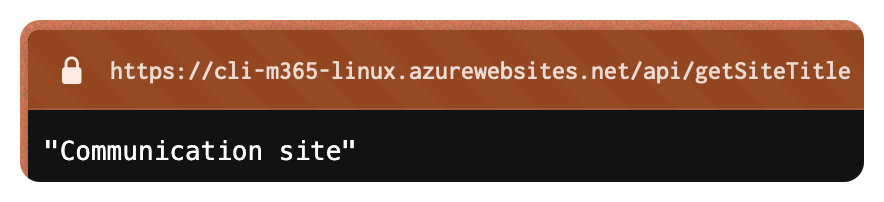
When you save the settings, the Azure Function can authenticate with the Azure Key Vault and retrieve the certificate.
Conclusion
In this article, I showed you how to use the CLI for Microsoft 365 in TypeScript Azure Functions. We configured the certificate-based authentication and used the Azure Key Vault to store the certificate.
Be sure to read the caveats when working with the CLI and certificate login to understand the limitations of this approach.
Related articles
How to debug your SharePoint Framework web part
Search web part created with the SharePoint Framework
Toggle settings in the property pane of your SharePoint Framework web part
Report issues or make changes on GitHub
Found a typo or issue in this article? Visit the GitHub repository to make changes or submit a bug report.
Comments

Let's build together
Manage content in VS Code
Present from VS Code
Engage with your audience throughout the event lifecycle