Building daemon or service app with the Microsoft Graph API
This post is over a year old, some of this information may be out of date.
In my previous blog post I described the process how to create all day events with the Microsoft Graph API. I used this method for synchronizing an external planning system to Office 365. This enabled our users to go to a MVC site and manually start the synchronization process. The next thing on my to-do list was to create a daemon or service application which performs a synchronization on a scheduled basis via an Azure WebJob.
In order to create / modify events in a user’s calendar, the service application requires app-only permissions. This can be configured via an Azure AD application. You are able to define the permission levels of various services like calendar, mail, groups, etc. which your application has to access. In this article I describe what I had to do in order to successfully configure and create such a service application.
Create a certificate (optional)
First of all you need a certificate. For the development process of you application you can make use of a self-signed. When you put your service application in production it is best to make use of a trusted certificate. So if you already have a self-signed or trusted certificate, this step is not required.
To create a self-signed certificate you can make use of the makecert.exe tool. Here are the steps to execute:
- Locate the makecert.exe tool on your computer. If you have Visual Studio installed, you can run it from the Visual Studio command prompt. Or if you have Fiddler installed, you find it in the Fiddler program folder. When you have neither of these installed, you can get it from the Windows SDK: MakeCert;
- Once you have located the makecert tool, execute the following command:
makecert -r -pe -n "CN=CompanyName AppName Cert" -b 11/25/2015 -e 11/25/2017 -ss my -len 2048- Once the certificate is created, you have to open the Microsoft Management Console. Easiest way is with the mmc.exe command;
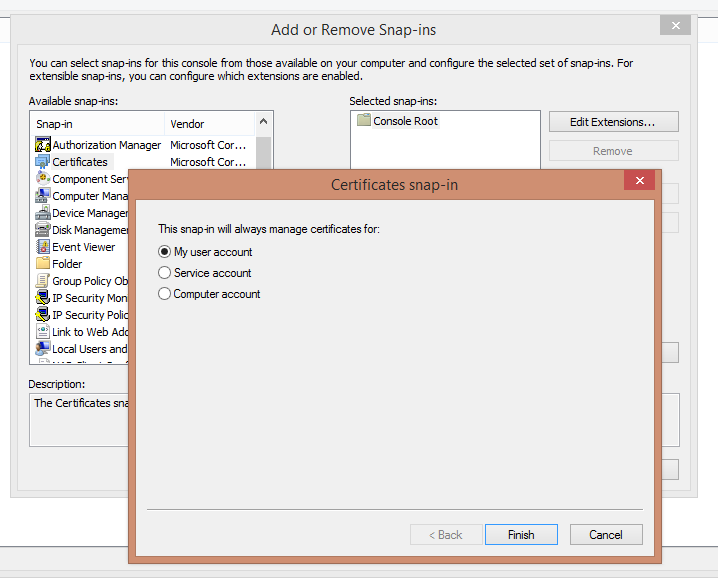
- Open the Current User’s certificate folder via: File > Add/Remove snap-in > Click on certificates > choose My user account and click Finish > click OK;
- Find the certificate you created in the list;

- Export the certificate as PFX and CER by right clicking on the certificate > All Tasks > Export;
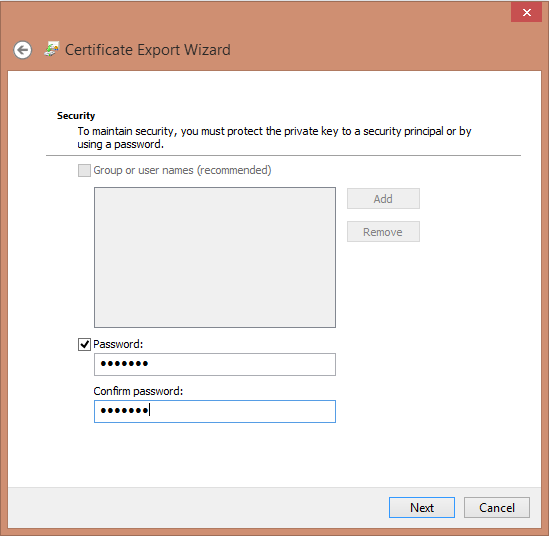
- Go through the export wizard and choose Yes, export the private key > Next > Check the password checkbox and fill in a password for the PFX;
- Choose the location to store the PFX file and click finish;
- Repeat the same steps, but choose in the export wizard **No, do not export the private key **and complete the wizard;
- Once you completed the export wizard twice, you should have the PFX and CER files.
Azure AD application configuration
As I mentioned, your service application requires app-only permissions to perform Microsoft Graph API calls. In order to do this, you have to create an Azure AD application.
Add an Azure AD application
Follow the next steps to create a new Azure AD application:
- Open the Azure management portal and go to your active directory;
- On the Applications tab, click on the ADD button;
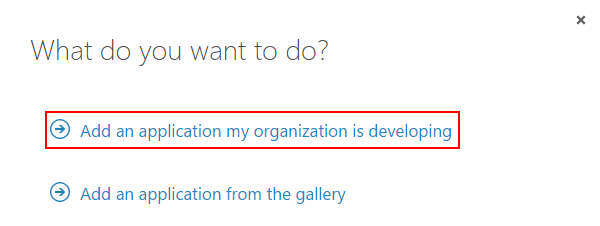
- In the dialog window choose to Add an application my organization is developing;
- Give your application a name;
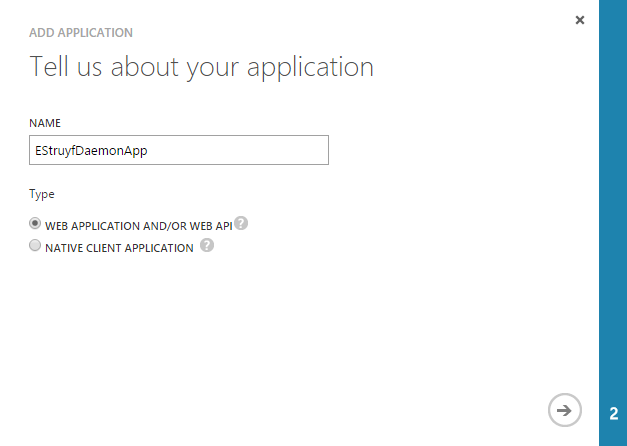
- Specify the sign-on URL and APP ID URI;
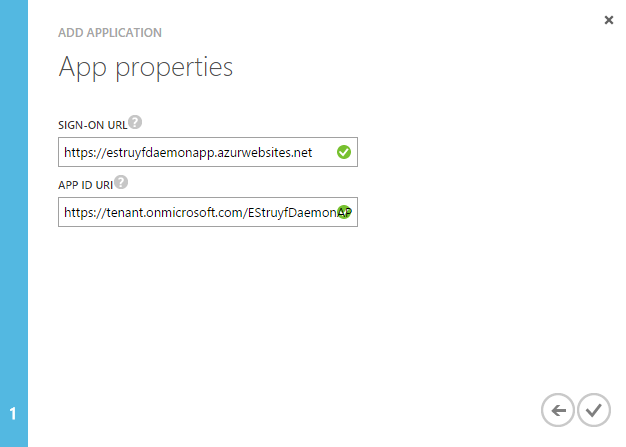
Note: The sign-on URL does not matter in this case, because you will use a certificate to get the access token. I entered the Azure Web App URL where the WebJob is going to run.
- Once you have completed this wizard your application is added and you are able to specify the permissions for your application.
Application permissions
Now that the Azure AD application is created, it is time to set the application permissions for your app.
- Click on the Configure tab of your application;
- Scroll to the bottom of the page and click on the Add application;

- Add the **Microsoft Graph **by clicking on the plus button and store this configuration;

- Once the Microsoft Graph has been added to the list of permissions to other applications. Click on the application permissions dropdown and select your required set of permissions for your application;
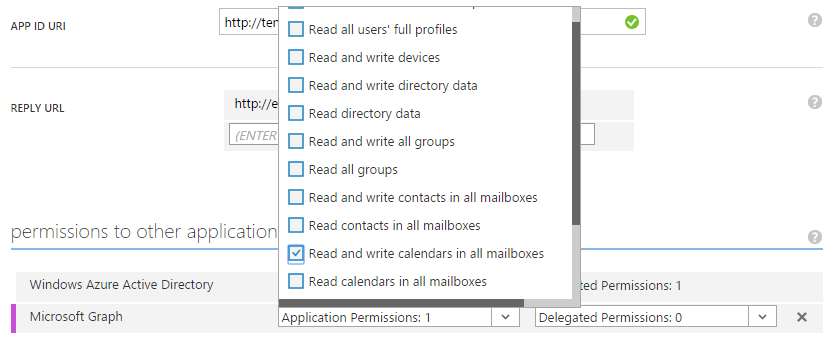
- Click on the save button at the bottom of the page to store your configuration.
Configure your certificate public key in the application manifest
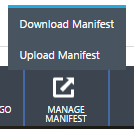
The next step is to configure your certificate public key in the Azure AD manifest. First of all you need to retrieve the keys. Richard diZerega created a PowerShell script for this on his blog:
$certPath = Read-Host "Enter certificate path (.cer)"$cert = New-Object System.Security.Cryptography.X509Certificates.X509Certificate2$cert.Import($certPath)$rawCert = $cert.GetRawCertData()$base64Cert = [System.Convert]::ToBase64String($rawCert)$rawCertHash = $cert.GetCertHash()$base64CertHash = [System.Convert]::ToBase64String($rawCertHash)$KeyId = [System.Guid]::NewGuid().ToString()Write-Host "base64Cert:" $base64CertWrite-Host "base64CertHash:" $base64CertHashWrite-Host "KeyId:" $KeyIdOnce you have the base64Cert, base64CertHash and KeyId value, go back to your Azure AD application and download the manifest file:
Open the manifest file, and replace the keyCredentials property with the following value:
"keyCredentials": [ { "customKeyIdentifier": "base64CertHash", "keyId": "KeyId", "type": "AsymmetricX509Cert", "usage": "Verify", "value": "base64Cert" }],Important: update the base64Cert, base64CertHash and KeyId value in this JSON string. When you updated the manifest file, upload it to the Azure AD application. Now you can almost start building your application.
Certificate configuration on the Azure Web App
I created the service application as a Azure WebJob, this makes scheduling of the job very straight forward. Once you start building your application, the first thing you have to do is retrieving the certificate and getting an access token. To retrieve your certificate in your application, you can make use of Azure Key Vault or another option is to add the certificate to the App Web to which you publish your WebJob. The last approach is the one I used.
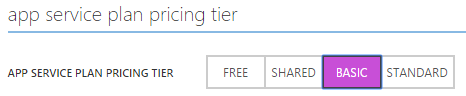
To configure a certificate on an Azure Web App, it should be scaled to the basic or standard tier.
Note: the whole certificate configuration process is explained on the following Azure documentation page: Using Certificates in Azure Websites Applications.
Important: switching to basic tier brings a cost with it.
Once you uploaded the certificate to your Azure Web App, it should look like this:

Important: Now there is one thing before you can start building your app. In order to be able to retrieve the certificate for your application, you have to make it accessible by adding an app setting: WEBSITE_LOAD_CERTIFICATES with the certificate Thumbprint value (you could also use ”*”).

Once this is added, you are ready to start developing.
Building your daemon or service app
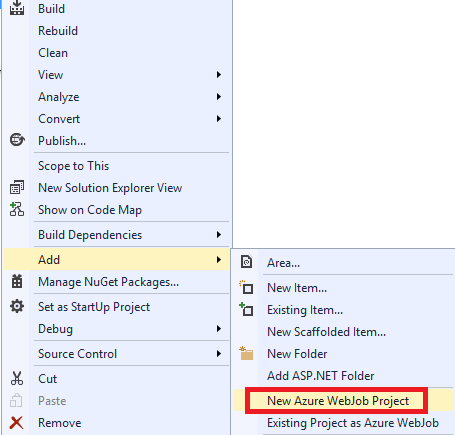
If you already have a Visual Studio web project, you can add the Azure WebJob project when you right-click on your web project > New Azure WebJob Project.
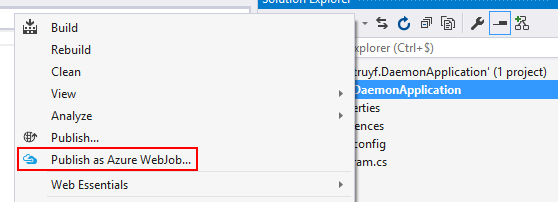
Another way to start is by creating a console application. Once you are finished you can publish it by right-clicking on the project > Publish as Azure WebJob. This is the method I used for this blog post.
Note: more information about this can be found here: Deploy WebJobs using Visual Studio.
Get the certificate
The first thing you need when you start building your application is to retrieve the certificate. This can be done as follows:
private static X509Certificate2 GetCertificate(){ X509Certificate2 certificate = null; var certStore = new X509Store(StoreName.My, StoreLocation.CurrentUser); certStore.Open(OpenFlags.ReadOnly); var certCollection = certStore.Certificates.Find(X509FindType.FindByThumbprint, Thumbprint, false); // Get the first cert with the thumbprint if (certCollection.Count > 0) { certificate = certCollection[0]; } certStore.Close(); return certificate;}Note: this piece of code requires the Thumbprint of your certificate in order to find it.
Get an access token
Once you acquired the certificate in by code. Your next step is to retrieve an access token to call the Microsoft Graph API. Here is the code to retrieve an access token:
private static async Task<string> GetAccessToken(X509Certificate2 certificate){ var authenticationContext = new AuthenticationContext(Authority, false); var cac = new ClientAssertionCertificate(ClientId, certificate); var authenticationResult = await authenticationContext.AcquireTokenAsync(GraphUrl, cac); return authenticationResult.AccessToken;}Note 1: this code requires the following NuGet package to be installed to your project: Microsoft.IdentityModel.Clients.ActiveDirectory.
Note 2: this piece of code requires the Authority (https://tenant.onmicrosoft.com), ClientId (you can find it on the Azure AD application configure page), GraphUrl (https://graph.microsoft.com).
Retrieving events from the Microsoft Graph API
Now that we have an access token, you are finally able to do calls against the Microsoft Graph API. Here is an example of how you can retrieve events:
var client = new RestClient(GraphUrl);var request = new RestRequest("/v1.0/users/{UserId or UserPrincipleName}/Events", Method.GET);request.AddHeader("Authorization", "Bearer " + token.Result);request.AddHeader("Content-Type", "application/json");request.AddHeader("Accept", "application/json");
var response = client.Execute(request);var content = response.Content;Note 1: this code is created with the RestSharp client, which can be installed from NuGet.
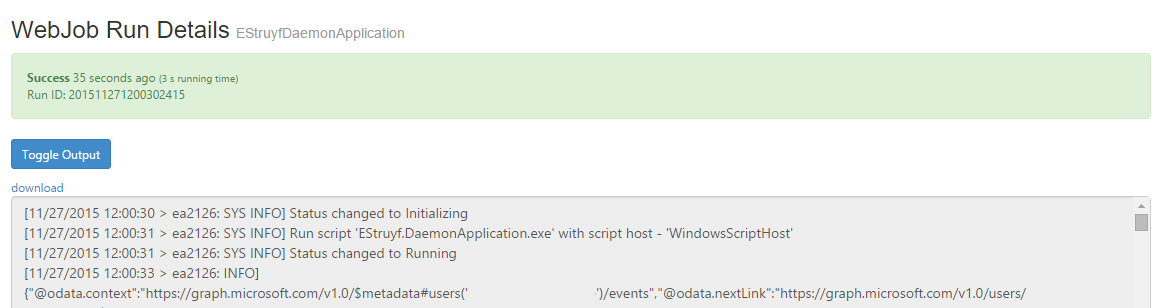
Note 2: you have to specify the user’s ID or Principle Name in order to retrieve the events. Once you have this, you can start adding your own calls and logic. The last thing that remains is publishing WebJob project to Azure and you are done.
Demo application code
The code of the demo application can be found at GitHub: Microsoft Graph Service Application Demo.
Useful resources
The following links have helped me accomplish to create my service app:
Related articles
Creating all day events with the Microsoft Graph on Office 365
How to add an attachment to a mail via an OWA App
Check if your mail app is opened in Outlook Web App or Outlook rich client
Report issues or make changes on GitHub
Found a typo or issue in this article? Visit the GitHub repository to make changes or submit a bug report.
Comments

Let's build together
Manage content in VS Code
Present from VS Code