Alert This post is over a year old, some of this information may be out of date.

Order List Items Like in a Meeting Workspace: Part 2

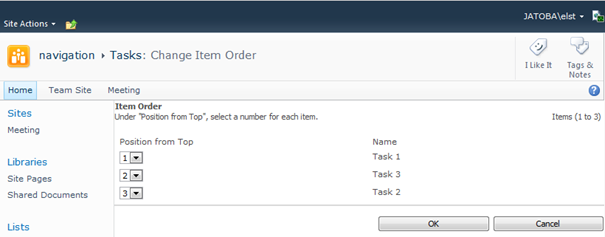
In Order List Items Like in a Meeting Workspace: Part 1 I wrote how you could enable the order field on other lists. In this blog post I will cover how you could create a custom action to reorder the list items.

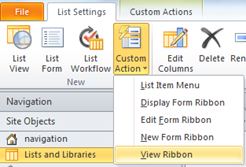
Add a Custom Reorder Action to the List

  • Open your site in SharePoint Designer 2010;
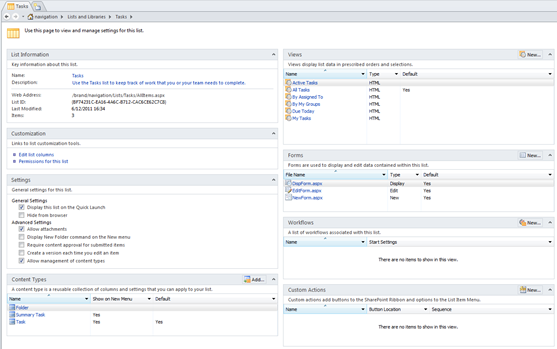
  • Navigate to your list settings page in SharePoint Designer;
    Show image List Settings in SharePoint Designer
    List Settings in SharePoint Designer
  • Under the List Settings tab, click Custom Action -> View Ribbon;
    Show image Custom Action - View Ribbon
    Custom Action - View Ribbon
  • In the Name textbox, fill in: Change Item Order;
  • Select Navigate to URL under the action type, and fill in the following URL value: ~site/_layouts/Reorder.aspx?List={ListId}
    Show image Navigate to URL
    Navigate to URL
  • Store the following images on your SharePoint site;
    Show image Reorder 16x16
    Reorder 16x16
    Show image Reorder 32x32
    Reorder 32x32
  • Fill in the URL’s to images in the two button image URL fields;
    Show image Advanced Custom Action Options
    Advanced Custom Action Options
  • Click OK. When you performed these actions, navigate back to your list and check if the item action is visible under the Items tab.
Show image Change Item Order - Custom Action
Change Item Order - Custom Action

When you click on this action you are now able to reorder the items.

Show image Change Item Order Page
Change Item Order Page

Part 3

In the next part I will cover how you could display the reorder page in a dialog window from SharePoint 2010.

Comments

Back to top