Yeoman is yet another tool that you cannot miss in your client-side development toolset. In the previous post, I talked about Node.js, npm and Gulp. To make use of these tools it required some manual actions/configuration before you could start developing your project.
By now you may have asked yourself if this is always the case with every new project you are going to create. Luckily it is not the case. This is where Yeoman comes into the picture.
Yeoman: the web’s scaffolding tool for modern webapps
As mentioned on the Yeoman website (http://yeoman.io/). Yeoman is a scaffolding tool for modern web apps. You can compare it to the templates which you have in Visual Studio. When you choose to make use of a particular Visual Studio template. Visual Studio puts in place all the required files and folders for your project. This project creation process is similar to what Yeoman does in the client-side developer world.
Yeoman creates projects base on the generator that you use. A generator is to Yeoman what a project template is to Visual Studio. The great thing about Yeoman is that it is not bound to be used only for JavaScript project creation. You can use Yeoman for “whatever” types of projects you want to create. An example is the ASP.NET 5 generator: https://github.com/omnisharp/generator-aspnet which contains templates for creating ASP.NET web applications.
Info: why would do people want to use a APS.NET Core Yeoman generator instead of a Visual Studio template? The answer is simple. .NET Core can be used cross-platform. As there is no full blown Visual Studio IDE for Mac or Linux. You cannot make use of the project templates which are available in the Visual Studio IDE. This is why Yeoman generators can be used to generate these projects on a Mac or Linux machine (also on Windows of course).
The creation process of new projects with Yeoman is also done via command line. An example of this would be: yo displaytemplates or yo office.
Info: yo is the Yeoman command line tool that you need to use. That is why “everyone” is talking about yo Office or yo SharePoint (which is probably coming with the SharePoint framework).
Installation
The installation part of Yeoman requires you to have Node.js and npm installed on your machine. Once these prerequisites are in place. You can install Yeoman globally with the following command:
| |
Info: you need to install Yeoman globally to be able to use it as a command line utility.
Once the installation is completed. You can test it out by running:
| |
Installing generators
On the http://yeoman.io/generators/ page, you find all the available Yeoman generators:

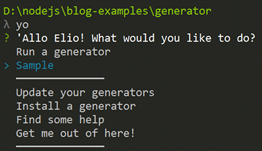
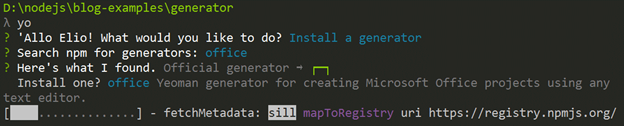
The first way to install a generator is to let Yeoman search for it. You do this as follows:
- Run yo;
- Select install a generator;
- Type in the name and press enter:
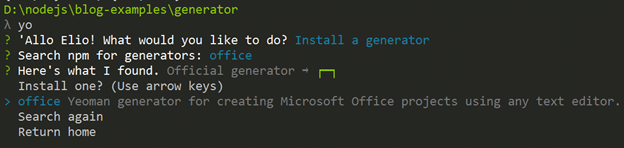
- Yeoman will search on npm for your generator and once it is found you can press enter again to install it:
Now there is another way and most likely the one you will be using the most. If you go to a project on GitHub or npm, the developer will tell you the command to use to install the generator. Like for example on my display template generator page: https://www.npmjs.com/package/generator-displaytemplates
The command to install the display template generator is:
| |
Info: the command will also install the gulp and yo dependencies.
The same goes for the Office generator. If you go to the GitHub page of the Office generator. The development team mentions the following install command:
| |
Info: the command will also install the tsd, bower, gulp and yo dependencies.
Using generators
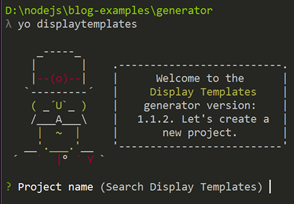
Once you have installed a generator, it is time to make use of it. You can do this by typing yo followed by the name of the generator:
| |
As Yeoman is a command line utility, there are no wizards for specifying the project name, description, and other project related information. Instead, Yeoman will ask you this questions in the command prompt:
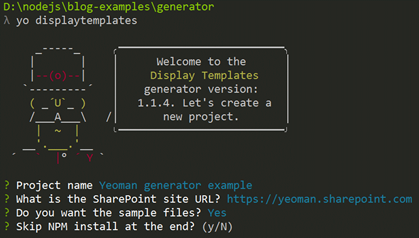
Of course, these questions vary based on the type of generator you are using. These questions are defined by the developer.
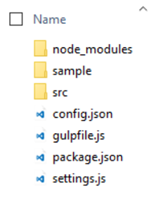
Once you answered all questions, the generator will do its thing to create your project.
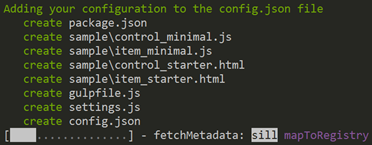
In this case, you will end up with the following files and folders in the project root:
Building your own generators
You could go one step further and that is to start building your own generators. Yeoman also got you covered. They developed a generator to build your own generators: https://github.com/yeoman/generator-generator. I will not go into more details how you can build your own generators, but if you are interested in doing so, definitely check out the writing your own Yeoman generator page.
Getting up to speed series
The files used for this article can be found here: getting up to speed series on GitHub.
Other articles in this series:
- Getting up to speed with Node.js and npm
- Getting up to speed with Gulp
- Getting up to speed with Yeoman aka “yo”
- Getting up to speed with webpack